
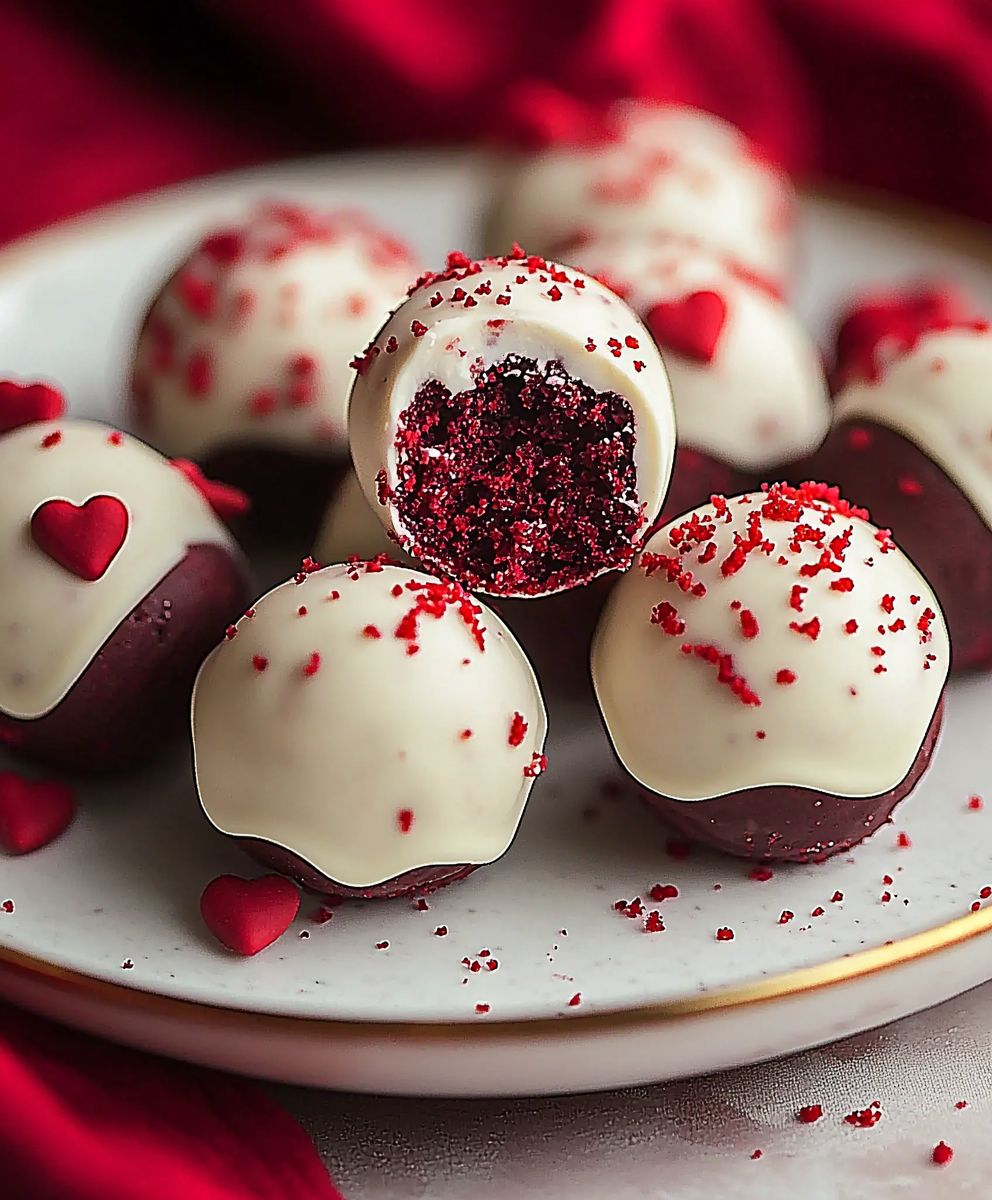
Red Velvet Cake Balls, those bite-sized morsels of pure indulgence, are about to become your new favorite treat! Imagine sinking your teeth into a creamy, decadent sphere, the rich red velvet flavor melting on your tongue, perfectly complemented by a smooth, sweet coating. Are you ready to experience a dessert that’s as beautiful as it is delicious?
The allure of red velvet extends far beyond its vibrant color. While the exact origins are debated, many believe it gained popularity during the Great Depression as a way to add visual appeal to desserts with limited ingredients. The reaction between cocoa powder and acidic ingredients like buttermilk and vinegar creates that signature reddish hue, enhanced today with food coloring. But it’s not just the color that captivates; it’s the unique flavor profile a subtle tanginess balanced by a rich, chocolatey sweetness.
People adore red velvet cake balls for several reasons. First, they’re incredibly convenient and portable, perfect for parties, potlucks, or a simple afternoon treat. Second, the combination of the moist cake interior and the creamy coating creates a delightful textural contrast that’s simply irresistible. And finally, let’s be honest, they’re just plain fun to eat! So, get ready to dive into this easy-to-follow recipe and create your own batch of these delightful little gems. You won’t regret it!

Ingredients:
- For the Red Velvet Cake:
- 2 1/2 cups all-purpose flour
- 2 cups granulated sugar
- 1 teaspoon baking soda
- 1 teaspoon baking powder
- 1 teaspoon salt
- 1 tablespoon unsweetened cocoa powder
- 1 cup buttermilk
- 1 cup vegetable oil
- 2 large eggs
- 2 tablespoons red food coloring
- 1 teaspoon white vinegar
- 1 teaspoon vanilla extract
- For the Cream Cheese Frosting:
- 8 ounces cream cheese, softened
- 1/2 cup (1 stick) unsalted butter, softened
- 4 cups powdered sugar
- 1 teaspoon vanilla extract
- 2-4 tablespoons milk or cream (optional, for desired consistency)
- For Coating:
- 12 ounces semi-sweet chocolate chips (or white chocolate chips, or candy melts your choice!)
- 1 tablespoon vegetable shortening (optional, for smoother melting)
- Sprinkles, for decoration (optional)
Baking the Red Velvet Cake:
- Preheat and Prep: First things first, preheat your oven to 350°F (175°C). Grease and flour a 9×13 inch baking pan. This will prevent the cake from sticking and make it easier to remove later. I like to use baking spray with flour already in it for extra insurance.
- Combine Dry Ingredients: In a large bowl, whisk together the flour, sugar, baking soda, baking powder, salt, and cocoa powder. Make sure everything is well combined so you don’t end up with pockets of baking soda in your cake.
- Combine Wet Ingredients: In a separate bowl, whisk together the buttermilk, vegetable oil, eggs, red food coloring, vinegar, and vanilla extract. The vinegar helps to activate the baking soda and gives the cake that classic red velvet tang.
- Combine Wet and Dry: Gradually add the wet ingredients to the dry ingredients, mixing on low speed until just combined. Be careful not to overmix! Overmixing can lead to a tough cake.
- Pour and Bake: Pour the batter into the prepared pan and spread it evenly. Bake for 25-30 minutes, or until a wooden skewer inserted into the center comes out clean. Keep an eye on it, as baking times can vary depending on your oven.
- Cool Completely: Let the cake cool in the pan for 10 minutes before inverting it onto a wire rack to cool completely. This is crucial! You need the cake to be completely cool before you can crumble it.
Making the Cream Cheese Frosting:
- Cream Butter and Cream Cheese: In a large bowl (or the bowl of a stand mixer), beat the softened cream cheese and butter together until smooth and creamy. Make sure your cream cheese and butter are truly softened, or you’ll end up with lumps in your frosting.
- Add Powdered Sugar: Gradually add the powdered sugar, one cup at a time, beating on low speed until combined. Be careful not to add it all at once, or you’ll end up with a cloud of powdered sugar in your kitchen!
- Add Vanilla and Milk: Stir in the vanilla extract. If the frosting is too thick, add milk or cream, one tablespoon at a time, until you reach your desired consistency. I like my frosting to be thick enough to hold its shape but still easy to spread.
Assembling the Cake Balls:
- Crumble the Cake: Once the cake is completely cool, crumble it into a large bowl. You can use your hands or a fork to do this. Make sure there are no large chunks of cake remaining.
- Add Frosting: Add the cream cheese frosting to the crumbled cake and mix well until everything is evenly combined. I usually start with about 3/4 of the frosting and add more if needed. You want the mixture to be moist enough to hold its shape but not too wet.
- Roll into Balls: Roll the mixture into 1-inch balls. I find it easiest to use a small cookie scoop to ensure they are all the same size. Place the cake balls on a baking sheet lined with parchment paper.
- Chill: Place the baking sheet in the refrigerator and chill the cake balls for at least 30 minutes. This will help them firm up and make them easier to dip. You can even chill them for longer, like an hour or two, if you have the time.
Dipping and Decorating:
- Melt the Chocolate: In a double boiler or microwave-safe bowl, melt the chocolate chips and vegetable shortening (if using) until smooth. If using a microwave, heat in 30-second intervals, stirring in between, to prevent burning. The shortening helps to thin the chocolate and gives it a smoother, glossier finish.
- Dip the Cake Balls: Remove the cake balls from the refrigerator. Dip each cake ball into the melted chocolate, using a fork or dipping tools to coat it completely. Tap off any excess chocolate.
- Decorate: Immediately sprinkle with sprinkles or other decorations, if desired. The chocolate will set quickly, so you need to add the decorations right away.
- Set: Place the dipped cake balls back on the parchment-lined baking sheet and let them set completely. You can speed up the process by placing them in the refrigerator for a few minutes.
- Enjoy!: Once the chocolate has set, your red velvet cake balls are ready to enjoy! Store them in an airtight container in the refrigerator for up to a week.
Tips and Variations:
- Cake Mix Shortcut: If you’re short on time, you can use a red velvet cake mix instead of making the cake from scratch. Just bake the cake according to the package directions and proceed with the recipe as written.
- Different Coatings: Get creative with your coatings! You can use white chocolate, dark chocolate, candy melts in different colors, or even crushed nuts or cookies.
- Flavor Variations: Add a teaspoon of peppermint extract to the melted chocolate for a festive holiday treat. Or, add a tablespoon of coffee liqueur to the cake mixture for a mocha flavor.
- Liqueur Infusion: For an adult twist, brush the cooled cake with a little bit of rum or bourbon before crumbling it. This will add a subtle but delicious flavor.
- Freezing: Cake balls freeze beautifully! You can freeze them before or after dipping them in chocolate. If freezing before dipping, thaw them completely before proceeding with the dipping process. If freezing after dipping, place them in a single layer on a baking sheet and freeze until solid, then transfer them to an airtight container.
- Preventing Cracking: Sometimes, the chocolate coating can crack as it sets. This is usually caused by the cake balls being too cold or the chocolate being too hot. To prevent this, make sure the cake balls are well-chilled but not frozen solid, and let the melted chocolate cool slightly before dipping.
- Dipping Tools: Investing in a set of dipping tools can make the dipping process much easier and neater. You can find them at most craft stores or online.
- Melting Chocolate Tips: When melting chocolate, it’s important to use a clean, dry bowl. Even a small amount of water can cause the chocolate to seize up. If your chocolate does seize, try adding a tablespoon of vegetable shortening or coconut oil and stirring vigorously.
- Sprinkle Placement: For even sprinkle coverage, hold the cake ball over a bowl of sprinkles and gently roll it around. This will help the sprinkles adhere evenly to the chocolate.
- Presentation: Arrange the cake balls on a pretty platter or in a decorative box for a beautiful presentation. They make a great gift for friends and family!
Conclusion:
And there you have it! These Red Velvet Cake Balls are truly irresistible, and I genuinely believe they’re a must-try for any dessert lover. The combination of the moist, tangy red velvet cake, the creamy, sweet coating, and the ease of preparation makes them a winner every time. Forget spending hours baking a full cake; these little bites deliver all the flavor and satisfaction in a fraction of the time. They’re perfect for parties, potlucks, or even just a little treat for yourself after a long day. But what truly sets these apart is their versatility. While the classic cream cheese frosting coating is divine, don’t be afraid to experiment! Try dipping them in melted white chocolate for an even sweeter experience, or use dark chocolate for a richer, more intense flavor. A sprinkle of chopped nuts, like pecans or walnuts, adds a delightful crunch. For a festive touch, consider using colored sprinkles or edible glitter to match the occasion. You could even drizzle them with a contrasting chocolate color for a beautiful presentation. Serving suggestions? The possibilities are endless! These Red Velvet Cake Balls are fantastic on their own, but they also pair wonderfully with a scoop of vanilla ice cream or a dollop of whipped cream. Arrange them on a tiered dessert stand for an elegant presentation at a party, or package them in small boxes as thoughtful homemade gifts. They’re also a great addition to a dessert platter, offering a delightful contrast to other sweets. For a truly decadent experience, serve them alongside a glass of chilled milk or a cup of hot coffee. I’ve made these cake balls countless times, and they’re always a hit. The recipe is forgiving, so don’t worry if you’re not a seasoned baker. The most important thing is to have fun and enjoy the process! And remember, the key to truly amazing Red Velvet Cake Balls is to not overbake the cake you want it to be moist and tender so it crumbles easily. I’m so confident that you’ll love this recipe, and I can’t wait to hear about your experience. Give it a try, and let me know what you think! Did you try any variations? What were your favorite toppings? Did you serve them at a party, and if so, how did your guests react? Share your photos and stories in the comments below I’m always eager to see your creations and learn from your experiences. Your feedback helps me improve my recipes and inspire other bakers. So, go ahead, get baking, and prepare to be amazed by these delightful little treats! You won’t regret it! Happy baking! PrintRed Velvet Cake Balls: The Ultimate Guide to Making Perfect Treats

Decadent red velvet cake balls coated in chocolate and sprinkles. A perfect bite-sized treat!
- Prep Time: 30 minutes
- Cook Time: 30 minutes
- Total Time: 90 minutes
- Yield: 30–40 cake balls 1x
Ingredients
- 2 1/2 cups all-purpose flour
- 2 cups granulated sugar
- 1 teaspoon baking soda
- 1 teaspoon baking powder
- 1 teaspoon salt
- 1 tablespoon unsweetened cocoa powder
- 1 cup buttermilk
- 1 cup vegetable oil
- 2 large eggs
- 2 tablespoons red food coloring
- 1 teaspoon white vinegar
- 1 teaspoon vanilla extract
- 8 ounces cream cheese, softened
- 1/2 cup (1 stick) unsalted butter, softened
- 4 cups powdered sugar
- 1 teaspoon vanilla extract
- 2–4 tablespoons milk or cream (optional, for desired consistency)
- 12 ounces semi-sweet chocolate chips (or white chocolate chips, or candy melts your choice!)
- 1 tablespoon vegetable shortening (optional, for smoother melting)
- Sprinkles, for decoration (optional)
Instructions
- Preheat your oven to 350°F (175°C). Grease and flour a 9×13 inch baking pan.
- In a large bowl, whisk together the flour, sugar, baking soda, baking powder, salt, and cocoa powder.
- In a separate bowl, whisk together the buttermilk, vegetable oil, eggs, red food coloring, vinegar, and vanilla extract.
- Gradually add the wet ingredients to the dry ingredients, mixing on low speed until just combined. Be careful not to overmix!
- Pour the batter into the prepared pan and spread it evenly. Bake for 25-30 minutes, or until a wooden skewer inserted into the center comes out clean.
- Let the cake cool in the pan for 10 minutes before inverting it onto a wire rack to cool completely.
- In a large bowl (or the bowl of a stand mixer), beat the softened cream cheese and butter together until smooth and creamy.
- Gradually add the powdered sugar, one cup at a time, beating on low speed until combined.
- Stir in the vanilla extract. If the frosting is too thick, add milk or cream, one tablespoon at a time, until you reach your desired consistency.
- Once the cake is completely cool, crumble it into a large bowl.
- Add the cream cheese frosting to the crumbled cake and mix well until everything is evenly combined.
- Roll the mixture into 1-inch balls. Place the cake balls on a baking sheet lined with parchment paper.
- Place the baking sheet in the refrigerator and chill the cake balls for at least 30 minutes.
- In a double boiler or microwave-safe bowl, melt the chocolate chips and vegetable shortening (if using) until smooth. If using a microwave, heat in 30-second intervals, stirring in between, to prevent burning.
- Remove the cake balls from the refrigerator. Dip each cake ball into the melted chocolate, using a fork or dipping tools to coat it completely. Tap off any excess chocolate.
- Immediately sprinkle with sprinkles or other decorations, if desired.
- Place the dipped cake balls back on the parchment-lined baking sheet and let them set completely. You can speed up the process by placing them in the refrigerator for a few minutes.
- Once the chocolate has set, your red velvet cake balls are ready to enjoy! Store them in an airtight container in the refrigerator for up to a week.
Notes
- Cake Mix Shortcut: Use a red velvet cake mix to save time.
- Different Coatings: Experiment with white chocolate, dark chocolate, candy melts, crushed nuts, or cookies.
- Flavor Variations: Add peppermint extract to the melted chocolate or coffee liqueur to the cake mixture.
- Liqueur Infusion: Brush the cooled cake with rum or bourbon before crumbling.
- Freezing: Cake balls freeze well before or after dipping.
- Preventing Cracking: Ensure cake balls are chilled but not frozen, and let the melted chocolate cool slightly before dipping.
- Dipping Tools: Use dipping tools for easier and neater dipping.
- Melting Chocolate Tips: Use a clean, dry bowl when melting chocolate.
- Sprinkle Placement: Roll the cake ball in a bowl of sprinkles for even coverage.
- Presentation: Arrange the cake balls on a platter or in a decorative box.

Leave a Comment