
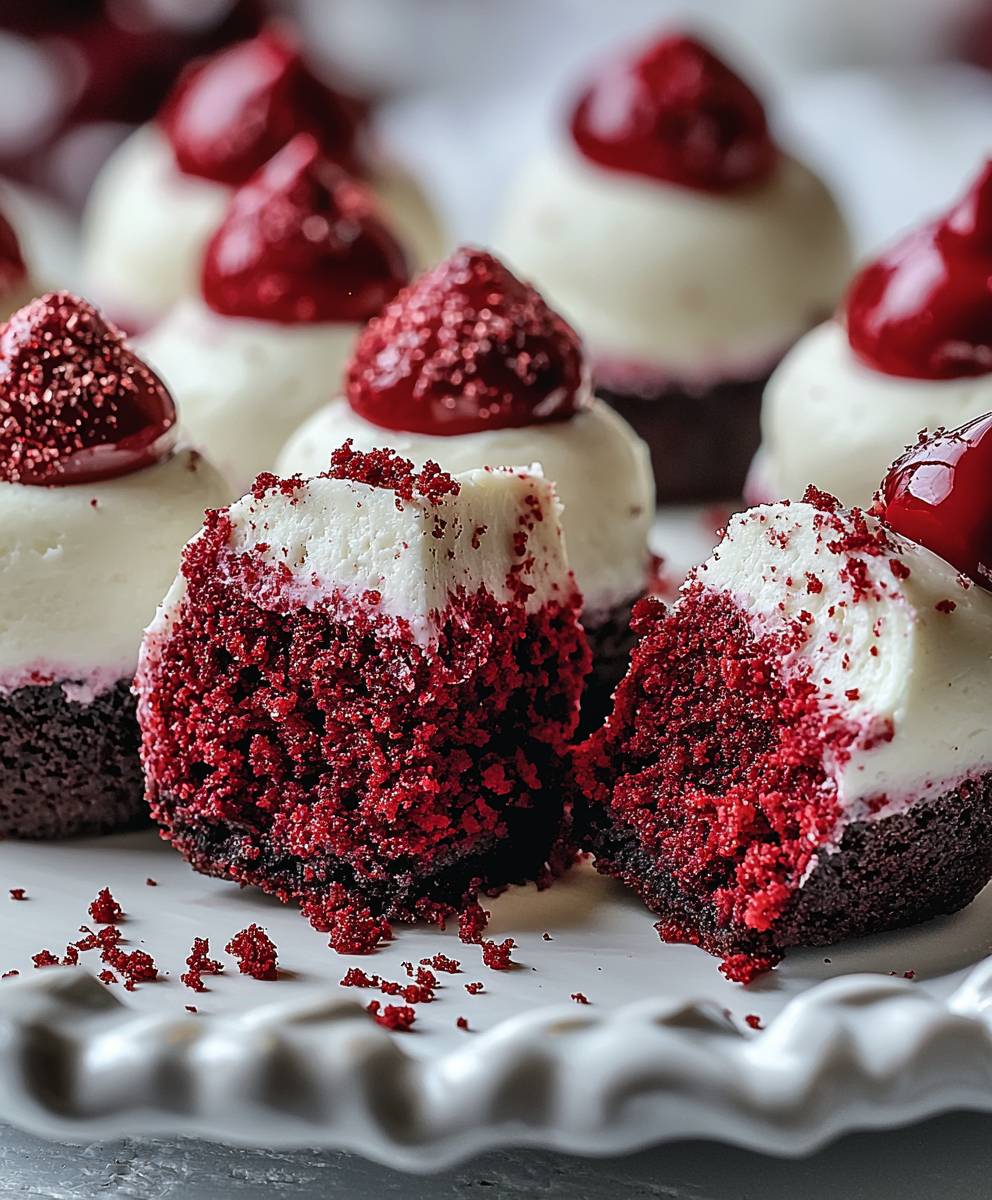
Red Velvet Cheesecake Bites: Prepare to be utterly captivated by these miniature marvels! Imagine the classic, tangy sweetness of cheesecake swirled together with the rich, cocoa-kissed flavor of red velvet cake, all nestled into perfectly portioned, bite-sized treats. These aren’t just desserts; they’re an experience, a delightful dance of textures and tastes that will leave you craving more.
The allure of red velvet itself is steeped in a bit of mystery. While its exact origins are debated, many believe it gained popularity during the Depression era, with bakers using beet juice to enhance the color and add moisture to cakes. The combination of buttermilk and vinegar creates a subtle tang that perfectly complements the cocoa, resulting in a flavor profile that’s both comforting and sophisticated. When paired with the creamy decadence of cheesecake, it’s a match made in dessert heaven!
People adore these Red Velvet Cheesecake Bites for so many reasons. First, they’re incredibly convenient. No need to slice a cake or worry about messy servings; each bite is perfectly contained. The combination of the moist, slightly crumbly red velvet and the smooth, rich cheesecake filling is simply irresistible. Plus, their vibrant color makes them a show-stopping addition to any dessert table, perfect for parties, holidays, or simply a special treat for yourself. Trust me, once you try these, you’ll understand the obsession!

Ingredients:
- For the Red Velvet Cookie Base:
- 1 ½ cups all-purpose flour
- ¼ cup unsweetened cocoa powder
- ½ teaspoon baking soda
- ¼ teaspoon salt
- ½ cup (1 stick) unsalted butter, softened
- ¾ cup granulated sugar
- ¼ cup packed light brown sugar
- 1 large egg
- 1 teaspoon vanilla extract
- 1 teaspoon white vinegar
- 1 tablespoon red food coloring
- ½ cup buttermilk
- For the Cheesecake Filling:
- 16 ounces cream cheese, softened
- ½ cup granulated sugar
- 1 large egg
- 1 teaspoon vanilla extract
- Optional Toppings:
- Whipped cream
- Chocolate shavings
- Red velvet cookie crumbs
Preparing the Red Velvet Cookie Base:
- Combine Dry Ingredients: In a medium bowl, whisk together the flour, cocoa powder, baking soda, and salt. Make sure there are no lumps of cocoa powder! This ensures a smooth cookie base.
- Cream Butter and Sugars: In a large bowl, cream together the softened butter, granulated sugar, and brown sugar until light and fluffy. This usually takes about 3-5 minutes with an electric mixer. Don’t rush this step; it’s crucial for a tender cookie.
- Add Egg and Vanilla: Beat in the egg and vanilla extract until well combined. Scrape down the sides of the bowl to ensure everything is evenly mixed.
- Mix Wet Ingredients: In a small bowl, whisk together the white vinegar, red food coloring, and buttermilk. The vinegar reacts with the baking soda to give the cookies a nice lift and that classic red velvet tang.
- Alternate Wet and Dry Ingredients: Gradually add the dry ingredients to the wet ingredients, alternating with the buttermilk mixture, beginning and ending with the dry ingredients. Mix until just combined. Be careful not to overmix, as this can result in tough cookies. I usually add the dry ingredients in three additions and the buttermilk in two.
- Chill the Dough: Cover the dough and chill in the refrigerator for at least 30 minutes. This helps prevent the cookies from spreading too much during baking and makes the dough easier to handle. You can chill it for longer, even overnight, if needed.
Preparing the Cheesecake Filling:
- Beat Cream Cheese and Sugar: In a large bowl, beat the softened cream cheese and granulated sugar until smooth and creamy. Make sure the cream cheese is truly softened; otherwise, you’ll end up with lumps in your filling.
- Add Egg and Vanilla: Beat in the egg and vanilla extract until just combined. Again, be careful not to overmix. Overmixing can incorporate too much air and cause the filling to crack during baking.
Assembling and Baking the Cheesecake Bites:
- Preheat Oven and Prepare Muffin Tin: Preheat your oven to 350°F (175°C). Line a 24-cup mini muffin tin with paper liners. If you don’t have paper liners, you can grease the muffin tin well.
- Scoop Cookie Dough: Scoop a small amount of the chilled red velvet cookie dough (about 1 tablespoon) into each muffin liner. Press the dough down slightly to form a base. I like to use a small cookie scoop for this to ensure even sizes.
- Add Cheesecake Filling: Spoon about 1-2 tablespoons of the cheesecake filling on top of the cookie dough in each liner. Don’t overfill the liners, as the filling will expand during baking.
- Bake: Bake for 15-18 minutes, or until the cheesecake filling is set and the edges are lightly golden brown. The centers should still have a slight jiggle.
- Cool Completely: Remove the muffin tin from the oven and let the cheesecake bites cool completely in the tin. This is important because the filling will continue to set as it cools.
- Chill: After they have cooled to room temperature, transfer the cheesecake bites to the refrigerator and chill for at least 2 hours before serving. Chilling helps the filling firm up even more and enhances the flavor.
Optional Toppings and Serving:
- Add Toppings: Once the cheesecake bites are chilled, you can add your favorite toppings. I love topping them with a dollop of whipped cream, chocolate shavings, or crushed red velvet cookie crumbs.
- Serve: Serve the red velvet cheesecake bites chilled and enjoy! They are perfect for parties, holidays, or any special occasion.
Tips for Success:
- Softened Cream Cheese is Key: Make sure your cream cheese is completely softened before making the filling. This will prevent lumps and ensure a smooth, creamy texture.
- Don’t Overmix: Overmixing the cookie dough or cheesecake filling can result in tough cookies or a cracked filling. Mix until just combined.
- Chill the Dough: Chilling the cookie dough is essential for preventing the cookies from spreading too much during baking.
- Cool Completely: Allow the cheesecake bites to cool completely in the muffin tin before chilling. This will help the filling set properly.
- Storage: Store leftover cheesecake bites in an airtight container in the refrigerator for up to 3 days.
Variations:
- Chocolate Chips: Add chocolate chips to the red velvet cookie dough for an extra chocolatey treat.
- Oreo Crust: Use crushed Oreo cookies instead of red velvet cookie dough for the base.
- Different Extracts: Experiment with different extracts in the cheesecake filling, such as almond or lemon extract.
- Swirls: Swirl a little raspberry jam or chocolate sauce into the cheesecake filling before baking.
Troubleshooting:
- Cracked Cheesecake Filling: If your cheesecake filling cracks, it could be due to overbaking or overmixing. Try reducing the baking time or mixing the filling less.
- Cookies Spreading Too Much: If your cookies are spreading too much, make sure you chill the dough for at least 30 minutes. You can also add a little more flour to the dough.
- Dry Cookies: If your cookies are dry, try adding a little more butter or buttermilk to the dough.
Nutritional Information (Approximate, per bite):
- Calories: 150
- Fat: 10g
- Saturated Fat: 6g
- Cholesterol: 40mg
- Sodium: 80mg
- Carbohydrates: 15g
- Sugar: 10g
- Protein: 2g
Conclusion:
Okay, friends, let’s be honest: you’ve read this far because something about these Red Velvet Cheesecake Bites has already captured your imagination. And trust me, they absolutely live up to the hype! From the vibrant red hue to the creamy, tangy cheesecake filling nestled on that perfectly crumbly base, these little bites are a symphony of textures and flavors that will have everyone begging for more. They’re not just a dessert; they’re an experience. But why are these a must-try? Well, beyond the sheer deliciousness, they’re surprisingly easy to make. I know, cheesecake can sound intimidating, but this recipe is designed for success, even if you’re a baking novice. Plus, they’re incredibly versatile. Need a show-stopping dessert for a party? These are perfect. Want a little something sweet to brighten up a weeknight? These are your answer. Looking for a unique and thoughtful homemade gift? Look no further! And the best part? You can totally customize them to your liking! Feeling adventurous? Try adding a swirl of chocolate ganache on top for an extra layer of decadence. Or, if you’re a fan of nuts, sprinkle some chopped pecans or walnuts over the crust before baking. For a festive twist during the holidays, a dusting of edible glitter adds a touch of sparkle. You could even experiment with different extracts in the cheesecake filling a hint of almond or vanilla bean would be divine. Speaking of serving, these Red Velvet Cheesecake Bites are delightful on their own, but they also pair beautifully with a scoop of vanilla ice cream or a dollop of whipped cream. A drizzle of raspberry sauce adds a bright, fruity counterpoint to the richness of the cheesecake. And for the coffee lovers out there, a small cup of espresso is the perfect complement to these sweet treats. I truly believe that this recipe is a winner, and I’m so excited for you to try it. I’ve poured my heart into creating a recipe that’s both delicious and approachable, and I’m confident that you’ll love the results. So, what are you waiting for? Gather your ingredients, preheat your oven, and get ready to embark on a baking adventure! I promise, the reward those irresistible Red Velvet Cheesecake Bites is well worth the effort. And now, for the most important part: I want to hear from you! Once you’ve made these little beauties, please, please, please share your experience. Did you make any variations? What did your friends and family think? Did you encounter any challenges along the way? I’m always eager to learn from your experiences and to see how you’ve made this recipe your own. Leave a comment below, tag me in your photos on social media I can’t wait to see your creations! Happy baking, and enjoy every single bite! Let me know if you have any questions, I’m here to help! PrintRed Velvet Cheesecake Bites: The Ultimate Guide to Delicious Mini Desserts

Decadent red velvet cookie cups filled with a creamy cheesecake filling. These mini cheesecake bites are perfect for parties and holidays!
- Prep Time: 30 minutes
- Cook Time: 18 minutes
- Total Time: 168 minutes
- Yield: 24 mini cheesecake bites 1x
Ingredients
- 1 ½ cups all-purpose flour
- ¼ cup unsweetened cocoa powder
- ½ teaspoon baking soda
- ¼ teaspoon salt
- ½ cup (1 stick) unsalted butter, softened
- ¾ cup granulated sugar
- ¼ cup packed light brown sugar
- 1 large egg
- 1 teaspoon vanilla extract
- 1 teaspoon white vinegar
- 1 tablespoon red food coloring
- ½ cup buttermilk
- 16 ounces cream cheese, softened
- ½ cup granulated sugar
- 1 large egg
- 1 teaspoon vanilla extract
- Whipped cream
- Chocolate shavings
- Red velvet cookie crumbs
Instructions
- In a medium bowl, whisk together the flour, cocoa powder, baking soda, and salt. Make sure there are no lumps of cocoa powder! This ensures a smooth cookie base.
- In a large bowl, cream together the softened butter, granulated sugar, and brown sugar until light and fluffy. This usually takes about 3-5 minutes with an electric mixer. Don’t rush this step; it’s crucial for a tender cookie.
- Beat in the egg and vanilla extract until well combined. Scrape down the sides of the bowl to ensure everything is evenly mixed.
- In a small bowl, whisk together the white vinegar, red food coloring, and buttermilk. The vinegar reacts with the baking soda to give the cookies a nice lift and that classic red velvet tang.
- Gradually add the dry ingredients to the wet ingredients, alternating with the buttermilk mixture, beginning and ending with the dry ingredients. Mix until just combined. Be careful not to overmix, as this can result in tough cookies. I usually add the dry ingredients in three additions and the buttermilk in two.
- Cover the dough and chill in the refrigerator for at least 30 minutes. This helps prevent the cookies from spreading too much during baking and makes the dough easier to handle. You can chill it for longer, even overnight, if needed.
- In a large bowl, beat the softened cream cheese and granulated sugar until smooth and creamy. Make sure the cream cheese is truly softened; otherwise, you’ll end up with lumps in your filling.
- Beat in the egg and vanilla extract until just combined. Again, be careful not to overmix. Overmixing can incorporate too much air and cause the filling to crack during baking.
- Preheat your oven to 350°F (175°C). Line a 24-cup mini muffin tin with paper liners. If you don’t have paper liners, you can grease the muffin tin well.
- Scoop a small amount of the chilled red velvet cookie dough (about 1 tablespoon) into each muffin liner. Press the dough down slightly to form a base. I like to use a small cookie scoop for this to ensure even sizes.
- Spoon about 1-2 tablespoons of the cheesecake filling on top of the cookie dough in each liner. Don’t overfill the liners, as the filling will expand during baking.
- Bake for 15-18 minutes, or until the cheesecake filling is set and the edges are lightly golden brown. The centers should still have a slight jiggle.
- Remove the muffin tin from the oven and let the cheesecake bites cool completely in the tin. This is important because the filling will continue to set as it cools.
- After they have cooled to room temperature, transfer the cheesecake bites to the refrigerator and chill for at least 2 hours before serving. Chilling helps the filling firm up even more and enhances the flavor.
- Once the cheesecake bites are chilled, you can add your favorite toppings. I love topping them with a dollop of whipped cream, chocolate shavings, or crushed red velvet cookie crumbs.
- Serve the red velvet cheesecake bites chilled and enjoy! They are perfect for parties, holidays, or any special occasion.
Notes
- Make sure your cream cheese is completely softened before making the filling. This will prevent lumps and ensure a smooth, creamy texture.
- Overmixing the cookie dough or cheesecake filling can result in tough cookies or a cracked filling. Mix until just combined.
- Chilling the cookie dough is essential for preventing the cookies from spreading too much during baking.
- Allow the cheesecake bites to cool completely in the muffin tin before chilling. This will help the filling set properly.
- Store leftover cheesecake bites in an airtight container in the refrigerator for up to 3 days.

Leave a Comment