
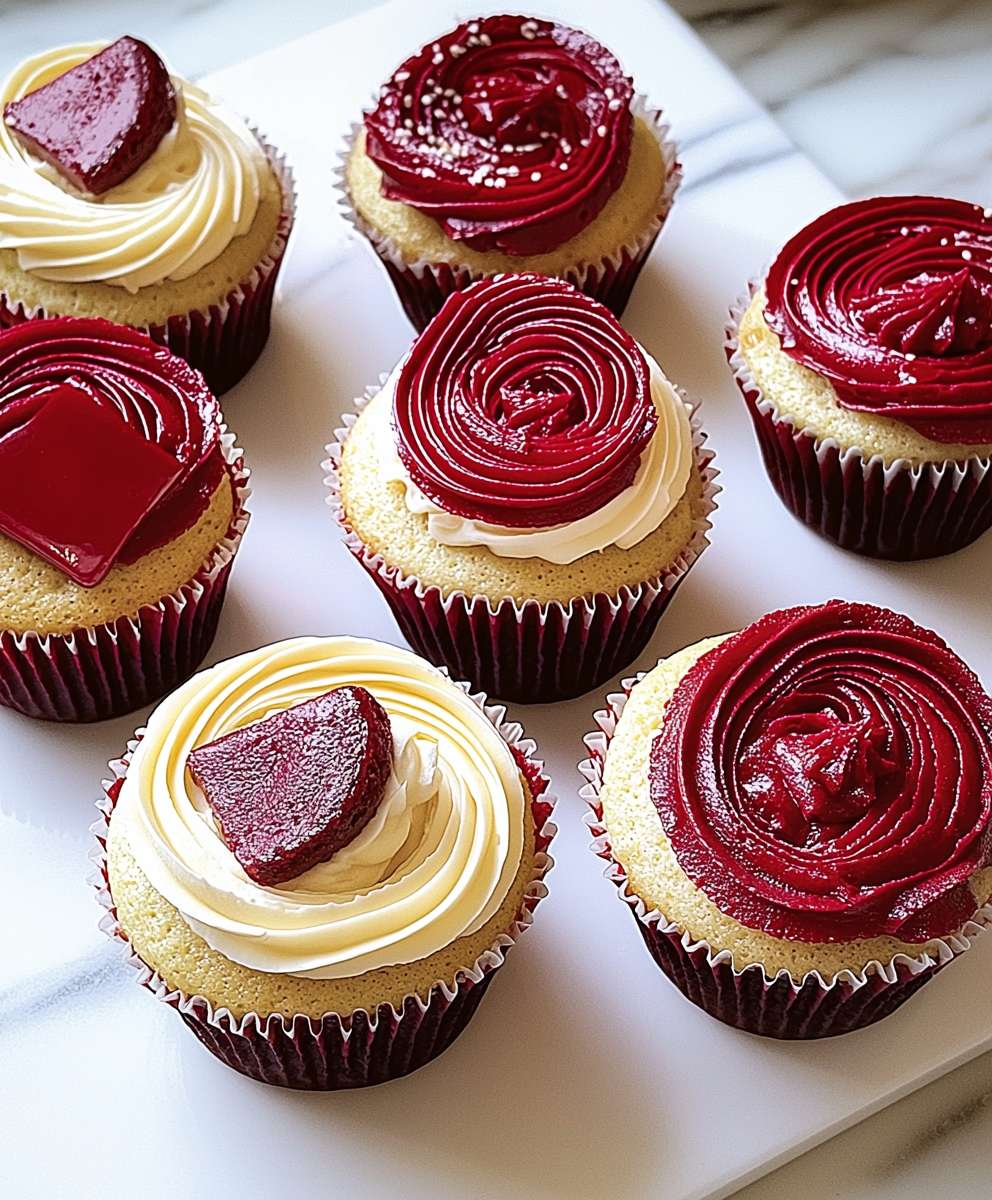
Red Velvet Marble Cupcakes: Prepare to be captivated by these stunning treats that are as delightful to look at as they are to devour! Imagine sinking your teeth into a moist, tender cupcake, swirled with the classic tang of red velvet and the rich decadence of chocolate. It’s a symphony of flavors and textures that will leave you craving more.
The allure of red velvet, with its mysterious crimson hue, has captivated bakers and dessert enthusiasts for generations. While the exact origins are debated, many believe it gained popularity during the Great Depression, when bakers used beet juice to enhance the color and moisture of their cakes. Over time, the vibrant color became synonymous with elegance and indulgence, making it a staple for celebrations and special occasions. The addition of the marble effect elevates these cupcakes to a new level of sophistication.
What makes these Red Velvet Marble Cupcakes so irresistible? It’s the perfect balance of flavors the subtle cocoa notes of the red velvet beautifully complement the intense chocolate swirls. The buttermilk in the batter ensures a moist and tender crumb, while the cream cheese frosting adds a tangy sweetness that ties everything together. Plus, the visually striking marble pattern makes them a show-stopping dessert that’s sure to impress your friends and family. Whether you’re baking for a party or simply treating yourself, these cupcakes are guaranteed to bring a smile to your face.

Ingredients:
- For the Red Velvet Cupcake Batter:
- 2 ½ cups (300g) all-purpose flour
- 1 teaspoon baking soda
- 1 teaspoon baking powder
- ½ teaspoon salt
- ½ cup (115g) unsalted butter, softened
- 1 ¾ cups (350g) granulated sugar
- 2 large eggs
- 1 teaspoon vanilla extract
- 1 cup (240ml) buttermilk
- 2 tablespoons red food coloring (gel is recommended for vibrant color)
- 1 teaspoon white vinegar
- 1 tablespoon unsweetened cocoa powder
- For the Vanilla Cupcake Batter:
- 2 ½ cups (300g) all-purpose flour
- 1 teaspoon baking soda
- 1 teaspoon baking powder
- ½ teaspoon salt
- ½ cup (115g) unsalted butter, softened
- 1 ¾ cups (350g) granulated sugar
- 2 large eggs
- 2 teaspoons vanilla extract
- 1 cup (240ml) buttermilk
- For the Cream Cheese Frosting:
- 8 ounces (226g) cream cheese, softened
- ½ cup (115g) unsalted butter, softened
- 4 cups (480g) powdered sugar
- 2 teaspoons vanilla extract
- 2-4 tablespoons milk or heavy cream (for desired consistency)
Preparing the Red Velvet Cupcake Batter:
- Preheat and Prep: First things first, preheat your oven to 350°F (175°C). Line a 12-cup muffin tin with cupcake liners. This makes cleanup a breeze!
- Dry Ingredients: In a medium bowl, whisk together the flour, baking soda, baking powder, and salt. Make sure everything is evenly distributed this helps with the texture of the cupcakes.
- Cream Butter and Sugar: In a large bowl (or the bowl of your stand mixer), cream together the softened butter and granulated sugar until light and fluffy. This usually takes about 3-5 minutes. Don’t rush this step; it’s important for incorporating air into the batter.
- Add Eggs and Vanilla: Beat in the eggs one at a time, mixing well after each addition. Then, stir in the vanilla extract.
- Alternate Wet and Dry: Gradually add the dry ingredients to the wet ingredients, alternating with the buttermilk. Begin and end with the dry ingredients. So, add about a third of the dry ingredients, then half of the buttermilk, then another third of the dry ingredients, the remaining buttermilk, and finally the last of the dry ingredients. Mix until just combined. Be careful not to overmix! Overmixing can lead to tough cupcakes.
- Red Velvet Magic: In a small bowl, whisk together the red food coloring, vinegar, and cocoa powder. This creates a chemical reaction that enhances the red color and adds a subtle tang to the red velvet flavor.
- Combine: Add the red food coloring mixture to the batter and mix until evenly colored.
Preparing the Vanilla Cupcake Batter:
- Dry Ingredients: In a medium bowl, whisk together the flour, baking soda, baking powder, and salt. Just like with the red velvet batter, ensure everything is evenly distributed.
- Cream Butter and Sugar: In a large bowl (or the bowl of your stand mixer), cream together the softened butter and granulated sugar until light and fluffy. Again, this takes about 3-5 minutes.
- Add Eggs and Vanilla: Beat in the eggs one at a time, mixing well after each addition. Then, stir in the vanilla extract. Since this is a vanilla batter, we’re using a bit more vanilla to really bring out that flavor.
- Alternate Wet and Dry: Gradually add the dry ingredients to the wet ingredients, alternating with the buttermilk. Begin and end with the dry ingredients, just like before. Mix until just combined, being careful not to overmix.
Creating the Marble Effect and Baking:
- Layer the Batters: Using a spoon or ice cream scoop, alternate spoonfuls of the red velvet batter and the vanilla batter into each cupcake liner. Fill each liner about 2/3 full.
- Marbleize: Use a toothpick or skewer to gently swirl the batters together in each cupcake liner. Be careful not to overmix, as this can muddy the colors and lose the marble effect. A few swirls are all you need!
- Bake: Bake for 18-22 minutes, or until a toothpick inserted into the center comes out clean.
- Cool: Let the cupcakes cool in the muffin tin for a few minutes before transferring them to a wire rack to cool completely. Make sure they are completely cool before frosting!
Preparing the Cream Cheese Frosting:
- Cream Cheese and Butter: In a large bowl (or the bowl of your stand mixer), beat together the softened cream cheese and butter until smooth and creamy. It’s crucial that both the cream cheese and butter are softened to avoid lumps in your frosting.
- Add Powdered Sugar: Gradually add the powdered sugar, one cup at a time, beating on low speed until combined. This prevents a powdered sugar cloud from erupting in your kitchen!
- Vanilla and Consistency: Stir in the vanilla extract. Then, add milk or heavy cream, one tablespoon at a time, until you reach your desired consistency. I like my frosting to be thick enough to hold its shape but still easy to spread.
- Whip it Good: Increase the mixer speed to medium-high and beat for 2-3 minutes, until the frosting is light and fluffy.
Frosting and Decorating:
- Frost the Cupcakes: Once the cupcakes are completely cool, frost them with the cream cheese frosting. You can use a knife, spatula, or piping bag to frost them. If you’re using a piping bag, try a star tip for a classic swirl.
- Decorate (Optional): Decorate the cupcakes with sprinkles, chocolate shavings, or any other toppings you like. Red velvet cupcakes look especially beautiful with a dusting of cocoa powder or a few red sprinkles.
- Enjoy!: These cupcakes are best enjoyed within a few days. Store them in an airtight container in the refrigerator.
Conclusion:
So, there you have it! These Red Velvet Marble Cupcakes are truly something special, and I genuinely believe they deserve a spot on your baking bucket list. The combination of the classic red velvet tang with the creamy vanilla swirl is simply irresistible. They’re moist, flavorful, and visually stunning perfect for any occasion, from a casual afternoon treat to a more formal celebration. But why are these cupcakes a must-try? It’s more than just the pretty swirls. It’s the perfect balance of flavors and textures. The slight tang of the buttermilk in the red velvet batter complements the sweetness of the vanilla, creating a symphony of taste that will leave you wanting more. Plus, the marble effect adds a touch of elegance that elevates these cupcakes from ordinary to extraordinary. Trust me, your friends and family will be seriously impressed! Now, let’s talk about serving suggestions and variations. While these cupcakes are delicious on their own, a simple cream cheese frosting is the classic pairing that truly makes them shine. I highly recommend using a tangy cream cheese frosting to cut through the richness of the cake. You could also experiment with different frostings, such as a vanilla bean buttercream or even a chocolate ganache for an extra decadent treat. For serving, consider adding a sprinkle of red velvet crumbs on top for a pop of color and texture. A few fresh berries, like raspberries or strawberries, would also be a beautiful and delicious addition. And if you’re feeling extra fancy, you could even pipe a small rosette of frosting on each cupcake and top it with a single edible pearl. Looking for variations? You could try adding a teaspoon of espresso powder to the red velvet batter for a mocha twist. Or, for a more festive flavor, incorporate a pinch of cinnamon or nutmeg. If you’re a fan of nuts, chopped pecans or walnuts would be a delightful addition to the batter. You could even try making mini cupcakes for a bite-sized treat! Don’t be intimidated by the marble effect it’s much easier than it looks! Just remember to alternate spoonfuls of each batter and swirl gently with a toothpick or skewer. The key is not to overmix, as this will muddy the colors and lose the distinct marble pattern. I’m so excited for you to try this recipe and experience the magic of these Red Velvet Marble Cupcakes for yourself. I know you’ll love them as much as I do! So, go ahead, preheat your oven, gather your ingredients, and get baking! I promise you won’t regret it. And when you do, please, please, please share your creations with me! I’d love to see your photos and hear about your experience. Tag me on social media using [Your Social Media Handle] or leave a comment below. I can’t wait to see your beautiful cupcakes and hear what you think! Happy baking! I am confident that you will find that this recipe for Red Velvet Marble Cupcakes will become a family favorite. PrintRed Velvet Marble Cupcakes: The Ultimate Recipe & Baking Guide

Delicious marble cupcakes with red velvet and vanilla flavors, topped with tangy cream cheese frosting.
- Prep Time: 30 minutes
- Cook Time: 22 minutes
- Total Time: 52 minutes
- Yield: 12 cupcakes 1x
Ingredients
- 2 ½ cups (300g) all-purpose flour
- 1 teaspoon baking soda
- 1 teaspoon baking powder
- ½ teaspoon salt
- ½ cup (115g) unsalted butter, softened
- 1 ¾ cups (350g) granulated sugar
- 2 large eggs
- 1 teaspoon vanilla extract
- 1 cup (240ml) buttermilk
- 2 tablespoons red food coloring (gel recommended)
- 1 teaspoon white vinegar
- 1 tablespoon unsweetened cocoa powder
- 2 ½ cups (300g) all-purpose flour
- 1 teaspoon baking soda
- 1 teaspoon baking powder
- ½ teaspoon salt
- ½ cup (115g) unsalted butter, softened
- 1 ¾ cups (350g) granulated sugar
- 2 large eggs
- 2 teaspoons vanilla extract
- 1 cup (240ml) buttermilk
- 8 ounces (226g) cream cheese, softened
- ½ cup (115g) unsalted butter, softened
- 4 cups (480g) powdered sugar
- 2 teaspoons vanilla extract
- 2–4 tablespoons milk or heavy cream (for desired consistency)
Instructions
- Preheat oven to 350°F (175°C). Line a 12-cup muffin tin with cupcake liners.
- In a medium bowl, whisk together the flour, baking soda, baking powder, and salt.
- In a large bowl (or stand mixer), cream together the softened butter and granulated sugar until light and fluffy (3-5 minutes).
- Beat in the eggs one at a time, mixing well after each addition. Stir in the vanilla extract.
- Gradually add the dry ingredients to the wet ingredients, alternating with the buttermilk. Begin and end with the dry ingredients. Mix until just combined. Do not overmix.
- In a small bowl, whisk together the red food coloring, vinegar, and cocoa powder.
- Add the red food coloring mixture to the batter and mix until evenly colored.
- In a medium bowl, whisk together the flour, baking soda, baking powder, and salt.
- In a large bowl (or stand mixer), cream together the softened butter and granulated sugar until light and fluffy (3-5 minutes).
- Beat in the eggs one at a time, mixing well after each addition. Stir in the vanilla extract.
- Gradually add the dry ingredients to the wet ingredients, alternating with the buttermilk. Begin and end with the dry ingredients. Mix until just combined. Do not overmix.
- Using a spoon or ice cream scoop, alternate spoonfuls of the red velvet batter and the vanilla batter into each cupcake liner. Fill each liner about 2/3 full.
- Use a toothpick or skewer to gently swirl the batters together in each cupcake liner. Be careful not to overmix.
- Bake for 18-22 minutes, or until a toothpick inserted into the center comes out clean.
- Let the cupcakes cool in the muffin tin for a few minutes before transferring them to a wire rack to cool completely.
- In a large bowl (or stand mixer), beat together the softened cream cheese and butter until smooth and creamy.
- Gradually add the powdered sugar, one cup at a time, beating on low speed until combined.
- Stir in the vanilla extract. Then, add milk or heavy cream, one tablespoon at a time, until you reach your desired consistency.
- Increase the mixer speed to medium-high and beat for 2-3 minutes, until the frosting is light and fluffy.
- Once the cupcakes are completely cool, frost them with the cream cheese frosting using a knife, spatula, or piping bag.
- Decorate the cupcakes with sprinkles, chocolate shavings, or any other toppings you like.
- Enjoy!: These cupcakes are best enjoyed within a few days. Store them in an airtight container in the refrigerator.
Notes
- Gel food coloring is recommended for a more vibrant red velvet color.
- Make sure butter and cream cheese are softened for smooth frosting.
- Don’t overmix the cupcake batter to avoid tough cupcakes.
- Cool cupcakes completely before frosting to prevent melting.
- Adjust milk/cream in frosting for desired consistency.

Leave a Comment