
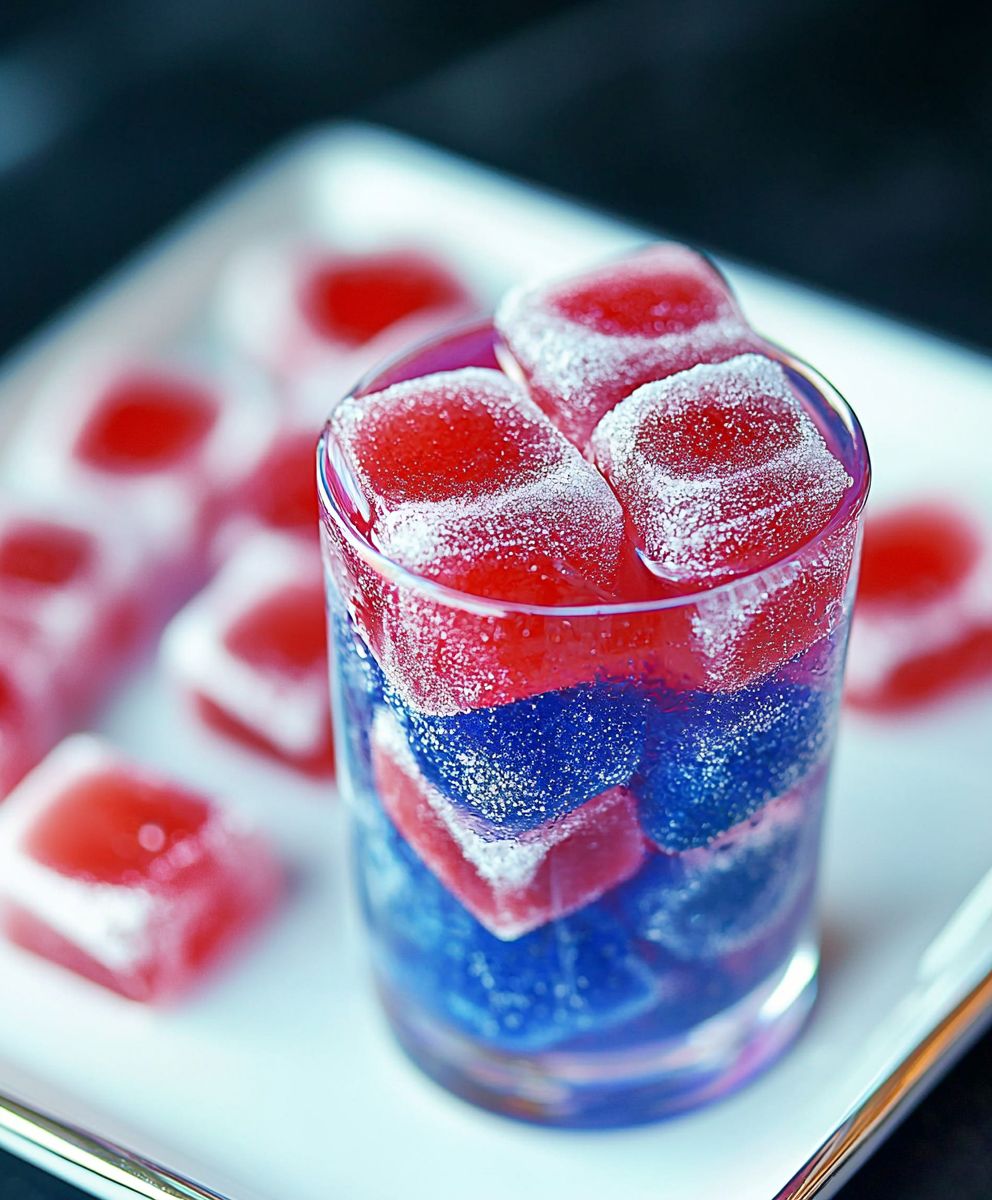
Red White Blue Ice just the name conjures up images of summer celebrations, doesn’t it? Imagine serving up a dazzling, patriotic treat that’s not only visually stunning but also incredibly refreshing. This isn’t just ice; it’s a miniature edible firework display, perfect for adding a festive touch to any gathering, especially around the Fourth of July!
While the concept of flavored ice has been around for centuries, with variations popping up in different cultures (think Italian ice or shaved ice desserts), the Red White Blue Ice we’re making today is a distinctly American twist. It’s a playful nod to our flag and a delicious way to beat the summer heat. It’s a relatively new tradition, gaining popularity with the rise of creative food presentation and patriotic celebrations.
People absolutely adore this recipe because it’s so simple to make, yet it delivers a huge impact. The vibrant colors are undeniably appealing, and the subtle fruity flavors are a crowd-pleaser. Plus, it’s incredibly versatile! You can use it to chill drinks, add a pop of color to desserts, or even just enjoy it on its own as a light and refreshing treat. The combination of visual appeal, ease of preparation, and delicious taste makes Red White Blue Ice a guaranteed hit at any summer event. Let’s get started!

Ingredients:
- 1 (16 ounce) package frozen strawberries, thawed
- 1 cup granulated sugar, divided
- 1/2 cup water
- 1/4 cup lemon juice
- 1 (16 ounce) package frozen blueberries, thawed
- 1 (16 ounce) package frozen raspberries, thawed
- 1 cup heavy cream
- 1/2 cup powdered sugar
- 1 teaspoon vanilla extract
- Edible glitter (optional, for extra sparkle!)
- Fresh mint sprigs (optional, for garnish)
Strawberry Layer Preparation
Okay, let’s start with the vibrant red layer! This is where the magic begins. We’re going to create a delicious strawberry puree that will form the base of our patriotic treat.
- Prepare the Strawberries: First, make sure your frozen strawberries are completely thawed. This will make them much easier to blend. Drain any excess liquid from the thawed strawberries. This step is crucial to prevent a watery final product. We want a concentrated strawberry flavor!
- Combine Ingredients: In a medium saucepan, combine the thawed strawberries, 1/2 cup of granulated sugar, water, and lemon juice. The lemon juice helps to brighten the strawberry flavor and adds a touch of tartness that balances the sweetness.
- Cook the Mixture: Place the saucepan over medium heat. Bring the mixture to a gentle simmer, stirring occasionally. As the strawberries heat up, they will release more of their juices. Continue to simmer for about 10-15 minutes, or until the strawberries have softened and the mixture has thickened slightly. Keep stirring to prevent sticking and burning!
- Puree the Strawberries: Remove the saucepan from the heat and let the strawberry mixture cool slightly. Once it’s cool enough to handle, carefully transfer the mixture to a blender or food processor. Blend until smooth. If you prefer a completely smooth puree, you can strain it through a fine-mesh sieve to remove any seeds. This is optional, but it will give your strawberry layer a more refined texture.
- Cool Completely: Pour the strawberry puree into a container and cover it tightly. Place it in the refrigerator to cool completely. This is important because we don’t want to melt the other layers when we start assembling our Red, White, and Blue Ice. Patience is key!
Blueberry Layer Preparation
Next up, the beautiful blue layer! We’ll follow a similar process to the strawberry layer, but with blueberries. The blueberries will give us a rich, deep color and a slightly different flavor profile.
- Prepare the Blueberries: Just like with the strawberries, make sure your frozen blueberries are completely thawed. Drain any excess liquid.
- Combine Ingredients: In a separate medium saucepan, combine the thawed blueberries and 1/4 cup of granulated sugar. We’re using a little less sugar here because blueberries tend to be naturally sweeter than strawberries.
- Cook the Mixture: Place the saucepan over medium heat. Bring the mixture to a gentle simmer, stirring occasionally. Simmer for about 10-15 minutes, or until the blueberries have softened and the mixture has thickened slightly. The blueberries will release their vibrant blue color as they cook.
- Puree the Blueberries: Remove the saucepan from the heat and let the blueberry mixture cool slightly. Transfer the mixture to a blender or food processor and blend until smooth. Again, you can strain the puree through a fine-mesh sieve if you prefer a completely smooth texture.
- Cool Completely: Pour the blueberry puree into a container and cover it tightly. Place it in the refrigerator to cool completely. Make sure it’s nice and cold before we start layering!
Raspberry Layer Preparation (Optional Red Variation)
If you want a slightly different red flavor profile, or if you simply prefer raspberries, you can substitute the strawberry layer with a raspberry layer. The process is almost identical, and the result is equally delicious!
- Prepare the Raspberries: Thaw your frozen raspberries completely and drain any excess liquid.
- Combine Ingredients: In a medium saucepan, combine the thawed raspberries, 1/2 cup of granulated sugar, water, and lemon juice.
- Cook the Mixture: Place the saucepan over medium heat. Bring the mixture to a gentle simmer, stirring occasionally. Simmer for about 10-15 minutes, or until the raspberries have softened and the mixture has thickened slightly.
- Puree the Raspberries: Remove the saucepan from the heat and let the raspberry mixture cool slightly. Transfer the mixture to a blender or food processor and blend until smooth. Strain through a fine-mesh sieve to remove the seeds for a smoother texture.
- Cool Completely: Pour the raspberry puree into a container and cover it tightly. Place it in the refrigerator to cool completely.
Whipped Cream Layer Preparation
Now for the creamy white layer! This is the easiest part, and it adds a wonderful richness and lightness to our Red, White, and Blue Ice. We’re making a simple homemade whipped cream that’s far superior to anything you can buy in a can.
- Chill the Bowl and Whisk: This is a crucial step! Place your mixing bowl and whisk (or whisk attachment for your stand mixer) in the freezer for at least 15 minutes before you start. Cold equipment helps the cream whip up faster and hold its shape better.
- Combine Ingredients: Pour the heavy cream into the chilled bowl. Add the powdered sugar and vanilla extract. The powdered sugar dissolves more easily than granulated sugar, resulting in a smoother whipped cream.
- Whip the Cream: Using your whisk or stand mixer, begin whipping the cream on medium speed. Gradually increase the speed to high. Continue whipping until stiff peaks form. This means that when you lift the whisk, the cream will hold its shape and stand up straight. Be careful not to overwhip, or you’ll end up with butter!
- Keep Chilled: Once the whipped cream is ready, cover it and place it in the refrigerator until you’re ready to assemble your Red, White, and Blue Ice.
Assembling the Red, White, and Blue Ice
Finally, the fun part! We’re going to layer our chilled purees and whipped cream to create a beautiful and delicious patriotic dessert. You can use individual glasses, a trifle bowl, or any other clear container that will show off the layers.
- First Layer: Start by spooning a layer of the strawberry (or raspberry) puree into the bottom of your chosen container. The thickness of the layer will depend on the size of your container, but aim for about 1-2 inches.
- Second Layer: Next, carefully spoon a layer of the whipped cream on top of the strawberry puree. Again, aim for about 1-2 inches. You can use a piping bag for a more precise and decorative layer, but it’s not necessary.
- Third Layer: Finally, spoon a layer of the blueberry puree on top of the whipped cream. Make sure the layers are even and visually appealing.
- Repeat Layers (Optional): If your container is large enough, you can repeat the layers for a more dramatic effect. Just remember to keep the layers consistent in thickness.
- Garnish (Optional): For an extra touch of patriotism, you can garnish your Red, White, and Blue Ice with edible glitter and fresh mint sprigs. The glitter will add a sparkle, and the mint will provide a refreshing contrast to the sweetness of the fruit.
- Chill Before Serving: Once you’ve assembled your Red, White, and Blue Ice, cover it and place it in the refrigerator for at least 30 minutes to allow the flavors to meld together. This will also help the layers to set up slightly.
Tips and Variations
Here are a few extra tips and ideas to customize your Red, White, and Blue Ice:
- Sweetener Alternatives: If you’re looking for a healthier option, you can substitute the granulated sugar and powdered sugar with honey, maple syrup, or a sugar substitute like stevia or erythritol. Just adjust the amount to your taste.
- Yogurt Parfait: For a lighter version, you can replace the whipped cream with Greek yogurt. This will add a tangy flavor and a boost of protein.
- Add Granola: For a crunchy texture, you can sprinkle a layer of granola between the fruit purees and the whipped cream.
- Different Berries: Feel free to experiment with other types of berries, such as blackberries or mixed berries.
- Boozy Version: For an adult twist, you can add a splash of vodka or rum to the fruit
Conclusion:
This Red White Blue Ice recipe isn’t just a treat; it’s a celebration in every bite! The vibrant layers, the refreshing flavors, and the sheer fun of creating something so visually stunning make it an absolute must-try for any occasion, especially those summer gatherings. I promise, you’ll be the star of the party! But why is this recipe so special? It’s more than just frozen water and fruit. It’s about creating a memorable experience. The combination of sweet strawberries, creamy coconut milk (or yogurt!), and juicy blueberries offers a delightful symphony of flavors that dance on your palate. Plus, it’s incredibly versatile! Think beyond just serving these as ice cubes in water or lemonade. Imagine adding them to a sparkling wine for a festive touch, or using them to chill your favorite fruit punch. For a more decadent treat, try blending them into a smoothie for an extra burst of flavor and color. You could even crush them and sprinkle them over a bowl of vanilla ice cream for a patriotic sundae! And the variations are endless! If you’re not a fan of coconut, feel free to substitute it with Greek yogurt or even a dairy-free alternative like almond or soy yogurt. For a different flavor profile, consider adding raspberries or cherries to the red layer, or blackberries to the blue layer. A touch of lime zest in the white layer can also add a refreshing zing. Get creative and experiment with different fruits and flavors to create your own signature Red White Blue Ice masterpiece! Don’t be intimidated by the layered effect. It’s much easier than it looks, and the results are well worth the effort. Just remember to be patient and allow each layer to freeze completely before adding the next. This will ensure that the colors remain distinct and vibrant. I truly believe that this recipe is a winner. It’s simple, delicious, and visually appealing. It’s the perfect way to add a touch of fun and festivity to any occasion. So, what are you waiting for? Gather your ingredients, grab your ice cube trays, and get ready to create some magic! I’m confident that you’ll love this recipe as much as I do. I’m so excited for you to try this Red White Blue Ice recipe! Once you’ve made it, I’d absolutely love to hear about your experience. Did you make any variations? What did you serve it with? What was the reaction of your family and friends? Please, don’t hesitate to share your photos and stories in the comments below. I can’t wait to see your creations and hear your feedback. Let’s spread the joy of this delicious and festive treat together! Happy freezing! I am sure you will enjoy this recipe as much as I do. PrintRed White Blue Ice: The Ultimate Guide to Patriotic Frozen Treats

Festive Red, White, and Blue Ice dessert with layers of strawberry (or raspberry), blueberry puree, and homemade whipped cream. Perfect for patriotic holidays or summer celebrations!
- Prep Time: 30 minutes
- Cook Time: 30 minutes
- Total Time: 90 minutes
- Yield: 6–8 servings 1x
Ingredients
Scale- 1 (16 ounce) package frozen strawberries, thawed
- 1 cup granulated sugar, divided
- 1/2 cup water
- 1/4 cup lemon juice
- 1 (16 ounce) package frozen blueberries, thawed
- 1 (16 ounce) package frozen raspberries, thawed (optional)
- 1 cup heavy cream
- 1/2 cup powdered sugar
- 1 teaspoon vanilla extract
- Edible glitter (optional, for extra sparkle!)
- Fresh mint sprigs (optional, for garnish)
Instructions
- Prepare the Strawberries: Make sure your frozen strawberries are completely thawed. Drain any excess liquid from the thawed strawberries.
- Combine Ingredients: In a medium saucepan, combine the thawed strawberries, 1/2 cup of granulated sugar, water, and lemon juice.
- Cook the Mixture: Place the saucepan over medium heat. Bring the mixture to a gentle simmer, stirring occasionally. Simmer for about 10-15 minutes, or until the strawberries have softened and the mixture has thickened slightly. Keep stirring to prevent sticking and burning!
- Puree the Strawberries: Remove the saucepan from the heat and let the strawberry mixture cool slightly. Once it’s cool enough to handle, carefully transfer the mixture to a blender or food processor. Blend until smooth. If you prefer a completely smooth puree, you can strain it through a fine-mesh sieve to remove any seeds (optional).
- Cool Completely: Pour the strawberry puree into a container and cover it tightly. Place it in the refrigerator to cool completely.
- Prepare the Blueberries: Make sure your frozen blueberries are completely thawed. Drain any excess liquid.
- Combine Ingredients: In a separate medium saucepan, combine the thawed blueberries and 1/4 cup of granulated sugar.
- Cook the Mixture: Place the saucepan over medium heat. Bring the mixture to a gentle simmer, stirring occasionally. Simmer for about 10-15 minutes, or until the blueberries have softened and the mixture has thickened slightly.
- Puree the Blueberries: Remove the saucepan from the heat and let the blueberry mixture cool slightly. Transfer the mixture to a blender or food processor and blend until smooth. Again, you can strain the puree through a fine-mesh sieve if you prefer a completely smooth texture.
- Cool Completely: Pour the blueberry puree into a container and cover it tightly. Place it in the refrigerator to cool completely.
- Prepare the Raspberries: Thaw your frozen raspberries completely and drain any excess liquid.
- Combine Ingredients: In a medium saucepan, combine the thawed raspberries, 1/2 cup of granulated sugar, water, and lemon juice.
- Cook the Mixture: Place the saucepan over medium heat. Bring the mixture to a gentle simmer, stirring occasionally. Simmer for about 10-15 minutes, or until the raspberries have softened and the mixture has thickened slightly.
- Puree the Raspberries: Remove the saucepan from the heat and let the raspberry mixture cool slightly. Transfer the mixture to a blender or food processor and blend until smooth. Strain through a fine-mesh sieve to remove the seeds for a smoother texture.
- Cool Completely: Pour the raspberry puree into a container and cover it tightly. Place it in the refrigerator to cool completely.
- Chill the Bowl and Whisk: Place your mixing bowl and whisk (or whisk attachment for your stand mixer) in the freezer for at least 15 minutes before you start.
- Combine Ingredients: Pour the heavy cream into the chilled bowl. Add the powdered sugar and vanilla extract.
- Whip the Cream: Using your whisk or stand mixer, begin whipping the cream on medium speed. Gradually increase the speed to high. Continue whipping until stiff peaks form. Be careful not to overwhip.
- Keep Chilled: Once the whipped cream is ready, cover it and place it in the refrigerator until you’re ready to assemble your Red, White, and Blue Ice.
- First Layer: Start by spooning a layer of the strawberry (or raspberry) puree into the bottom of your chosen container (individual glasses, trifle bowl, etc.). Aim for about 1-2 inches.
- Second Layer: Next, carefully spoon a layer of the whipped cream on top of the strawberry puree. Again, aim for about 1-2 inches.
- Third Layer: Finally, spoon a layer of the blueberry puree on top of the whipped cream.
- Repeat Layers (Optional): If your container is large enough, you can repeat the layers.
- Garnish (Optional): Garnish with edible glitter and fresh mint sprigs.
- Chill Before Serving: Cover and place in the refrigerator for at least 30 minutes to allow the flavors to meld.
Notes
- For a smoother puree, strain the fruit purees through a fine-mesh sieve to remove seeds.
- Chill the bowl and whisk before whipping the cream for best results.
- Be careful not to overwhip the cream.
- You can substitute the granulated sugar and powdered sugar with honey, maple syrup, or a sugar substitute like stevia or erythritol. Just adjust the amount to your taste.
- For a lighter version, you can replace the whipped cream with Greek yogurt.
- For a crunchy texture, you can sprinkle a layer of granola between the fruit purees and the whipped cream.
- Feel free to experiment with other types of berries, such as blackberries or mixed berries.
- For an adult twist, you can add a splash of vodka or rum to the fruit purees.

Leave a Comment