
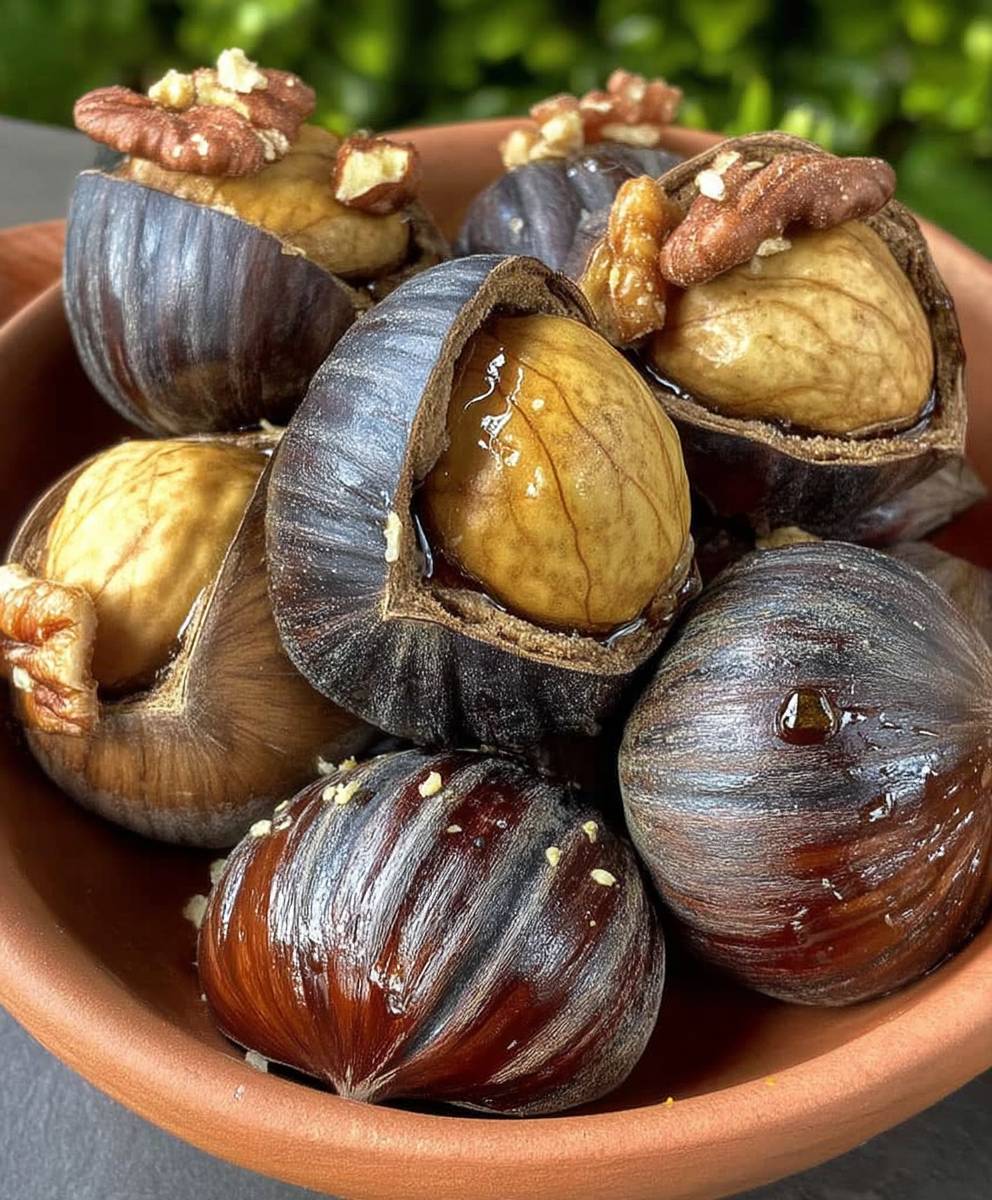
Roasted Chestnuts: the quintessential taste of autumn and winter, conjuring images of crackling fireplaces and cozy evenings. Have you ever experienced the simple joy of peeling back the warm, papery shell to reveal the sweet, nutty treasure inside? If not, you’re in for a treat! This recipe will guide you through creating perfectly roasted chestnuts at home, a delightful experience that’s easier than you might think.
The tradition of enjoying roasted chestnuts dates back centuries, with evidence suggesting their consumption as early as the Roman Empire. They were a staple food source in many parts of Europe and Asia, providing sustenance and warmth during the colder months. Street vendors selling roasted chestnuts are a common sight in European cities during the holiday season, adding to the festive atmosphere.
But why do people love them so much? It’s a combination of factors. The unique, slightly sweet flavor is incredibly satisfying, and the soft, almost creamy texture is a welcome contrast to the crisp outer shell. Plus, the aroma of roasting chestnuts is simply irresistible, filling your home with a warm and inviting scent. They’re also a relatively healthy snack, packed with fiber and nutrients. Whether you’re looking for a nostalgic treat or a new culinary adventure, learning how to roast chestnuts is a skill you’ll cherish for years to come. Let’s get started!

Ingredients:
- 2 pounds fresh chestnuts, preferably large and plump
- 1 tablespoon olive oil (optional, for a slight sheen and flavor)
- Coarse sea salt (optional, for seasoning after roasting)
- Water (for soaking)
Preparing the Chestnuts: The Crucial First Step
Okay, friends, roasting chestnuts at home is a delightful experience, but it all hinges on proper preparation. This isn’t just about tossing them in the oven; we need to ensure they don’t explode! Chestnuts have a high moisture content, and when heated, that steam needs a way to escape. Otherwise, kaboom! So, let’s get cracking (pun intended!).
- Soaking the Chestnuts: This step is often overlooked, but it’s vital. Place the chestnuts in a large bowl and cover them completely with cold water. Let them soak for at least 30 minutes, or even up to 2 hours. Soaking helps to hydrate the chestnuts, making them easier to peel after roasting and preventing them from drying out too much during the cooking process. The water also helps to clean off any dirt or debris clinging to the shells.
- Scoring the Chestnuts: This is the most important step to prevent explosions and make peeling a breeze. There are a few methods you can use, but the key is to cut through both layers of the shell.
- The “X” Method: Using a sharp paring knife or a chestnut knife (if you have one), carefully cut an “X” on the flat side of each chestnut. Make sure the “X” is large enough to penetrate both the outer shell and the inner skin. This is my preferred method because it allows for maximum steam release and easier peeling.
- The Single Slit Method: You can also make a single, long slit across the flat side of the chestnut. Again, ensure you cut through both layers of the shell. This method is a bit faster, but the “X” method tends to result in easier peeling.
- The Circle Method: Some people prefer to cut a shallow circle around the chestnut. This can be effective, but it requires a bit more precision.
Safety First! Be extremely careful when scoring the chestnuts. Use a stable cutting board and keep your fingers out of the path of the knife. A chestnut knife, with its curved blade and sturdy handle, is the safest option, but a sharp paring knife will work just fine if you’re cautious. I like to hold the chestnut firmly in my non-dominant hand, using a kitchen towel for extra grip and protection.
- Drying the Chestnuts (Optional): After scoring, you can pat the chestnuts dry with a clean kitchen towel. This isn’t strictly necessary, but it can help them roast more evenly.
Roasting the Chestnuts: Bringing Out the Flavor
Now for the fun part! Roasting is where the magic happens, transforming those hard, bland nuts into sweet, smoky delights. There are a few ways to roast chestnuts, but I’m going to share my favorite method, which involves the oven.
- Preheating the Oven: Preheat your oven to 400°F (200°C). Make sure your oven rack is positioned in the middle of the oven for even heat distribution.
- Preparing the Baking Sheet: Line a baking sheet with parchment paper. This will prevent the chestnuts from sticking and make cleanup a breeze.
- Arranging the Chestnuts: Spread the scored chestnuts in a single layer on the prepared baking sheet. Make sure they’re not overcrowded, as this can prevent them from roasting evenly. If you’re roasting a large batch, you may need to use two baking sheets.
- Adding Olive Oil (Optional): If you’re using olive oil, drizzle it lightly over the chestnuts and toss them gently to coat. This will give them a slight sheen and add a subtle savory flavor. I find that a good quality extra virgin olive oil really enhances the taste.
- Roasting Time: Place the baking sheet in the preheated oven and roast for 20-30 minutes, or until the shells begin to open up and the insides are tender. The exact roasting time will depend on the size of the chestnuts and the accuracy of your oven. Keep an eye on them and check for doneness after 20 minutes. You’ll know they’re ready when the scored “X” opens wide and the flesh inside is soft and slightly browned.
- Checking for Doneness: To check for doneness, carefully remove a chestnut from the oven (use oven mitts, they’re hot!). Let it cool slightly, then try to peel it. If the shell and inner skin come off easily, they’re ready. If they’re still clinging tightly, return the chestnuts to the oven for a few more minutes.
Peeling and Serving: The Final Reward
This is where patience comes in handy. Peeling hot chestnuts can be a bit tricky, but with the right technique, it’s manageable. The key is to peel them while they’re still warm, as the shells and skins become much harder to remove as they cool.
- Cooling Slightly: Remove the roasted chestnuts from the oven and let them cool slightly for a few minutes. You want them to be cool enough to handle without burning your fingers, but still warm enough for easy peeling.
- Peeling the Chestnuts: Using a small knife or your fingers, peel away the outer shell and the inner skin. Start at the “X” you scored earlier and work your way around the chestnut. If the chestnuts are properly roasted, the shell and skin should come off relatively easily. If you’re having trouble, try using a small paring knife to loosen the skin.
- Seasoning (Optional): While the chestnuts are still warm, you can sprinkle them with coarse sea salt to taste. This adds a nice savory contrast to their natural sweetness.
- Serving: Serve the roasted chestnuts immediately while they’re still warm. They’re delicious on their own as a snack, or you can use them in a variety of dishes, such as stuffings, soups, and stews.
Alternative Roasting Methods: For the Adventurous Cook
While oven roasting is my go-to method, there are other ways to enjoy roasted chestnuts. Here are a couple of alternatives:
Roasting Chestnuts Over an Open Fire:
This is the most traditional method, and it’s perfect for a cozy evening by the fireplace. You’ll need a chestnut roasting pan, which is a pan with holes in the bottom to allow the heat to reach the chestnuts directly. Place the scored chestnuts in the roasting pan and hold it over the hot coals or flames, shaking it occasionally to ensure even roasting. Roast for about 15-20 minutes, or until the shells begin to open and the insides are tender. Be careful not to burn the chestnuts, and keep a close eye on them. This method requires a bit more attention than oven roasting, but the smoky flavor is unbeatable.
Roasting Chestnuts in a Skillet:
If you don’t have an oven or a fireplace, you can also roast chestnuts in a skillet on the stovetop. Use a heavy-bottomed skillet, preferably cast iron. Place the scored chestnuts in the skillet and cook over medium heat, shaking the skillet frequently to prevent burning. Roast for about 20-25 minutes, or until the shells begin to open and the insides are tender. You may need to add a tablespoon or two of water to the skillet if the chestnuts start to dry out too much. This method is a bit less precise than oven roasting, but it’s a good option if you’re short on time or equipment.
Tips and Tricks for Perfect Roasted Chestnuts:
- Choose the Right Chestnuts: Look for chestnuts that are firm, heavy, and free of blemishes. Avoid chestnuts that are soft, shriveled, or have holes in the shell.
- Don’t Skip the Soaking: Soaking the chestnuts is crucial for preventing them from drying out and exploding.
- Score Deeply: Make sure you cut through both layers of the shell when scoring the chestnuts.
- Roast Evenly: Spread the chestnuts in a single layer on the baking sheet to ensure even roasting.
- Peel While Warm: Peel the chestnuts while they’re still warm for easier removal of the shell and skin.
- Experiment with Flavors: Try adding different seasonings to your roasted chestnuts, such as cinnamon, nutmeg, or rosemary.
- Storage: Store leftover roasted chestnuts in an airtight container in the refrigerator for up to 3 days.
Enjoy your homemade roasted chestnuts! They’re a delicious and festive treat that’s perfect for any occasion.
Conclusion:
And there you have it! I truly believe that these Roasted Chestnuts are more than just a snack; they’re an experience, a warm hug on a chilly evening, and a delicious reminder of simpler times. The subtle sweetness, the slightly smoky flavor, and the satisfyingly soft texture make them utterly irresistible. If you’ve never tried roasting chestnuts at home, you’re in for a real treat, and if you’re a seasoned pro, I hope this method helps you achieve chestnut perfection every single time.
Why is this recipe a must-try? Well, beyond the incredible flavor, it’s surprisingly easy! Forget complicated techniques and fancy equipment. All you need are fresh chestnuts, a baking sheet, and a little bit of patience. Plus, the aroma that fills your kitchen as they roast is simply divine a natural air freshener that smells like autumn itself! It’s a fantastic activity to do with family and friends, especially during the holiday season. Imagine gathering around the fireplace, sharing stories, and enjoying a bowl of freshly roasted chestnuts. It doesn’t get much cozier than that!
But the best part is the versatility! While I love enjoying them straight from the oven, there are so many other ways to savor these little gems.
Serving Suggestions and Variations:
* Classic Style: Simply sprinkle with a little sea salt and enjoy them warm. This is my go-to method for pure, unadulterated chestnut flavor.
* Sweet Treat: Drizzle with a touch of honey or maple syrup for a sweeter indulgence. A sprinkle of cinnamon adds a lovely warmth.
* Savory Side: Chop them up and add them to stuffing or risotto for a nutty and flavorful twist. They pair beautifully with mushrooms and herbs.
* Chestnut Puree: Blend roasted chestnuts with a little broth or cream to create a smooth and decadent puree. Serve it as a side dish or use it as a base for soups and sauces.
* Holiday Cheer: Incorporate them into your holiday baking! Add chopped chestnuts to cookies, cakes, or even bread for a festive touch.
* Glazed Chestnuts: For a truly special treat, try glazing them with a mixture of butter, sugar, and a splash of bourbon. These are perfect for holiday gatherings.
* Chestnut Flour: Grind the roasted chestnuts into flour for gluten-free baking. Chestnut flour adds a unique flavor and texture to breads, pancakes, and other baked goods.
Don’t be afraid to experiment and find your own favorite way to enjoy these delicious nuts. The possibilities are endless!
I’m so excited for you to try this recipe and experience the magic of Roasted Chestnuts for yourself. I truly believe you’ll love them as much as I do. So, gather your ingredients, preheat your oven, and get ready to create some delicious memories.
And most importantly, please share your experience! I’d love to hear how your chestnuts turned out, what variations you tried, and any tips or tricks you discovered along the way. Leave a comment below, tag me in your photos on social media, and let’s spread the chestnut love! Happy roasting! I can’t wait to see what you create. Let me know if you have any questions, and I’ll do my best to help. Enjoy!
Roasted Chestnuts: A Guide to Roasting Perfectly at Home
Classic roasted chestnuts, perfectly prepared for easy peeling and delicious flavor. A holiday favorite!
Ingredients
- 2 pounds fresh chestnuts, preferably large and plump
- 1 tablespoon olive oil (optional, for a slight sheen and flavor)
- Coarse sea salt (optional, for seasoning after roasting)
- Water (for soaking)
Instructions
- Place the chestnuts in a large bowl and cover completely with cold water. Let them soak for at least 30 minutes, or up to 2 hours.
- Using a sharp paring knife or chestnut knife, carefully cut an “X” on the flat side of each chestnut, cutting through both layers of the shell. Alternatively, make a single slit across the flat side.
- Pat the scored chestnuts dry with a clean kitchen towel.
- Preheat your oven to 400°F (200°C).
- Line a baking sheet with parchment paper.
- Spread the scored chestnuts in a single layer on the prepared baking sheet.
- Drizzle olive oil lightly over the chestnuts and toss gently to coat.
- Place the baking sheet in the preheated oven and roast for 20-30 minutes, or until the shells begin to open up and the insides are tender.
- Carefully remove a chestnut from the oven. Let it cool slightly, then try to peel it. If the shell and inner skin come off easily, they’re ready. If not, return to the oven for a few more minutes.
- Remove the roasted chestnuts from the oven and let them cool slightly for a few minutes.
- Using a small knife or your fingers, peel away the outer shell and the inner skin, starting at the “X” you scored earlier.
- While the chestnuts are still warm, sprinkle them with coarse sea salt to taste.
- Serve the roasted chestnuts immediately while they’re still warm.
Notes
- Safety First: Be extremely careful when scoring the chestnuts. Use a stable cutting board and keep your fingers out of the path of the knife.
- Don’t Skip Soaking: Soaking is crucial to prevent explosions and drying out.
- Peel While Warm: Peeling is easiest when the chestnuts are still warm.
- Alternative Roasting Methods: You can also roast chestnuts over an open fire using a chestnut roasting pan, or in a skillet on the stovetop.
- Storage: Store leftover roasted chestnuts in an airtight container in the refrigerator for up to 3 days.

Leave a Comment