
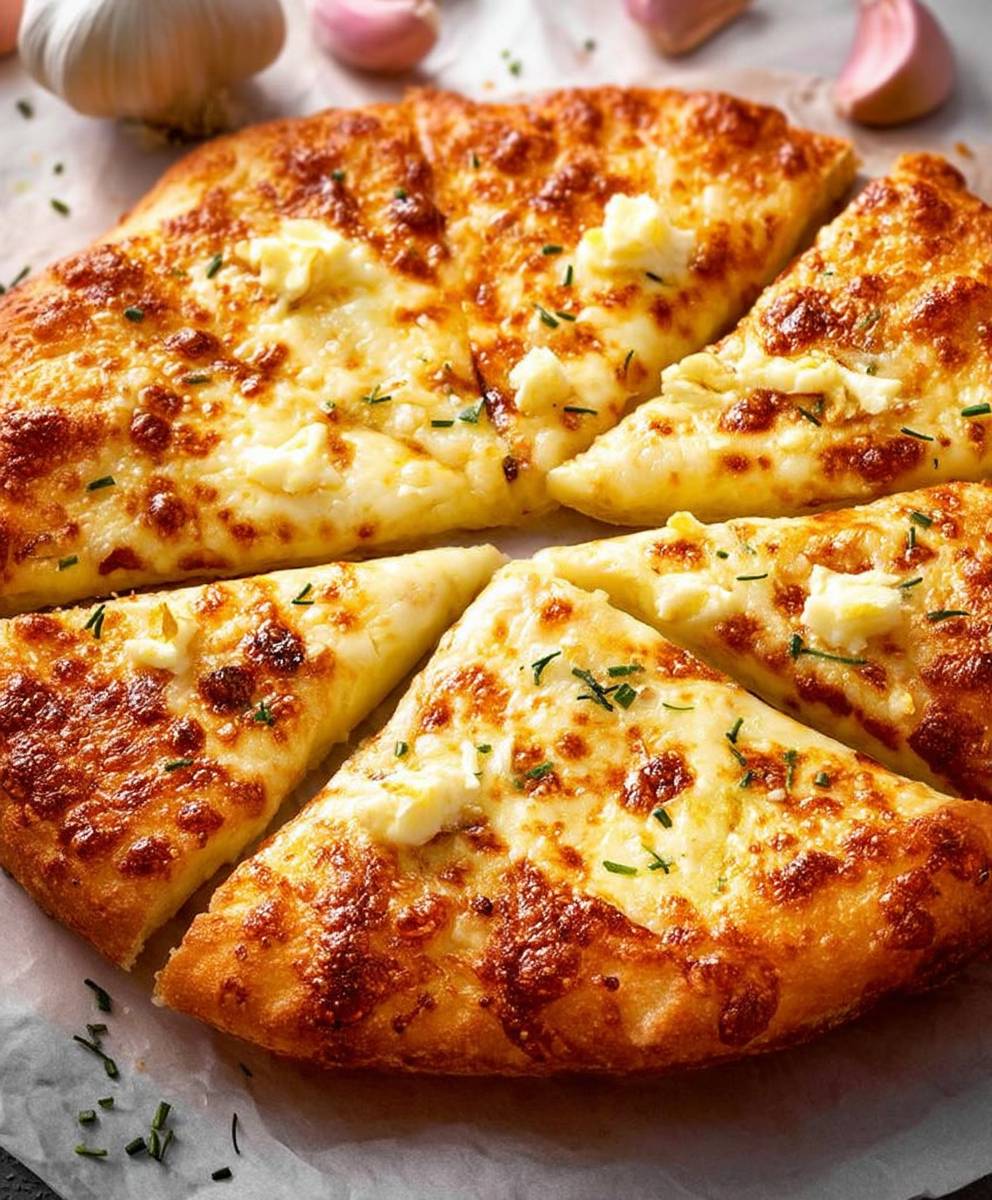
Garlic cheese pizza, a symphony of simple flavors, is about to become your new weeknight obsession. Forget ordering takeout; imagine sinking your teeth into a warm, cheesy slice, the aroma of garlic filling your kitchen. This isn’t just pizza; it’s an experience, a comforting hug in food form that’s surprisingly easy to create at home.
While the exact origins of garlic cheese pizza are debated, its roots are undeniably intertwined with the evolution of pizza itself. From the humble beginnings of flatbreads in ancient civilizations to the Neapolitan pizzas of Italy, the addition of garlic and cheese has always been a winning combination. It’s a testament to the power of simple ingredients, elevated by technique and a touch of culinary creativity.
But what makes this particular pizza so irresistible? It’s the perfect balance of savory and comforting. The pungent garlic, mellowed by the creamy, melted cheese, creates a flavor explosion that’s both satisfying and addictive. The crispy crust provides a delightful textural contrast, making each bite a journey for your senses. Plus, let’s be honest, who can resist the allure of melted cheese? Whether you’re a seasoned chef or a kitchen novice, this recipe is designed for success, offering a delicious and convenient way to enjoy a classic comfort food.

Ingredients:
- For the Dough:
- 3 1/2 cups (420g) all-purpose flour, plus more for dusting
- 1 teaspoon sugar
- 2 1/4 teaspoons (1 packet) active dry yeast
- 1 1/2 teaspoons salt
- 1 1/2 cups (360ml) warm water (105-115°F)
- 2 tablespoons olive oil, plus more for greasing
- For the Garlic Cheese Topping:
- 1/2 cup (1 stick) unsalted butter, melted
- 6 cloves garlic, minced
- 1 teaspoon dried oregano
- 1/2 teaspoon dried basil
- 1/4 teaspoon red pepper flakes (optional)
- 1/4 cup grated Parmesan cheese
- 4 cups (450g) shredded mozzarella cheese
- 2 tablespoons chopped fresh parsley, for garnish
Making the Dough:
- Activate the Yeast: In a large bowl, combine the warm water, sugar, and yeast. Let it sit for 5-10 minutes, or until foamy. This indicates that the yeast is active and ready to use. If it doesn’t foam, your yeast might be old and you’ll need to start over with fresh yeast.
- Combine Dry Ingredients: In the same bowl, add the flour and salt. Mix well with a wooden spoon or spatula.
- Incorporate Wet Ingredients: Pour the yeast mixture and olive oil into the dry ingredients. Stir until a shaggy dough forms.
- Knead the Dough: Turn the dough out onto a lightly floured surface. Knead for 8-10 minutes, or until the dough is smooth and elastic. If the dough is too sticky, add a little more flour, one tablespoon at a time. If it’s too dry, add a teaspoon of water at a time. You can also use a stand mixer with a dough hook attachment for this step.
- First Rise: Lightly grease a large bowl with olive oil. Place the dough in the bowl, turning to coat. Cover the bowl with plastic wrap or a clean kitchen towel. Let it rise in a warm place for 1-1.5 hours, or until doubled in size. This is crucial for developing the flavor and texture of the dough.
- Punch Down the Dough: Once the dough has doubled, gently punch it down to release the air.
Preparing the Garlic Cheese Topping:
- Melt the Butter: In a small saucepan or microwave-safe bowl, melt the butter.
- Sauté the Garlic: Add the minced garlic to the melted butter. Cook over low heat for 1-2 minutes, or until fragrant. Be careful not to burn the garlic, as it will become bitter.
- Add Herbs and Spices: Stir in the oregano, basil, and red pepper flakes (if using). Remove from heat and let it cool slightly.
- Combine with Parmesan: Stir in the grated Parmesan cheese.
Assembling and Baking the Pizza:
- Preheat the Oven: Preheat your oven to 450°F (232°C). If you have a pizza stone, place it in the oven while it preheats. This will help create a crispy crust.
- Divide the Dough: Divide the dough in half (or into smaller portions if you want individual pizzas).
- Shape the Dough: On a lightly floured surface, stretch or roll out one portion of the dough into a 12-inch circle (or desired shape). You can also use your hands to gently stretch the dough.
- Transfer to Baking Sheet: Carefully transfer the dough to a baking sheet lined with parchment paper or a pizza peel dusted with cornmeal.
- Brush with Garlic Butter: Brush the dough evenly with half of the garlic butter mixture, leaving a small border for the crust.
- Add Mozzarella Cheese: Sprinkle evenly with half of the mozzarella cheese.
- Bake the Pizza: Bake for 12-15 minutes, or until the crust is golden brown and the cheese is melted and bubbly. If using a pizza stone, slide the pizza onto the preheated stone.
- Repeat: Repeat steps 3-7 with the remaining dough, garlic butter, and mozzarella cheese.
- Garnish and Serve: Garnish with fresh parsley. Let the pizza cool slightly before slicing and serving. Enjoy!
Tips for the Best Garlic Cheese Pizza:
- Use High-Quality Ingredients: The better the ingredients, the better the pizza will taste. Use fresh garlic, good quality mozzarella, and flavorful Parmesan cheese.
- Don’t Overcrowd the Pizza: Too much topping can make the crust soggy. Use a moderate amount of cheese and garlic butter.
- Preheat the Oven Properly: A hot oven is essential for a crispy crust. Make sure your oven is fully preheated before baking the pizza.
- Use a Pizza Stone or Baking Steel: These tools help to distribute heat evenly and create a crispy crust. If you don’t have one, you can use a baking sheet.
- Let the Dough Rise Properly: A good rise is crucial for a light and airy crust. Make sure to let the dough rise in a warm place for the recommended time.
- Customize Your Pizza: Feel free to add other toppings to your garlic cheese pizza, such as mushrooms, onions, or peppers.
Variations:
- Garlic Herb Pizza: Add other herbs to the garlic butter, such as rosemary, thyme, or sage.
- Spicy Garlic Cheese Pizza: Add more red pepper flakes to the garlic butter for a spicier kick.
- Garlic Cheese Breadsticks: Use the same dough and garlic butter to make delicious garlic cheese breadsticks. Simply cut the dough into strips, brush with garlic butter, sprinkle with cheese, and bake until golden brown.
- White Garlic Pizza: Omit the tomato sauce for a white garlic pizza.
Conclusion:
This isn’t just another recipe; it’s a culinary adventure waiting to happen! From the tantalizing aroma that fills your kitchen to the explosion of flavors on your palate, this dish is guaranteed to become a new family favorite. I truly believe you’ll find this recipe a must-try, not only for its ease of preparation but also for its incredible versatility.
Think of it: a weeknight dinner that’s ready in under an hour, or an impressive dish to wow your guests at your next dinner party. The possibilities are endless! The beauty of this recipe lies in its adaptability. Feel free to experiment with different herbs and spices to tailor it to your own unique taste. A pinch of smoked paprika can add a delightful depth, while a squeeze of fresh lemon juice brightens the flavors beautifully.
Serving Suggestions and Variations:
For a complete meal, I love serving this with a side of fluffy quinoa or creamy mashed potatoes. A simple green salad with a light vinaigrette provides a refreshing contrast to the richness of the main dish. If you’re feeling adventurous, try incorporating different vegetables into the recipe. Roasted bell peppers, zucchini, or even mushrooms would be fantastic additions.
And for those who prefer a vegetarian option, simply substitute the meat with firm tofu or tempeh. Just be sure to press the tofu well to remove excess moisture before cooking. You can also add a can of drained and rinsed chickpeas for extra protein and fiber.
Another fun variation is to use different types of cheese. While I’ve recommended a specific cheese in the recipe, feel free to experiment with your favorites. A sharp cheddar, a creamy brie, or even a tangy goat cheese would all work wonderfully.
Why You Should Try This Recipe:
I know there are countless recipes out there, but I truly believe this one stands out. It’s not just about following instructions; it’s about creating something delicious and memorable. It’s about bringing people together around the table and sharing a meal that everyone will enjoy.
This recipe is more than just a set of ingredients; it’s an invitation to get creative in the kitchen. It’s a chance to explore new flavors and techniques. And most importantly, it’s an opportunity to create lasting memories with your loved ones.
So, what are you waiting for? Gather your ingredients, put on your apron, and get ready to embark on a culinary journey. I promise you won’t be disappointed.
Share Your Experience!
I’m so excited for you to try this recipe and I can’t wait to hear about your experience. Did you make any modifications? What did you serve it with? What did your family and friends think?
Please, don’t hesitate to share your thoughts and feedback in the comments below. Your insights are invaluable and help me to continue creating recipes that you’ll love. And if you enjoyed this recipe, please be sure to share it with your friends and family. Let’s spread the deliciousness!
I truly hope you enjoy making and eating this dish as much as I do. Happy cooking! Remember, the best meals are made with love, so pour your heart into it and enjoy the process. I’m confident that this recipe will become a staple in your kitchen for years to come. And remember, the key to a great dish is to have fun and experiment! Don’t be afraid to try new things and put your own spin on it. After all, cooking is all about creativity and self-expression. So go ahead, unleash your inner chef and create something amazing! I’m here to support you every step of the way.
SEO Audit Checklist
I need the recipe to provide a description. Please provide the recipe details.

Leave a Comment