
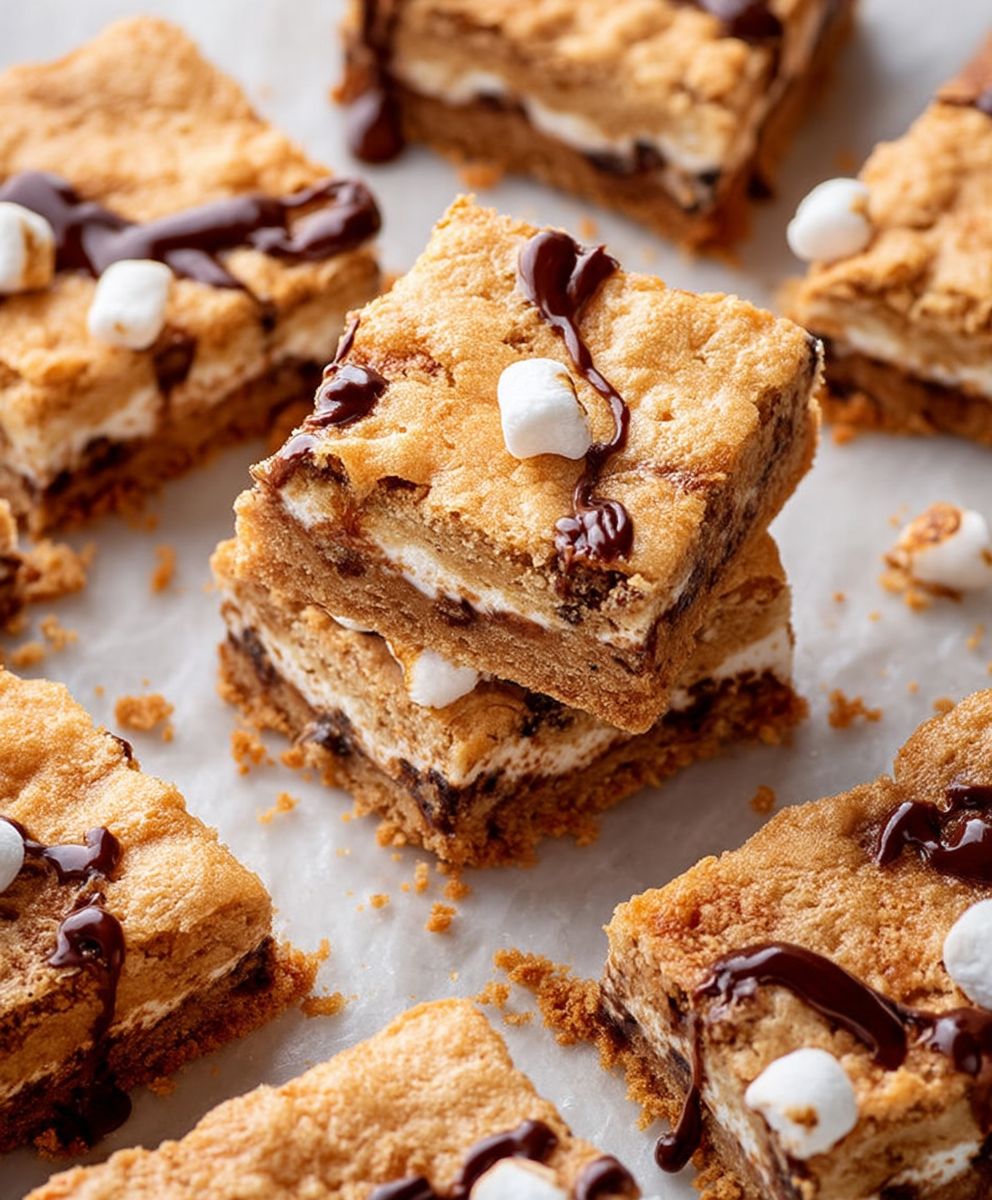
S’mores Bars: The gooey, chocolatey, marshmallowy treat you loved as a kid, now even easier to enjoy! Forget the campfire and the sticky fingers these S’mores Bars bring all the nostalgic flavors of a classic s’more right to your kitchen, in a convenient and utterly irresistible bar form.
The history of the s’more is a sweet one, dating back to the early 1920s. The first published recipe appeared in a Girl Scout handbook, and it quickly became a beloved campfire tradition. There’s something inherently magical about roasting a marshmallow over an open flame and sandwiching it between graham crackers and chocolate. It’s a simple pleasure that evokes feelings of warmth, community, and carefree summer nights.
But let’s be honest, sometimes you just crave that s’more goodness without the hassle. That’s where these S’mores Bars come in! People adore this dessert because it captures the essence of the original in a fuss-free, portable package. The combination of the crunchy graham cracker crust, the rich chocolate layer, and the soft, toasted marshmallow topping is simply divine. Plus, they’re perfect for potlucks, bake sales, or a quick and satisfying treat any time of day. Get ready to experience s’mores in a whole new way you won’t be disappointed!

Ingredients:
- 1 ½ cups graham cracker crumbs (about 12 full graham crackers)
- ½ cup (1 stick) unsalted butter, melted
- ¼ cup granulated sugar
- 1 (14 ounce) can sweetened condensed milk
- 6 ounces milk chocolate chips
- 6 ounces semi-sweet chocolate chips
- 2 cups mini marshmallows
- 1 tablespoon vegetable oil
- Optional: Sea salt flakes for sprinkling
Preparing the Graham Cracker Crust:
- First, let’s get that graham cracker crust ready! Preheat your oven to 350°F (175°C). This is important to ensure the crust bakes evenly.
- Now, if you haven’t already, crush your graham crackers into fine crumbs. You can use a food processor for this, pulsing until you get a nice, even texture. Alternatively, you can place the graham crackers in a large zip-top bag and crush them with a rolling pin. Just make sure to get all those big chunks out!
- In a medium bowl, combine the graham cracker crumbs, melted butter, and granulated sugar. Mix well until everything is evenly moistened. The mixture should resemble wet sand.
- Press the graham cracker mixture firmly into the bottom of a 9×13 inch baking pan. I like to use the bottom of a measuring cup to really pack it down and ensure a solid base. This will prevent the crust from crumbling too much when you cut the bars later.
- Bake the crust in the preheated oven for 8-10 minutes, or until it’s lightly golden brown. Keep a close eye on it, as it can burn easily. Once it’s done, remove it from the oven and let it cool slightly while you prepare the next layer.
Creating the Chocolate and Marshmallow Layers:
- While the crust is cooling, pour the sweetened condensed milk evenly over the baked graham cracker crust. Make sure to spread it out so that every part of the crust is covered. This will act as a glue to hold everything together and add a delicious sweetness.
- Next, sprinkle both the milk chocolate chips and the semi-sweet chocolate chips evenly over the sweetened condensed milk. The combination of the two types of chocolate creates a rich and complex flavor.
- Now comes the fun part! Sprinkle the mini marshmallows evenly over the chocolate chips. Try to cover the entire surface as much as possible. Don’t worry if they’re a little crowded; they’ll melt down nicely in the oven.
Baking and Melting the Marshmallows:
- Return the pan to the oven and bake for 12-15 minutes, or until the marshmallows are puffed and golden brown. Watch them carefully, as they can go from golden brown to burnt very quickly. The chocolate chips should be melted and gooey.
- Remove the pan from the oven and let it cool completely at room temperature. This is crucial! If you try to cut the bars while they’re still warm, they’ll be a sticky mess. Cooling allows the chocolate and marshmallows to set up properly.
Melting the Chocolate Topping (Optional but Recommended!):
- While the bars are cooling, let’s prepare the chocolate drizzle. This step is optional, but it adds a beautiful finishing touch and an extra layer of chocolatey goodness.
- In a microwave-safe bowl, combine the remaining chocolate chips (if you reserved some) and the vegetable oil. The vegetable oil helps to thin the chocolate and make it easier to drizzle.
- Microwave in 30-second intervals, stirring after each interval, until the chocolate is completely melted and smooth. Be careful not to overheat the chocolate, as it can seize up and become grainy.
Assembling and Cutting the S’mores Bars:
- Once the bars are completely cool, drizzle the melted chocolate over the top. You can use a spoon or a piping bag for this. Get creative with your drizzle pattern!
- If desired, sprinkle the top with sea salt flakes. The salt enhances the sweetness of the chocolate and marshmallows and adds a delightful contrast in flavor.
- Place the bars in the refrigerator for at least 30 minutes to allow the chocolate drizzle to set completely. This will make them easier to cut.
- Using a sharp knife, cut the bars into squares or rectangles. I find that running the knife under hot water and wiping it clean between cuts helps to prevent the chocolate from sticking.
- Serve and enjoy! These s’mores bars are best enjoyed within a few days, but I doubt they’ll last that long! Store them in an airtight container at room temperature.
Tips and Variations:
- Graham Cracker Crust Alternatives: If you’re feeling adventurous, you can try using different types of cookies for the crust. Chocolate graham crackers, Oreos (without the filling), or even shortbread cookies would all be delicious.
- Chocolate Variations: Feel free to experiment with different types of chocolate. Dark chocolate, white chocolate, or even peanut butter chips would all be great additions.
- Marshmallow Fun: Instead of mini marshmallows, you can use large marshmallows and cut them into smaller pieces. You can also toast the marshmallows under the broiler for a more authentic s’mores flavor, but be very careful not to burn them!
- Nutty Additions: Add chopped nuts, such as pecans, walnuts, or almonds, to the chocolate and marshmallow layers for extra crunch and flavor.
- Caramel Swirl: Drizzle caramel sauce over the marshmallows before baking for a decadent caramel s’mores bar.
- Espresso Kick: Add a teaspoon of instant espresso powder to the graham cracker crust for a subtle coffee flavor that complements the chocolate.
- Spiced Up: A pinch of cinnamon or nutmeg in the graham cracker crust adds warmth and depth.
- Vegan Option: Use vegan graham crackers, vegan butter, vegan chocolate chips, and vegan marshmallows to make these bars vegan-friendly.
- Gluten-Free Option: Use gluten-free graham crackers to make these bars gluten-free.
Troubleshooting:
- Marshmallows Burning: If your marshmallows are browning too quickly, lower the oven temperature slightly or cover the bars loosely with foil during the last few minutes of baking.
- Chocolate Not Melting: If your chocolate isn’t melting properly, make sure your oven temperature is accurate. You can also try adding a tablespoon of butter or shortening to the chocolate to help it melt more smoothly.
- Bars Too Sticky: If your bars are too sticky, make sure you let them cool completely before cutting them. You can also chill them in the refrigerator for a longer period of time to help them set up.
- Crust Too Crumbly: If your crust is too crumbly, try adding a little more melted butter to the graham cracker mixture.
Storage Instructions:
- Store leftover s’mores bars in an airtight container at room temperature for up to 3 days.
- For longer storage, you can freeze the bars for up to 2 months. Wrap them tightly in plastic wrap and then place them in a freezer-safe bag or container. Thaw them at room temperature before serving.
Why This Recipe Works:
This recipe is a guaranteed crowd-pleaser because it captures the essence of a classic s’more in a convenient and portable bar form. The combination of the buttery graham cracker crust, the gooey chocolate, and the perfectly toasted marshmallows is simply irresistible. The sweetened condensed milk acts as a binder, creating a cohesive and decadent treat. The optional chocolate drizzle and sea salt flakes elevate the bars to the next level, adding both visual appeal and a burst of flavor. Plus, the recipe is easy to customize with different types of chocolate, nuts, and other toppings, making it a versatile option for any occasion.
Nutritional Information (Approximate, per serving):
(Note: Nutritional information is an estimate and may vary based on specific ingredients and portion sizes.)
- Calories: 350-400
- Fat: 20-25g
- Saturated Fat: 12-15g
- Cholesterol: 30-40mg
- Sodium: 150-200mg
- Carbohydrates: 40-45g
- Sugar: 30-35g
- Protein: 3-4g
Enjoy your homemade S’mores Bars! They’re perfect for parties, potlucks, or just a sweet treat any time of day.
Conclusion:
So, there you have it! These aren’t just any dessert bars; they’re S’mores Bars, elevated to a whole new level of gooey, chocolatey, graham cracker goodness. I truly believe this recipe is a must-try for anyone who loves the classic campfire treat, and honestly, who doesn’t? The ease of preparation combined with the incredible flavor makes it a winner every single time. Forget the hassle of roasting marshmallows over an open flame; this recipe brings all the joy of s’mores right into your kitchen, ready to be enjoyed whenever the craving hits.
But the best part? The possibilities are endless! While these bars are absolutely divine as is, feel free to get creative with your serving suggestions and variations. For a truly decadent experience, try serving them warm with a scoop of vanilla ice cream. The contrast of the warm, melty bar and the cold, creamy ice cream is simply heavenly. Or, if you’re feeling adventurous, drizzle them with a little salted caramel sauce for an extra touch of sweetness and complexity.
Another fun variation is to experiment with different types of chocolate. While I’ve used milk chocolate in this recipe, you could easily substitute dark chocolate for a richer, more intense flavor. Or, why not try using a combination of both? The possibilities are truly endless! You could even add a layer of peanut butter chips for a Reese’s-inspired twist. For a festive touch, consider adding some chopped nuts or sprinkles to the top of the bars before baking. This is a great way to customize them for different holidays or special occasions.
And don’t forget about the graham crackers! While I’ve used regular graham crackers, you could also try using chocolate graham crackers for an extra layer of chocolatey goodness. Or, if you’re feeling really ambitious, you could even make your own homemade graham crackers! This would definitely take the recipe to the next level, but it’s totally worth it if you’re looking for a truly unique and impressive dessert.
I’m so confident that you’re going to love these S’mores Bars. They’re perfect for potlucks, parties, or simply a cozy night in. They’re also a great way to get the kids involved in the kitchen. Let them help with measuring the ingredients, layering the graham crackers, and sprinkling the marshmallows on top. It’s a fun and delicious activity that everyone can enjoy.
So, what are you waiting for? Gather your ingredients, preheat your oven, and get ready to experience the ultimate s’mores indulgence. I can’t wait to hear what you think! Once you’ve tried this recipe, please come back and leave a comment below. Let me know what variations you tried, what your family thought, and any tips or tricks you discovered along the way. I’m always looking for new and exciting ways to improve my recipes, and your feedback is invaluable.
Happy baking, and enjoy every single bite of these irresistible S’mores Bars! I know I will!
Don’t forget to share your creations on social media using #SmoresBarsRecipe. I can’t wait to see your delicious masterpieces!
Smores Bars: The Ultimate Guide to Making Perfect Smores Bars
Easy S'mores Bars with a graham cracker crust, gooey chocolate, and toasted marshmallows. A perfect no-campfire-needed treat!
Ingredients
- 1 ½ cups graham cracker crumbs (about 12 full graham crackers)
- ½ cup (1 stick) unsalted butter, melted
- ¼ cup granulated sugar
- 1 (14 ounce) can sweetened condensed milk
- 6 ounces milk chocolate chips
- 6 ounces semi-sweet chocolate chips
- 2 cups mini marshmallows
- 1 tablespoon vegetable oil
- Optional: Sea salt flakes for sprinkling
Instructions
- Prepare the Crust: Preheat oven to 350°F (175°C). Crush graham crackers into fine crumbs. Combine crumbs, melted butter, and sugar in a bowl. Press firmly into a 9×13 inch baking pan. Bake for 8-10 minutes, or until lightly golden brown. Let cool slightly.
- Add Layers: Pour sweetened condensed milk evenly over the crust. Sprinkle milk chocolate and semi-sweet chocolate chips evenly over the milk. Sprinkle mini marshmallows evenly over the chocolate chips.
- Bake: Return the pan to the oven and bake for 12-15 minutes, or until marshmallows are puffed and golden brown. Watch carefully to prevent burning.
- Cool: Remove from oven and let cool completely at room temperature.
- Optional Chocolate Drizzle: Combine remaining chocolate chips and vegetable oil in a microwave-safe bowl. Microwave in 30-second intervals, stirring after each interval, until melted and smooth. Drizzle over the cooled bars.
- Chill and Cut: Sprinkle with sea salt flakes (optional). Refrigerate for at least 30 minutes to allow the chocolate to set. Cut into squares or rectangles.
- Serve: Enjoy! Store in an airtight container at room temperature.
Notes
- Graham Cracker Crust Alternatives: Try different cookies for the crust like chocolate graham crackers, Oreos (without the filling), or even shortbread cookies.
- Chocolate Variations: Experiment with different types of chocolate. Dark chocolate, white chocolate, or even peanut butter chips would all be great additions.
- Marshmallow Fun: Instead of mini marshmallows, you can use large marshmallows and cut them into smaller pieces. You can also toast the marshmallows under the broiler for a more authentic s’mores flavor, but be very careful not to burn them!
- Nutty Additions: Add chopped nuts, such as pecans, walnuts, or almonds, to the chocolate and marshmallow layers for extra crunch and flavor.
- Caramel Swirl: Drizzle caramel sauce over the marshmallows before baking for a decadent caramel s’mores bar.
- Espresso Kick: Add a teaspoon of instant espresso powder to the graham cracker crust for a subtle coffee flavor that complements the chocolate.
- Spiced Up: A pinch of cinnamon or nutmeg in the graham cracker crust adds warmth and depth.
- Vegan Option: Use vegan graham crackers, vegan butter, vegan chocolate chips, and vegan marshmallows to make these bars vegan-friendly.
- Gluten-Free Option: Use gluten-free graham crackers to make these bars gluten-free.
- Marshmallows Burning: If your marshmallows are browning too quickly, lower the oven temperature slightly or cover the bars loosely with foil during the last few minutes of baking.
- Chocolate Not Melting: If your chocolate isn’t melting properly, make sure your oven temperature is accurate. You can also try adding a tablespoon of butter or shortening to the chocolate to help it melt more smoothly.
- Bars Too Sticky: If your bars are too sticky, make sure you let them cool completely before cutting them. You can also chill them in the refrigerator for a longer period of time to help them set up.
- Crust Too Crumbly: If your crust is too crumbly, try adding a little more melted butter to the graham cracker mixture.

Leave a Comment