
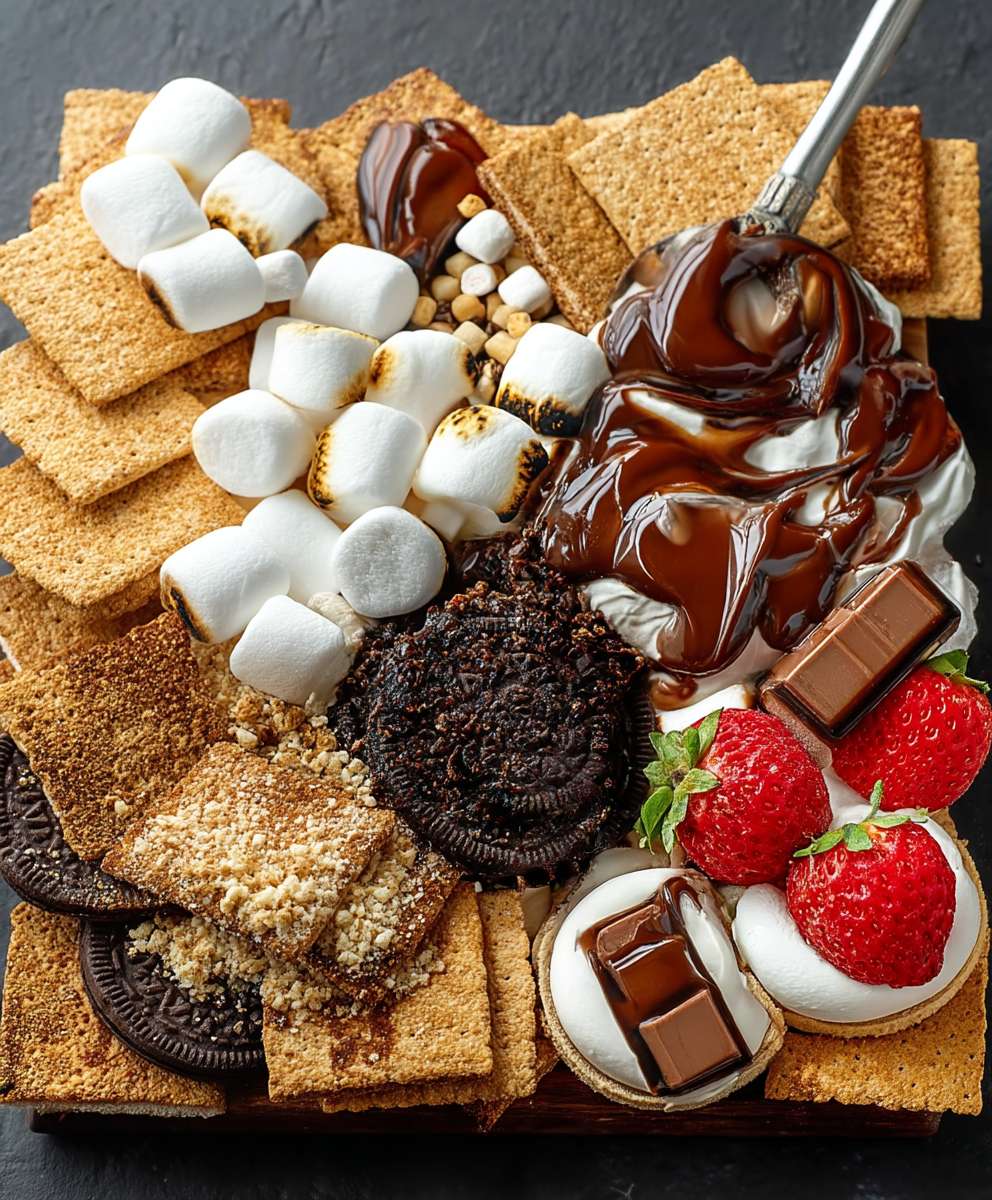
S’mores dessert board: the ultimate crowd-pleaser that transforms a classic campfire treat into an elegant and interactive dessert experience! Forget the sticky fingers and uneven roasting we’re elevating the humble s’more to a whole new level of deliciousness.
The history of s’mores is as warm and comforting as the treat itself. While the exact origin is debated, the first published recipe appeared in a Girl Scout handbook in the 1920s. Since then, s’mores have become synonymous with summer nights, campfires, and shared moments of joy. But who says you need a campfire to enjoy this iconic combination of gooey marshmallow, rich chocolate, and crisp graham cracker?
What makes s’mores so universally loved? It’s the perfect trifecta of textures and flavors: the soft, melted marshmallow, the snap of the chocolate, and the subtle sweetness of the graham cracker. And now, with a s’mores dessert board, you can customize your perfect bite with an array of gourmet chocolates, flavored marshmallows, and unique dippers. It’s a fun, interactive, and visually stunning way to enjoy a timeless classic. Get ready to impress your friends and family with this easy-to-assemble and utterly irresistible dessert!

Ingredients:
- Graham Crackers: 1 large box, preferably honey-flavored for that classic taste. Consider having a variety chocolate, cinnamon, or even gluten-free options for your guests.
- Marshmallows: 1-2 large bags. Jet-Puffed are the standard, but don’t be afraid to experiment! Jumbo marshmallows are fun, and flavored marshmallows (vanilla, strawberry) add a unique twist. Mini marshmallows are great for melting.
- Chocolate Bars: At least 3-4 different kinds. Milk chocolate is a must, but also include dark chocolate, semi-sweet, and maybe even a white chocolate option. Consider chocolate bars with additions like caramel, nuts, or sea salt.
- Peanut Butter Cups: A bag of miniature peanut butter cups adds a salty-sweet element that everyone loves.
- Cookies: Chocolate chip cookies, Oreos, shortbread cookies the possibilities are endless! These provide a different texture and flavor profile than graham crackers.
- Pretzels: Mini pretzels or pretzel sticks offer a salty crunch that balances the sweetness of the other ingredients.
- Strawberries: Fresh strawberries, washed and sliced, add a touch of freshness and acidity.
- Bananas: Sliced bananas are another great fruit option, providing a creamy texture and subtle sweetness.
- Raspberries: These add a beautiful color and tartness to the board.
- Nutella: A jar of Nutella for spreading on graham crackers or cookies.
- Peanut Butter: A jar of your favorite peanut butter (creamy or crunchy) for another spreadable option.
- Caramel Sauce: A bottle of caramel sauce for drizzling over everything.
- Sprinkles: Because everything is better with sprinkles! Choose a variety of colors and shapes.
- Shredded Coconut: Toasted or untoasted, shredded coconut adds a tropical flavor and texture.
- Sea Salt: Flaky sea salt for sprinkling over the finished smores for a salty-sweet contrast.
- Other Candies: Consider adding other candies like M&Ms, Reese’s Pieces, or chopped-up candy bars.
Preparing the S’mores Board:
- Gather Your Supplies: Before you start, make sure you have everything you need: your ingredients, a large board or platter (a wooden cutting board, a large serving platter, or even a clean baking sheet will work), small bowls or ramekins for holding smaller items, and skewers or roasting sticks for toasting the marshmallows.
- Arrange the Graham Crackers: Start by placing the graham crackers around the board. You can arrange them in neat rows or create a more casual, scattered look. Leave space between the crackers for other ingredients.
- Add the Chocolate: Next, arrange the chocolate bars around the board. Break them into smaller pieces so they are easy to grab and use. Group similar types of chocolate together.
- Place the Marshmallows: Place the marshmallows in a bowl or ramekin and position it near the chocolate and graham crackers. If you have different types of marshmallows, you can use separate bowls for each.
- Arrange the Cookies and Pretzels: Add the cookies and pretzels to the board, filling in any gaps between the graham crackers, chocolate, and marshmallows.
- Add the Fruit: Arrange the sliced strawberries, bananas, and raspberries around the board. These add a pop of color and freshness.
- Prepare the Spreads: Place the Nutella and peanut butter in small bowls or ramekins. You can also warm them slightly in the microwave to make them easier to spread.
- Add the Sauces and Toppings: Drizzle caramel sauce over some of the graham crackers or cookies. Sprinkle shredded coconut, sprinkles, and sea salt over the board.
- Fill in the Gaps: Look for any empty spaces on the board and fill them in with additional ingredients. You want the board to look abundant and inviting.
- Final Touches: Take a step back and assess the overall look of the board. Make any necessary adjustments to ensure that everything is visually appealing and easily accessible.
Setting Up for Roasting:
- Choose Your Roasting Method: You have several options for roasting the marshmallows:
- Campfire or Fire Pit: This is the classic method and provides the most authentic s’mores experience. Make sure you have a safe and controlled fire.
- Indoor Fireplace: If you have an indoor fireplace, you can use it to roast marshmallows, but be sure to take proper safety precautions.
- Gas Stove: You can roast marshmallows over a gas stove burner, but be careful not to burn them too quickly.
- Kitchen Torch: A kitchen torch is a convenient way to toast marshmallows indoors.
- Microwave: While not ideal for roasting, you can microwave marshmallows for a few seconds to soften them.
- Prepare Your Roasting Area: Set up your roasting area near the s’mores board. Make sure you have a safe and stable surface for roasting.
- Provide Roasting Sticks or Skewers: Provide each guest with a roasting stick or skewer for toasting their marshmallows. Metal skewers can get hot, so consider using wooden skewers or roasting forks with insulated handles.
- Have a Plate or Napkin Ready: Provide each guest with a plate or napkin to hold their finished s’mores.
Assembling the S’mores:
- Toast the Marshmallow: Carefully place a marshmallow on the end of a roasting stick or skewer. Hold it over the heat source, rotating it slowly until it is golden brown and slightly melted. Be careful not to burn the marshmallow.
- Assemble the S’more: Place a piece of chocolate (or a peanut butter cup, or Nutella, or whatever you like!) on a graham cracker. Carefully slide the toasted marshmallow off the roasting stick and onto the chocolate.
- Top with Another Graham Cracker: Top the marshmallow and chocolate with another graham cracker. Gently press down to sandwich everything together.
- Enjoy! Let the s’more cool slightly before taking a bite. The heat from the marshmallow will melt the chocolate, creating a gooey and delicious treat.
- Experiment with Flavors: Encourage your guests to experiment with different combinations of ingredients. Try adding fruit, pretzels, or other toppings to create unique and personalized s’mores.
Tips and Variations:
- Get Creative with the Board: Don’t be afraid to get creative with the arrangement of your s’mores board. Use different shapes and sizes of bowls and platters to add visual interest.
- Offer Dietary Options: Consider offering gluten-free graham crackers, dairy-free chocolate, and vegan marshmallows to accommodate guests with dietary restrictions.
- Make it a Theme: Create a themed s’mores board for holidays or special occasions. For example, you could create a Halloween-themed board with orange and black sprinkles and candy corn.
- Prepare Ahead: You can prepare the s’mores board ahead of time, but wait to add the fruit until just before serving to prevent it from browning.
- Keep it Fresh: Replenish the ingredients on the board as needed to keep it looking fresh and inviting.
- S’mores in a Jar: For individual servings, layer crushed graham crackers, chocolate chips, and mini marshmallows in a mason jar. Microwave for a few seconds until the marshmallows are melted.
- S’mores Dip: Combine chocolate chips and marshmallows in a cast iron skillet. Bake at 350°F (175°C) until the marshmallows are melted and golden brown. Serve with graham crackers for dipping.
- S’mores Bark: Melt chocolate and spread it on a baking sheet. Sprinkle with crushed graham crackers and mini marshmallows. Let it cool and harden before breaking it into pieces.
- S’mores Parfaits: Layer crushed graham crackers, chocolate pudding, and marshmallow fluff in a glass. Top with whipped cream and a sprinkle of graham cracker crumbs.
- S’mores Milkshake: Blend vanilla ice cream, milk, chocolate syrup, and marshmallow fluff. Top with whipped cream, crushed graham crackers, and a toasted marshmallow.
Making it Kid-Friendly:
- Smaller Portions: Use mini graham crackers and marshmallows for smaller, more manageable s’mores.
- Pre-Made S’mores: For younger children, you can pre-assemble some s’mores and microwave them for a few seconds to melt the marshmallows.
- Supervision: Always supervise children when they are roasting marshmallows.
- Cooling Time: Make sure the s’mores have cooled down slightly before giving them to children to prevent burns.
- Fun Toppings: Offer a variety of
Conclusion:
This S’mores Dessert Board isn’t just a dessert; it’s an experience! It’s a guaranteed crowd-pleaser, a conversation starter, and a delicious way to create lasting memories. The sheer versatility and customizable nature of this board make it a must-try for anyone who loves a sweet treat and enjoys sharing with friends and family. Forget the same old boring dessert options this is where the fun begins!
Why is this S’mores Dessert Board a must-try? Because it caters to everyone! Whether you’re a purist who loves the classic graham cracker, chocolate, and marshmallow combination, or an adventurous foodie eager to experiment with gourmet chocolates, flavored marshmallows, and unique dippers, this board has something for you. It’s incredibly easy to assemble, requiring minimal cooking and maximum creativity. Plus, it’s visually stunning! The vibrant colors and textures of the various ingredients create a beautiful centerpiece that will impress your guests before they even take a bite.
But the best part? The endless possibilities!
Serving Suggestions and Variations:
* For the Chocolate Lover: Offer a selection of dark, milk, and white chocolate bars. Include chocolate squares infused with sea salt, caramel, or chili for an extra kick. Chocolate-covered pretzels or even chocolate-filled wafers would be amazing additions.
* For the Fruit Fanatic: Fresh strawberries, raspberries, blueberries, and sliced bananas are fantastic dippers. Consider grilling the fruit lightly for a caramelized flavor that complements the toasted marshmallows perfectly.
* For the Adventurous Palate: Think outside the box! Peanut butter cups, cookies, brownies cut into bite-sized pieces, and even potato chips can add a surprising and delightful twist. Flavored marshmallows like salted caramel, vanilla bean, or even peppermint can elevate the experience.
* Seasonal Twists: Adapt the board to the seasons! In the fall, add pumpkin spice marshmallows and apple slices. During the holidays, include peppermint bark and gingerbread cookies. In the summer, use fresh berries and tropical fruits.
* Dietary Considerations: Offer gluten-free graham crackers and vegan marshmallows to accommodate guests with dietary restrictions. Sugar-free chocolate is also a great option for those watching their sugar intake.
* Presentation is Key: Arrange the ingredients artfully on a large wooden board or platter. Use small bowls and ramekins to hold smaller items like sprinkles or sauces. Add some greenery, like sprigs of rosemary or mint, for a touch of elegance.I truly believe that this S’mores Dessert Board will become a new favorite in your household. It’s perfect for birthday parties, holiday gatherings, casual get-togethers, or even just a fun family night in. The joy of creating your own personalized s’mores is something that everyone can enjoy.
So, what are you waiting for? Gather your ingredients, unleash your creativity, and prepare to indulge in the ultimate s’mores experience. I’m confident that you’ll love this recipe as much as I do.
And most importantly, I want to hear about your creations! Please, try this recipe and share your photos and experiences in the comments below. Let me know what variations you tried, what your guests loved, and any tips or tricks you discovered along the way. I can’t wait to see your amazing S’mores Dessert Boards! Happy s’mores-making!
Smores Dessert Board: The Ultimate Guide to a Perfect S'mores Bar
Create a fun and interactive S'mores Board with a variety of graham crackers, chocolates, marshmallows, fruits, and toppings for a customizable dessert experience. Perfect for parties, gatherings, or a special family treat!
Ingredients
- 1 large box Graham Crackers (honey-flavored, chocolate, cinnamon, or gluten-free)
- 1-2 large bags Marshmallows (Jet-Puffed, jumbo, flavored, or mini)
- 3-4 different kinds of Chocolate Bars (milk, dark, semi-sweet, white, caramel, nuts, or sea salt)
- 1 bag miniature Peanut Butter Cups
- Cookies (chocolate chip, Oreos, shortbread)
- Mini Pretzels or Pretzel Sticks
- Fresh Strawberries, washed and sliced
- Sliced Bananas
- Raspberries
- 1 jar Nutella
- 1 jar Peanut Butter (creamy or crunchy)
- 1 bottle Caramel Sauce
- Sprinkles (variety of colors and shapes)
- Shredded Coconut (toasted or untoasted)
- Flaky Sea Salt
- Other Candies (M&Ms, Reese’s Pieces, chopped-up candy bars)
Instructions
- Gather Your Supplies: Collect all ingredients, a large board or platter, small bowls/ramekins, and skewers/roasting sticks.
- Arrange the Graham Crackers: Place graham crackers around the board, leaving space for other ingredients.
- Add the Chocolate: Arrange chocolate bars around the board, broken into smaller pieces. Group similar types together.
- Place the Marshmallows: Put marshmallows in a bowl/ramekin near the chocolate and graham crackers. Use separate bowls for different types.
- Arrange the Cookies and Pretzels: Add cookies and pretzels to fill gaps between other ingredients.
- Add the Fruit: Arrange sliced strawberries, bananas, and raspberries around the board.
- Prepare the Spreads: Place Nutella and peanut butter in small bowls/ramekins. Warm slightly for easier spreading.
- Add the Sauces and Toppings: Drizzle caramel sauce over some crackers/cookies. Sprinkle shredded coconut, sprinkles, and sea salt over the board.
- Fill in the Gaps: Fill any empty spaces with additional ingredients for an abundant look.
- Final Touches: Assess the board and make adjustments for visual appeal and accessibility.
- Choose Your Roasting Method: Campfire, indoor fireplace, gas stove, kitchen torch, or microwave.
- Prepare Your Roasting Area: Set up a safe and stable roasting area near the board.
- Provide Roasting Sticks/Skewers: Give each guest a roasting stick or skewer.
- Have a Plate/Napkin Ready: Provide each guest with a plate or napkin.
- Toast the Marshmallow: Place a marshmallow on a skewer and roast over heat until golden brown and slightly melted.
- Assemble the S’more: Place chocolate (or other toppings) on a graham cracker. Slide the toasted marshmallow onto the chocolate.
- Top with Another Graham Cracker: Top with another graham cracker and gently press down.
- Enjoy! Let cool slightly before eating.
- Experiment with Flavors: Encourage guests to try different combinations of ingredients.
Notes
- Get creative with the board arrangement.
- Offer gluten-free, dairy-free, and vegan options.
- Create a themed board for holidays or special occasions.
- Prepare the board ahead of time, but add fruit just before serving.
- Replenish ingredients as needed.
- Consider S’mores in a Jar, S’mores Dip, S’mores Bark, S’mores Parfaits, or S’mores Milkshake variations.
- Use smaller portions for kids.
- Pre-make s’mores for younger children.
- Supervise children when roasting marshmallows.
- Ensure s’mores have cooled before giving them to children.
- Offer fun toppings for kids.

Leave a Comment