
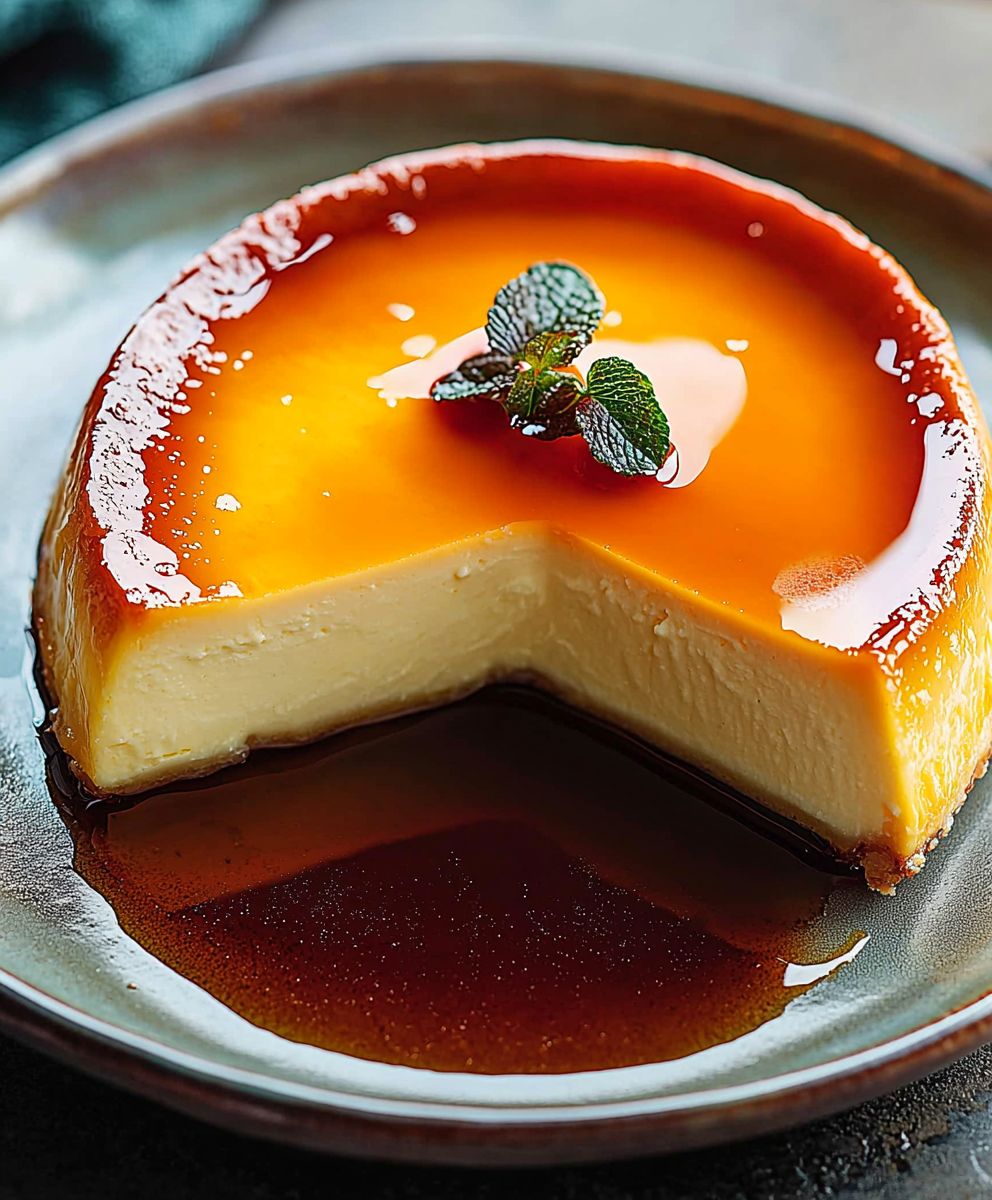
Spanish Flan, that creamy, dreamy custard dessert, is calling your name! Imagine a silky smooth, vanilla-infused custard, baked to golden perfection and then drizzled with a luscious caramel sauce. Are you drooling yet? I know I am! This isn’t just a dessert; it’s an experience, a taste of sunshine and sweet memories.
Flan, in its various forms, has a rich history stretching back to the Roman Empire. However, the Spanish Flan we know and love today evolved in Spain, becoming a staple in households and restaurants alike. It’s a testament to simple ingredients transformed into something truly extraordinary. Passed down through generations, each family often has their own secret twist, making every bite a unique and cherished experience.
What makes this dessert so universally adored? It’s the perfect combination of textures the smooth, melt-in-your-mouth custard against the slightly bitter, yet intensely sweet caramel. It’s also surprisingly easy to make, requiring minimal ingredients and effort for maximum impact. Whether you’re looking for a show-stopping dessert for a dinner party or a comforting treat to enjoy on a quiet evening, Spanish Flan is always the answer. So, let’s get baking and create some magic in the kitchen!

Ingredients:
- 1 cup granulated sugar, for the caramel
- 1 (12 ounce) can evaporated milk
- 1 (14 ounce) can sweetened condensed milk
- 5 large eggs
- 1 teaspoon vanilla extract
- Pinch of salt
- Optional: 1/4 cup of brandy or rum for added flavor
Making the Caramel:
- Prepare your baking dish: I like to use a 9-inch round cake pan for my flan. Make sure it’s oven-safe! You can also use individual ramekins if you prefer individual servings.
- Melt the sugar: Pour the 1 cup of granulated sugar into a heavy-bottomed saucepan. Use medium heat. It’s crucial to use medium heat to prevent burning the sugar.
- Watch it closely: As the sugar heats, it will start to melt. At first, it might look clumpy. Don’t worry, just keep a close eye on it.
- Gentle stirring (optional): You can gently stir the sugar with a heat-resistant spatula or spoon as it melts, but avoid over-stirring. Over-stirring can cause the sugar to crystallize. If you see crystals forming, add a tablespoon of water and continue heating.
- Achieve the amber color: Continue heating the sugar until it melts completely and turns a beautiful amber color. This is the key to a perfect caramel flavor. Be careful not to let it get too dark, or it will taste burnt.
- Pour into the pan: Once the caramel is ready, carefully pour it into the prepared baking dish. Tilt the pan to evenly coat the bottom and sides with the caramel. Work quickly, as the caramel will harden as it cools.
- Let it cool and harden: Set the pan aside to allow the caramel to cool and harden completely. This usually takes about 15-20 minutes.
Preparing the Flan Custard:
- Preheat your oven: Preheat your oven to 350°F (175°C). This is important to ensure even cooking of the flan.
- Combine the milks: In a large bowl, whisk together the evaporated milk and sweetened condensed milk until well combined. This creates the creamy base for the flan.
- Add the eggs: Add the 5 large eggs to the milk mixture. Whisk gently until just combined. Be careful not to over-whisk, as this can incorporate too much air into the custard, which can cause it to be less smooth.
- Incorporate the vanilla and salt: Add the vanilla extract and a pinch of salt to the mixture. Whisk gently to combine. The vanilla enhances the flavor of the flan, and the salt balances the sweetness.
- Optional: Add brandy or rum: If you’re using brandy or rum, add it to the custard mixture now. This adds a lovely depth of flavor to the flan.
- Strain the custard (optional but recommended): For an extra smooth flan, strain the custard mixture through a fine-mesh sieve into a pitcher or measuring cup. This removes any lumps or bits of egg that may not have fully incorporated.
Baking the Flan:
- Prepare the water bath: A water bath is essential for baking flan. It helps to cook the custard gently and evenly, preventing it from cracking or curdling. Place the baking dish with the hardened caramel in a larger baking pan. A roasting pan works well.
- Pour in the custard: Carefully pour the custard mixture into the baking dish over the hardened caramel.
- Add hot water to the water bath: Pour hot water into the larger baking pan, around the baking dish, until the water reaches about halfway up the sides of the flan dish. Be careful not to splash any water into the custard.
- Bake: Carefully transfer the entire setup to the preheated oven. Bake for 50-60 minutes, or until the flan is set but still slightly jiggly in the center. The baking time may vary depending on your oven, so it’s important to check it regularly.
- Check for doneness: To check if the flan is done, gently shake the pan. The flan should be set around the edges but still slightly jiggly in the center. You can also insert a knife into the center of the flan. If it comes out clean, the flan is done.
- Cooling process: Turn off the oven and crack the oven door slightly. Let the flan cool in the oven for about an hour. This allows the flan to cool gradually and prevents it from cracking.
- Refrigerate: After cooling in the oven, remove the flan from the water bath and let it cool completely at room temperature. Then, cover it with plastic wrap and refrigerate for at least 4 hours, or preferably overnight. This allows the flan to set completely and develop its flavor.
Unmolding and Serving:
- Loosen the edges: Before unmolding, run a thin knife or spatula around the edges of the flan to loosen it from the pan.
- Invert onto a plate: Place a serving plate over the top of the baking dish. Holding the plate and the baking dish firmly together, quickly invert them. The flan should release from the pan and the caramel will drizzle over the top.
- Tap if necessary: If the flan doesn’t release immediately, gently tap the bottom of the baking dish.
- Serve and enjoy: Serve the flan chilled. The caramel will have softened and created a delicious sauce. Enjoy!
Tips for Success:
- Don’t burn the caramel: Keep a close eye on the sugar as it melts to prevent it from burning. Burnt caramel will taste bitter and ruin the flavor of the flan.
- Use a water bath: A water bath is essential for baking flan. It helps to cook the custard gently and evenly, preventing it from cracking or curdling.
- Don’t overbake: Overbaking the flan can make it tough and rubbery. Bake it until it is set around the edges but still slightly jiggly in the center.
- Refrigerate thoroughly: Refrigerating the flan for at least 4 hours, or preferably overnight, allows it to set completely and develop its flavor.
- Strain the custard: Straining the custard mixture through a fine-mesh sieve will remove any lumps or bits of egg that may not have fully incorporated, resulting in a smoother flan.
- Experiment with flavors: Feel free to experiment with different flavors. You can add a pinch of cinnamon, a few drops of almond extract, or even a little bit of coffee to the custard mixture.
Troubleshooting:
- Cracked flan: If your flan cracks, it’s likely because it was baked at too high of a temperature or for too long. Make sure to use a water bath and check the flan regularly while it’s baking.
- Rubbery flan: If your flan is rubbery, it’s likely because it was overbaked. Bake it until it is set around the edges but still slightly jiggly in the center.
- Caramel stuck to the pan: If the caramel is stuck to the pan, try running a thin knife or spatula around the edges of the pan to loosen it. You can also try placing the pan in a bowl of warm water for a few minutes to help loosen the caramel.
- Flan not setting: If your flan is not setting, it’s likely because it was not baked long enough. Bake it until it is set around the edges but still slightly jiggly in the center. You may also need to refrigerate it for a longer period of time.
Variations:
- Coconut Flan: Add 1/2 cup of shredded coconut to the custard mixture for a tropical twist.
- Chocolate Flan: Add 1/4 cup of unsweetened cocoa powder to the custard mixture for a chocolatey treat.
- Coffee Flan: Add 1 tablespoon of instant coffee granules to the custard mixture for a coffee-flavored flan.
- Orange Flan: Add the zest of one orange to the custard mixture for a citrusy flavor.
Conclusion:
This isn’t just another dessert recipe; it’s an invitation to experience a taste of sunshine and tradition. The creamy, melt-in-your-mouth texture, the delicate sweetness, and that signature caramel drizzle it all comes together to create a truly unforgettable experience. I genuinely believe that this Spanish Flan recipe is a must-try for anyone who appreciates simple elegance and exquisite flavor. It’s surprisingly easy to make, and the results are guaranteed to impress, whether you’re serving it to family, friends, or just treating yourself to a little something special. Think of it: the smooth, cool flan gliding down your palate, the rich caramel dancing on your tongue. It’s pure bliss! And the best part? You can easily adapt this recipe to suit your own preferences. For a richer, more decadent experience, try using heavy cream instead of whole milk. Or, if you’re feeling adventurous, infuse the milk with a cinnamon stick or a vanilla bean while it’s heating. A touch of orange zest added to the custard mixture can also elevate the flavor profile, adding a bright, citrusy note that complements the caramel beautifully. Serving suggestions are endless! While the classic presentation of a simple flan, unmolded onto a plate and drizzled with its own caramel sauce, is always a winner, you can also get creative. Consider topping it with fresh berries, such as raspberries or strawberries, for a pop of color and a burst of freshness. A sprinkle of toasted almonds or chopped pistachios adds a delightful crunch and nutty flavor. For a truly indulgent treat, serve it alongside a scoop of vanilla ice cream or a dollop of whipped cream. And if you’re looking for a sophisticated pairing, a glass of sweet sherry or dessert wine will perfectly complement the flan’s delicate sweetness. Don’t be intimidated by the idea of making caramel from scratch. It’s easier than you think! Just remember to keep a close eye on it and stir it constantly to prevent burning. And if you’re worried about unmolding the flan, simply run a thin knife around the edges of the ramekins or baking dish before inverting it onto a plate. A little patience and a gentle tap should do the trick. I’ve poured my heart into perfecting this recipe, and I’m confident that you’ll love it as much as I do. It’s a dish that evokes memories of warm summer evenings and shared laughter, and I hope it brings the same joy to your table. So, go ahead, gather your ingredients, and get ready to create a little magic in your kitchen. I’m so excited for you to try this Spanish Flan recipe! Once you’ve made it, please, please, please share your experience with me! Let me know how it turned out, what variations you tried, and what your family and friends thought. Did you add a special twist? Did you find a particularly delicious pairing? I’m always eager to learn from your culinary adventures and to hear your feedback. You can leave a comment below, tag me on social media, or send me an email. I can’t wait to see your creations and to hear your stories! Happy baking! PrintSpanish Flan: The Ultimate Guide to Making Perfect Flan

A classic, creamy flan with a rich caramel topping. This decadent dessert is surprisingly easy to make at home with simple ingredients.
- Prep Time: 25 minutes
- Cook Time: 50 minutes
- Total Time: 300 minutes
- Yield: 6–8 servings 1x
Ingredients
- 1 cup granulated sugar, for the caramel
- 1 (12 ounce) can evaporated milk
- 1 (14 ounce) can sweetened condensed milk
- 5 large eggs
- 1 teaspoon vanilla extract
- Pinch of salt
- Optional: 1/4 cup of brandy or rum for added flavor
Instructions
- Prepare your baking dish: Use a 9-inch round cake pan (oven-safe) or individual ramekins.
- Melt the sugar: Pour the 1 cup of granulated sugar into a heavy-bottomed saucepan. Use medium heat.
- Watch it closely: As the sugar heats, it will start to melt.
- Gentle stirring (optional): You can gently stir the sugar with a heat-resistant spatula or spoon as it melts, but avoid over-stirring. If you see crystals forming, add a tablespoon of water and continue heating.
- Achieve the amber color: Continue heating the sugar until it melts completely and turns a beautiful amber color. Be careful not to let it get too dark, or it will taste burnt.
- Pour into the pan: Once the caramel is ready, carefully pour it into the prepared baking dish. Tilt the pan to evenly coat the bottom and sides with the caramel. Work quickly, as the caramel will harden as it cools.
- Let it cool and harden: Set the pan aside to allow the caramel to cool and harden completely. This usually takes about 15-20 minutes.
- Preheat your oven: Preheat your oven to 350°F (175°C).
- Combine the milks: In a large bowl, whisk together the evaporated milk and sweetened condensed milk until well combined.
- Add the eggs: Add the 5 large eggs to the milk mixture. Whisk gently until just combined. Be careful not to over-whisk.
- Incorporate the vanilla and salt: Add the vanilla extract and a pinch of salt to the mixture. Whisk gently to combine.
- Optional: Add brandy or rum: If you’re using brandy or rum, add it to the custard mixture now.
- Strain the custard (optional but recommended): For an extra smooth flan, strain the custard mixture through a fine-mesh sieve into a pitcher or measuring cup.
- Prepare the water bath: Place the baking dish with the hardened caramel in a larger baking pan (roasting pan works well).
- Pour in the custard: Carefully pour the custard mixture into the baking dish over the hardened caramel.
- Add hot water to the water bath: Pour hot water into the larger baking pan, around the baking dish, until the water reaches about halfway up the sides of the flan dish. Be careful not to splash any water into the custard.
- Bake: Carefully transfer the entire setup to the preheated oven. Bake for 50-60 minutes, or until the flan is set but still slightly jiggly in the center.
- Check for doneness: Gently shake the pan. The flan should be set around the edges but still slightly jiggly in the center. You can also insert a knife into the center of the flan. If it comes out clean, the flan is done.
- Cooling process: Turn off the oven and crack the oven door slightly. Let the flan cool in the oven for about an hour.
- Refrigerate: After cooling in the oven, remove the flan from the water bath and let it cool completely at room temperature. Then, cover it with plastic wrap and refrigerate for at least 4 hours, or preferably overnight.
- Loosen the edges: Before unmolding, run a thin knife or spatula around the edges of the flan to loosen it from the pan.
- Invert onto a plate: Place a serving plate over the top of the baking dish. Holding the plate and the baking dish firmly together, quickly invert them. The flan should release from the pan and the caramel will drizzle over the top.
- Tap if necessary: If the flan doesn’t release immediately, gently tap the bottom of the baking dish.
- Serve and enjoy: Serve the flan chilled. The caramel will have softened and created a delicious sauce. Enjoy!
Notes
- Don’t burn the caramel: Keep a close eye on the sugar as it melts to prevent it from burning. Burnt caramel will taste bitter and ruin the flavor of the flan.
- Use a water bath: A water bath is essential for baking flan. It helps to cook the custard gently and evenly, preventing it from cracking or curdling.
- Don’t overbake: Overbaking the flan can make it tough and rubbery. Bake it until it is set around the edges but still slightly jiggly in the center.
- Refrigerate thoroughly: Refrigerating the flan for at least 4 hours, or preferably overnight, allows it to set completely and develop its flavor.
- Strain the custard: Straining the custard mixture through a fine-mesh sieve will remove any lumps or bits of egg that may not have fully incorporated, resulting in a smoother flan.
- Experiment with flavors: Feel free to experiment with different flavors. You can add a pinch of cinnamon, a few drops of almond extract, or even a little bit of coffee to the custard mixture.

Leave a Comment