
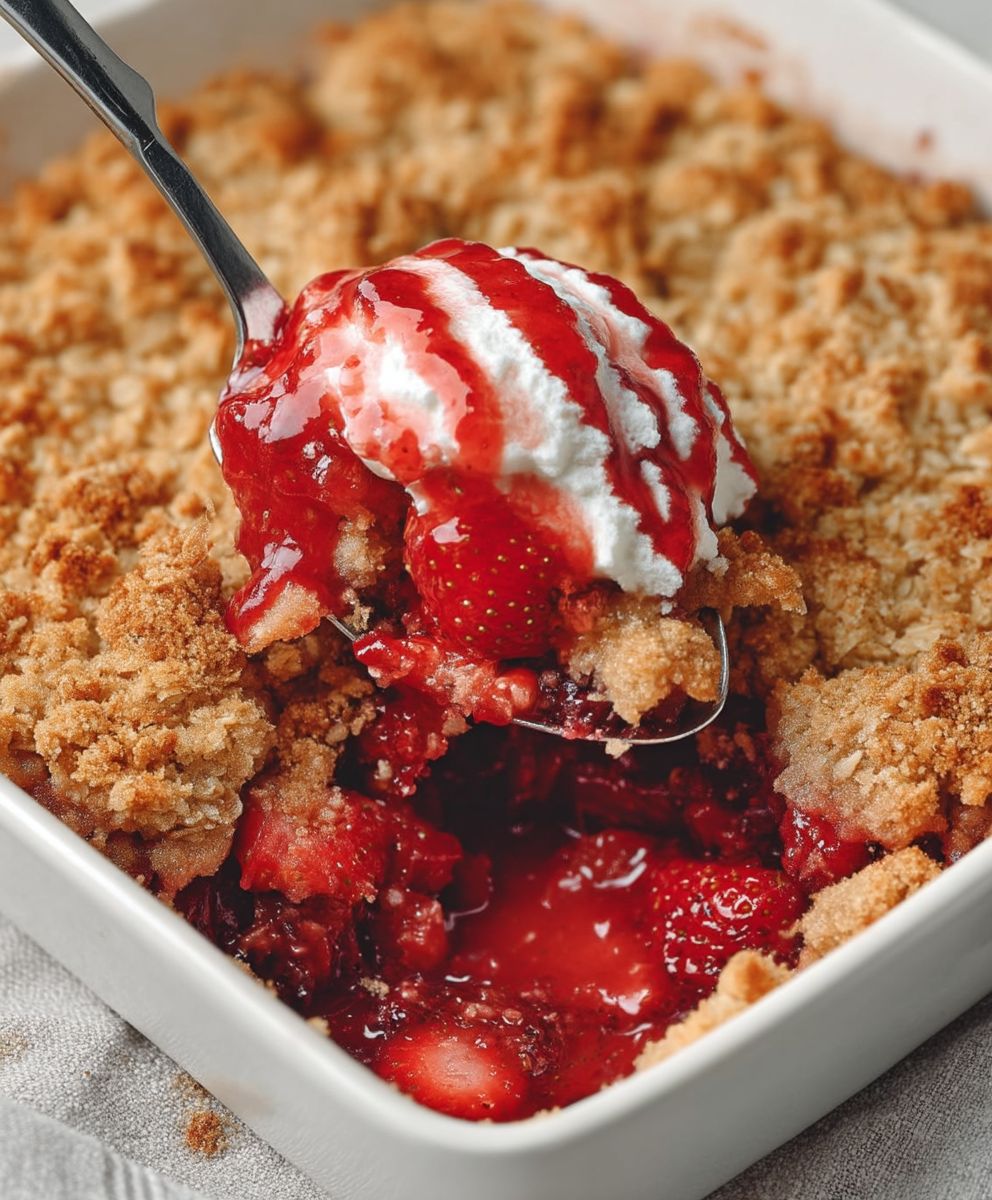
Strawberry Crisp: the very words conjure images of warm, bubbling fruit, a golden-brown, crumbly topping, and a scoop of melting vanilla ice cream. Is there anything more comforting and evocative of summer than this classic dessert? I think not! This isn’t just a recipe; it’s a memory waiting to be made.
While the exact origins of fruit crisps are debated, they rose to prominence in American and British kitchens during World War II. Butter and flour were rationed, making traditional pies a challenge. The resourceful home cook turned to oats and other readily available ingredients to create a satisfying topping, and the crisp was born! It became a symbol of making the most of what you had, a testament to the power of simple ingredients transformed into something extraordinary.
But beyond its humble beginnings, the enduring appeal of strawberry crisp lies in its delightful simplicity and irresistible combination of textures and flavors. The sweet, slightly tart strawberries, softened and intensified by baking, mingle beautifully with the buttery, crunchy topping. It’s a symphony of sweet and savory, soft and crisp, that dances on your palate. Plus, let’s be honest, it’s incredibly easy to make! Forget fussy pie crusts; this recipe comes together in minutes, making it the perfect dessert for busy weeknights or impromptu gatherings. So, grab a bowl of fresh strawberries, and let’s get baking!

Ingredients:
- For the Strawberry Filling:
- 6 cups fresh strawberries, hulled and sliced
- 1/2 cup granulated sugar
- 2 tablespoons all-purpose flour
- 1 tablespoon lemon juice
- 1/2 teaspoon vanilla extract
- Pinch of salt
- For the Crisp Topping:
- 1 cup all-purpose flour
- 1 cup rolled oats (not instant)
- 3/4 cup packed brown sugar
- 1/2 teaspoon ground cinnamon
- 1/4 teaspoon ground nutmeg
- 1/2 cup (1 stick) cold unsalted butter, cut into small cubes
- 1/4 cup chopped pecans or walnuts (optional)
Preparing the Strawberry Filling:
- Prep the Strawberries: First, you’ll want to wash your strawberries thoroughly. Then, hull them (remove the green tops) and slice them into pieces that are about 1/4 to 1/2 inch thick. I like to slice them a bit thicker so they retain some texture during baking, but it’s really up to your preference.
- Combine Filling Ingredients: In a large bowl, gently toss the sliced strawberries with the granulated sugar, all-purpose flour, lemon juice, vanilla extract, and a pinch of salt. The flour will help to thicken the juices as the crisp bakes, and the lemon juice brightens the flavor of the strawberries. Be gentle when tossing so you don’t crush the strawberries.
- Transfer to Baking Dish: Pour the strawberry mixture into a 9-inch square baking dish or a similar-sized oven-safe dish. Make sure the strawberries are evenly distributed in the dish. This will ensure even baking and a beautiful presentation.
Making the Crisp Topping:
- Combine Dry Ingredients: In a separate medium-sized bowl, whisk together the all-purpose flour, rolled oats, brown sugar, cinnamon, and nutmeg. The oats give the topping a wonderful texture, and the spices add warmth and depth of flavor. Make sure everything is well combined.
- Cut in the Butter: Add the cold, cubed butter to the dry ingredients. Using a pastry blender or your fingertips, cut the butter into the flour mixture until it resembles coarse crumbs. The key here is to keep the butter cold, as this will create pockets of steam during baking, resulting in a wonderfully crumbly topping. If using your fingertips, work quickly to prevent the butter from melting.
- Add Nuts (Optional): If you’re using nuts, stir them into the crisp topping mixture. Pecans or walnuts add a nice crunch and nutty flavor that complements the strawberries perfectly.
Assembling and Baking the Strawberry Crisp:
- Distribute the Topping: Sprinkle the crisp topping evenly over the strawberry filling in the baking dish. Make sure to cover the entire surface of the strawberries. You can gently press the topping down slightly to help it adhere to the filling.
- Bake: Preheat your oven to 375°F (190°C). Bake the strawberry crisp for 30-40 minutes, or until the topping is golden brown and the strawberry filling is bubbly. Keep an eye on it towards the end of the baking time to prevent the topping from burning. If the topping starts to brown too quickly, you can loosely tent the dish with aluminum foil.
- Cool Slightly: Remove the strawberry crisp from the oven and let it cool for at least 15-20 minutes before serving. This allows the filling to thicken slightly and prevents it from being too runny.
Serving Suggestions:
Strawberry crisp is delicious served warm, either on its own or with a scoop of vanilla ice cream, a dollop of whipped cream, or a drizzle of caramel sauce. The warm, bubbly strawberries and the crunchy topping create a delightful contrast of textures and flavors. Here are some other serving ideas:
- With Ice Cream: A classic pairing! The cold ice cream melts slightly into the warm crisp, creating a heavenly combination. Vanilla, strawberry, or even a nutty ice cream would be delicious.
- With Whipped Cream: A light and airy whipped cream adds a touch of elegance to the crisp. You can even flavor the whipped cream with a hint of vanilla or almond extract.
- With Yogurt: For a slightly healthier option, serve the crisp with a dollop of Greek yogurt. The tanginess of the yogurt complements the sweetness of the strawberries.
- With Custard: A rich and creamy custard sauce is another decadent option.
- Plain: Honestly, it’s so good on its own that you don’t even need any toppings!
Tips and Variations:
Here are some tips and variations to help you customize your strawberry crisp:
- Use Different Berries: Feel free to substitute some of the strawberries with other berries, such as blueberries, raspberries, or blackberries. A mixed berry crisp is always a crowd-pleaser.
- Add Other Fruits: You can also add other fruits, such as rhubarb or apples, to the strawberry filling. Rhubarb adds a tartness that balances the sweetness of the strawberries, while apples add a comforting warmth.
- Use Gluten-Free Flour: To make this crisp gluten-free, simply substitute the all-purpose flour with a gluten-free all-purpose flour blend. Make sure to choose a blend that contains xanthan gum for best results.
- Make it Vegan: To make this crisp vegan, use a vegan butter substitute and ensure that your sugar is vegan-friendly (some granulated sugar is processed using bone char).
- Add Spices: Experiment with different spices in the crisp topping. A pinch of ground ginger or cardamom would add a unique flavor.
- Make it Ahead: You can assemble the strawberry crisp ahead of time and store it in the refrigerator for up to 24 hours before baking. This is a great option if you’re preparing for a party or gathering. Just add a few minutes to the baking time.
- Freeze it: Baked strawberry crisp can be frozen for up to 2 months. Let it cool completely before wrapping it tightly in plastic wrap and then in aluminum foil. To reheat, bake from frozen at 350°F (175°C) for about 30-40 minutes, or until heated through.
- Adjust Sweetness: Taste the strawberries before adding the sugar. If they are very sweet, you may need to reduce the amount of sugar in the filling.
- Don’t Overbake: Overbaking can result in a dry topping and a mushy filling. Keep an eye on the crisp and remove it from the oven when the topping is golden brown and the filling is bubbly.
Troubleshooting:
Here are some common problems and solutions:
- Topping is Burning: If the topping is browning too quickly, loosely tent the dish with aluminum foil.
- Filling is Too Runny: Make sure you’re using enough flour in the filling. You can also add a tablespoon of cornstarch to the filling for extra thickening power.
- Topping is Too Dry: Make sure you’re using enough butter in the topping. You can also add a tablespoon of milk or cream to the topping for extra moisture.
- Strawberries are Too Tart: Add a little more sugar to the filling.
Nutritional Information (Approximate):
Please note that the nutritional information is an estimate and may vary depending on the specific ingredients used.
- Calories: Approximately 350-400 per serving
- Fat: 15-20g
- Saturated Fat: 8-12g
- Cholesterol: 30-40mg
- Sodium: 100-150mg
- Carbohydrates: 50-60g
- Fiber: 3-5g
- Sugar: 30-40g
- Protein: 3-5g
Enjoy your homemade Strawberry Crisp! I hope you find this recipe easy to follow and delicious. Let me know in the comments if you have any questions or if you try any variations!
Conclusion:
This Strawberry Crisp isn’t just another dessert; it’s a warm hug on a plate, a burst of summer sunshine even on the gloomiest of days. The sweet, slightly tart strawberries bubbling beneath a golden, buttery oat topping create a symphony of textures and flavors that’s simply irresistible. I truly believe this recipe is a must-try for anyone who appreciates simple, comforting, and utterly delicious desserts. It’s the kind of dish that evokes memories of childhood, of family gatherings, and of pure, unadulterated joy.
But the best part? It’s incredibly easy to make! You don’t need to be a seasoned baker to whip up this masterpiece. The ingredients are readily available, the instructions are straightforward, and the results are consistently amazing. Seriously, even if you’ve never baked a day in your life, I’m confident you can nail this Strawberry Crisp.
Now, let’s talk about serving suggestions and variations, because that’s where the real fun begins! My personal favorite is to serve it warm, straight from the oven, with a generous scoop of vanilla bean ice cream melting over the top. The contrast between the warm crisp and the cold ice cream is heavenly. But don’t stop there! A dollop of freshly whipped cream, a drizzle of honey, or a sprinkle of chopped nuts would also be fantastic additions.
Feeling adventurous? Try adding a touch of almond extract to the strawberry filling for a subtle nutty flavor. Or, if you’re a fan of spice, a pinch of cinnamon or nutmeg in the topping will add a warm, comforting note. You could even experiment with different fruits! While this recipe is specifically for Strawberry Crisp, it works beautifully with other berries like raspberries, blueberries, or blackberries. A mixed berry crisp would be absolutely divine! You could also add a layer of rhubarb under the strawberries for a more tart and complex flavor profile.
For a slightly healthier twist, you can substitute some of the butter in the topping with coconut oil or applesauce. You can also use whole wheat flour or almond flour instead of all-purpose flour. And if you’re looking for a vegan option, simply use a vegan butter substitute and ensure your oats are certified gluten-free if needed. The possibilities are endless!
I’ve poured my heart and soul into perfecting this recipe, and I’m so excited for you to try it. I truly believe this Strawberry Crisp will become a staple in your kitchen, a go-to dessert for any occasion. Whether you’re hosting a dinner party, celebrating a special occasion, or simply craving a sweet treat, this recipe is sure to impress.
So, what are you waiting for? Gather your ingredients, preheat your oven, and get ready to experience the magic of this incredible Strawberry Crisp. I promise you won’t be disappointed.
And most importantly, I want to hear about your experience! Once you’ve made this recipe, please come back and leave a comment below. Let me know what you thought, what variations you tried, and how much you enjoyed it. Your feedback is invaluable to me, and I love hearing from my readers. Share your photos on social media too, and tag me so I can see your creations! Happy baking! I can’t wait to hear all about your Strawberry Crisp adventures!
Strawberry Crisp: The Ultimate Guide to Baking Perfection
Warm and comforting Strawberry Crisp with a sweet, bubbly strawberry filling and a golden, crumbly oat topping. Perfect with ice cream or whipped cream!
Ingredients
- 6 cups fresh strawberries, hulled and sliced
- 1/2 cup granulated sugar
- 2 tablespoons all-purpose flour
- 1 tablespoon lemon juice
- 1/2 teaspoon vanilla extract
- Pinch of salt
- 1 cup all-purpose flour
- 1 cup rolled oats (not instant)
- 3/4 cup packed brown sugar
- 1/2 teaspoon ground cinnamon
- 1/4 teaspoon ground nutmeg
- 1/2 cup (1 stick) cold unsalted butter, cut into small cubes
- 1/4 cup chopped pecans or walnuts (optional)
Instructions
- Prep the Strawberries: Wash, hull, and slice the strawberries into 1/4 to 1/2 inch thick pieces.
- Combine Filling Ingredients: In a large bowl, gently toss the sliced strawberries with the granulated sugar, all-purpose flour, lemon juice, vanilla extract, and a pinch of salt.
- Transfer to Baking Dish: Pour the strawberry mixture into a 9-inch square baking dish, ensuring even distribution.
- Combine Dry Ingredients (Topping): In a separate bowl, whisk together the all-purpose flour, rolled oats, brown sugar, cinnamon, and nutmeg.
- Cut in the Butter (Topping): Add the cold, cubed butter to the dry ingredients. Using a pastry blender or your fingertips, cut the butter into the flour mixture until it resembles coarse crumbs.
- Add Nuts (Optional – Topping): Stir in the chopped pecans or walnuts, if using.
- Distribute the Topping: Sprinkle the crisp topping evenly over the strawberry filling in the baking dish.
- Bake: Preheat oven to 375°F (190°C). Bake for 30-40 minutes, or until the topping is golden brown and the strawberry filling is bubbly. If the topping browns too quickly, tent with foil.
- Cool Slightly: Let cool for at least 15-20 minutes before serving.
Notes
- Serve warm with vanilla ice cream, whipped cream, yogurt, or custard.
- Substitute some strawberries with other berries like blueberries, raspberries, or blackberries.
- Add other fruits like rhubarb or apples to the strawberry filling.
- Use gluten-free all-purpose flour blend to make it gluten-free.
- Use vegan butter substitute and vegan-friendly sugar to make it vegan.
- Experiment with different spices in the crisp topping like ground ginger or cardamom.
- Assemble ahead of time and store in the refrigerator for up to 24 hours before baking.
- Baked strawberry crisp can be frozen for up to 2 months.
- Adjust sweetness based on the strawberries.
- Don’t overbake.

Leave a Comment