
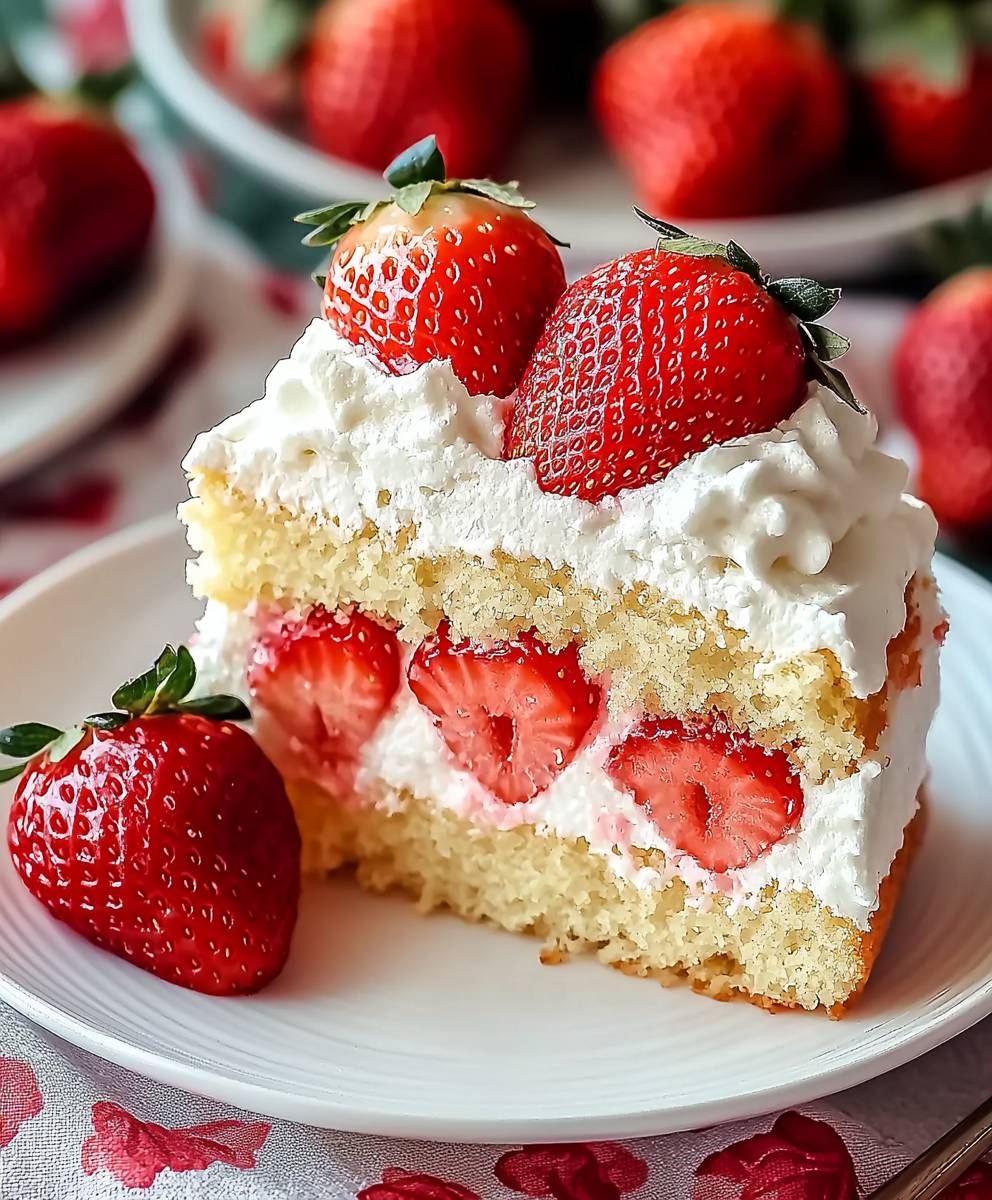
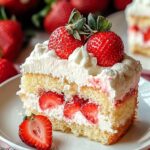
Strawberry Shortcake Cake: Prepare to be transported to a summery paradise with every single bite! Imagine the fluffy, tender crumb of a classic shortcake, but amplified into a show-stopping cake, layered with sweet, juicy strawberries and clouds of whipped cream. This isn’t just dessert; it’s an experience.
While the exact origins of strawberry shortcake are debated, its roots can be traced back to England, where similar biscuit-like cakes were enjoyed with fruit and cream. It quickly gained popularity in America, becoming a beloved summer staple, especially around strawberry season. The beauty of a classic strawberry shortcake lies in its simplicity, but this Strawberry Shortcake Cake elevates that simplicity to a whole new level of deliciousness.
What makes this cake so irresistible? It’s the perfect combination of textures and flavors. The slightly crumbly, yet moist cake provides a delightful contrast to the soft, yielding strawberries and the light, airy whipped cream. The sweetness of the berries is perfectly balanced by the subtle tang of the cake, creating a symphony of flavors that will leave you wanting more. Plus, it’s surprisingly easy to make! Whether you’re celebrating a special occasion or simply craving a taste of summer, this cake is guaranteed to be a crowd-pleaser. Let’s get baking!

Ingredients:
- For the Cake:
- 2 ½ cups all-purpose flour
- 1 tablespoon baking powder
- ½ teaspoon baking soda
- ½ teaspoon salt
- 1 cup (2 sticks) unsalted butter, softened
- 1 ¾ cups granulated sugar
- 2 large eggs
- 1 teaspoon vanilla extract
- 1 cup buttermilk
- For the Strawberry Filling:
- 4 cups fresh strawberries, hulled and sliced
- ½ cup granulated sugar
- 2 tablespoons lemon juice
- For the Whipped Cream Frosting:
- 2 cups heavy cream
- ½ cup powdered sugar
- 1 teaspoon vanilla extract
Preparing the Cake Batter
- Preheat and Prep: First things first, let’s get that oven ready! Preheat your oven to 350°F (175°C). Grease and flour two 9-inch round cake pans. I like to use baking spray with flour already in it it makes life so much easier! You can also line the bottom of the pans with parchment paper rounds for extra insurance against sticking.
- Combine Dry Ingredients: In a large bowl, whisk together the flour, baking powder, baking soda, and salt. Whisking is key here to make sure everything is evenly distributed. This will help your cake rise beautifully and have a nice, even texture.
- Cream Butter and Sugar: In a separate large bowl (or the bowl of your stand mixer), cream together the softened butter and granulated sugar until light and fluffy. This usually takes about 3-5 minutes on medium speed. Don’t rush this step! The creaming process incorporates air into the butter and sugar, which is essential for a tender cake.
- Add Eggs and Vanilla: Beat in the eggs one at a time, then stir in the vanilla extract. Make sure each egg is fully incorporated before adding the next. This prevents the batter from curdling.
- Alternate Wet and Dry Ingredients: Gradually add the dry ingredients to the wet ingredients, alternating with the buttermilk, beginning and ending with the dry ingredients. I usually do this in three additions. So, add about a third of the dry ingredients, then half of the buttermilk, then another third of the dry ingredients, the remaining buttermilk, and finally the last third of the dry ingredients. Mix until just combined. Be careful not to overmix! Overmixing develops the gluten in the flour, which can result in a tough cake.
- Divide and Bake: Divide the batter evenly between the prepared cake pans. Spread the batter evenly in each pan. Bake for 25-30 minutes, or until a wooden skewer inserted into the center comes out clean.
- Cool the Cakes: Let the cakes cool in the pans for 10 minutes before inverting them onto a wire rack to cool completely. Make sure the cakes are completely cool before frosting. Warm cakes will melt the frosting and make a mess!
Making the Strawberry Filling
- Prepare the Strawberries: While the cakes are baking and cooling, let’s make the strawberry filling. In a medium bowl, combine the sliced strawberries, granulated sugar, and lemon juice.
- Macerate the Strawberries: Gently stir the mixture and let it sit for at least 30 minutes, or up to an hour, at room temperature. This process, called maceration, draws out the juices from the strawberries and creates a delicious, syrupy sauce. Stir occasionally.
- Drain (Optional): If you prefer a thicker filling, you can drain some of the excess juice from the strawberries before assembling the cake. I usually leave it as is, because I love the extra strawberry flavor!
Whipping the Cream
- Chill Everything: Make sure your heavy cream, bowl, and whisk (or whisk attachment for your stand mixer) are all well-chilled. This is crucial for getting stiff peaks. I sometimes even put the bowl and whisk in the freezer for 15-20 minutes before whipping.
- Whip the Cream: In the chilled bowl, combine the heavy cream, powdered sugar, and vanilla extract. Beat on medium-high speed until stiff peaks form. Be careful not to overwhip, or you’ll end up with butter! You’ll know you have stiff peaks when you lift the whisk and the cream holds its shape.
Assembling the Strawberry Shortcake Cake
- Level the Cakes (Optional): If your cakes have a slight dome, you can use a serrated knife to level them. This will make the cake easier to frost and stack.
- Place First Layer: Place one cake layer on a serving plate or cake stand.
- Add Strawberry Filling: Spread about half of the strawberry filling evenly over the first cake layer.
- Add Whipped Cream: Spread about one-third of the whipped cream over the strawberry filling.
- Place Second Layer: Carefully place the second cake layer on top of the whipped cream.
- Frost the Cake: Frost the top and sides of the cake with the remaining whipped cream. You can use a spatula or a piping bag to create a decorative finish.
- Garnish (Optional): Garnish the cake with additional sliced strawberries, if desired. You can also sprinkle some powdered sugar on top for a pretty presentation.
- Chill and Serve: Refrigerate the cake for at least 30 minutes before serving. This will allow the flavors to meld together and the frosting to set. Enjoy!
Conclusion:
This Strawberry Shortcake Cake isn’t just a dessert; it’s a celebration of summer flavors, a nostalgic trip to childhood picnics, and a guaranteed crowd-pleaser. I truly believe this recipe is a must-try because it perfectly balances the light, airy texture of a classic shortcake with the convenience and visual appeal of a cake. Forget fussy individual shortcakes this is a showstopper that’s surprisingly simple to make. The moist cake layers, the luscious whipped cream, and the burst of fresh strawberry flavor create a symphony of textures and tastes that will leave everyone wanting more. But the best part? It’s incredibly versatile! While I’ve shared my go-to recipe, feel free to experiment and make it your own. For a richer flavor, try using brown butter in the cake batter. It adds a nutty depth that complements the sweetness of the strawberries beautifully. Or, if you’re feeling adventurous, incorporate a layer of homemade strawberry jam between the cake layers for an extra intense strawberry experience. Serving Suggestions and Variations: * Classic Presentation: Slice and serve with an extra dollop of whipped cream and a few fresh strawberry slices. A sprig of mint adds a touch of elegance. * Berry Medley: Don’t limit yourself to just strawberries! Add blueberries, raspberries, or blackberries for a mixed berry shortcake cake that’s bursting with antioxidants and flavor. * Grilled Cake: For a unique twist, grill slices of the cake for a smoky char that pairs perfectly with the sweet strawberries and cream. * Individual Parfaits: Crumble the cake and layer it with whipped cream and strawberries in individual glasses for a delightful parfait. * Boozy Boost: A splash of Grand Marnier or Kirsch in the strawberry mixture adds a sophisticated touch for adult gatherings. * Dairy-Free Delight: Use coconut cream instead of whipped cream for a delicious dairy-free version. You can also substitute the butter in the cake with a plant-based alternative. * Chocolate Strawberry Shortcake Cake: Add cocoa powder to the cake batter for a chocolatey twist. This recipe for Strawberry Shortcake Cake is more than just a set of instructions; it’s an invitation to create something special. It’s about bringing joy to your loved ones and savoring the simple pleasures of life. I’ve poured my heart into perfecting this recipe, and I’m confident that you’ll love it as much as I do. So, what are you waiting for? Gather your ingredients, preheat your oven, and get ready to bake a cake that will become a family favorite. I can’t wait to hear about your experiences! Please, try this recipe and share your photos and feedback in the comments below. Let me know what variations you tried and how they turned out. Did you add a secret ingredient? Did you make it for a special occasion? I’m eager to learn from your culinary adventures and see your beautiful creations. Happy baking! PrintStrawberry Shortcake Cake: The Ultimate Recipe and Baking Guide
Tender vanilla cake layered with sweet strawberry filling and fluffy whipped cream frosting. A perfect summer dessert!
- Prep Time: 45 minutes
- Cook Time: 30 minutes
- Total Time: 75
- Yield: 8–10 servings 1x
Ingredients
- 2 ½ cups all-purpose flour
- 1 tablespoon baking powder
- ½ teaspoon baking soda
- ½ teaspoon salt
- 1 cup (2 sticks) unsalted butter, softened
- 1 ¾ cups granulated sugar
- 2 large eggs
- 1 teaspoon vanilla extract
- 1 cup buttermilk
- 4 cups fresh strawberries, hulled and sliced
- ½ cup granulated sugar
- 2 tablespoons lemon juice
- 2 cups heavy cream
- ½ cup powdered sugar
- 1 teaspoon vanilla extract
Instructions
- Preheat and Prep: Preheat your oven to 350°F (175°C). Grease and flour two 9-inch round cake pans. You can also line the bottom of the pans with parchment paper rounds.
- Combine Dry Ingredients: In a large bowl, whisk together the flour, baking powder, baking soda, and salt.
- Cream Butter and Sugar: In a separate large bowl (or the bowl of your stand mixer), cream together the softened butter and granulated sugar until light and fluffy (3-5 minutes on medium speed).
- Add Eggs and Vanilla: Beat in the eggs one at a time, then stir in the vanilla extract. Make sure each egg is fully incorporated before adding the next.
- Alternate Wet and Dry Ingredients: Gradually add the dry ingredients to the wet ingredients, alternating with the buttermilk, beginning and ending with the dry ingredients. Mix until just combined. Be careful not to overmix!
- Divide and Bake: Divide the batter evenly between the prepared cake pans. Spread the batter evenly in each pan. Bake for 25-30 minutes, or until a wooden skewer inserted into the center comes out clean.
- Cool the Cakes: Let the cakes cool in the pans for 10 minutes before inverting them onto a wire rack to cool completely. Make sure the cakes are completely cool before frosting.
- Prepare the Strawberries: While the cakes are baking and cooling, let’s make the strawberry filling. In a medium bowl, combine the sliced strawberries, granulated sugar, and lemon juice.
- Macerate the Strawberries: Gently stir the mixture and let it sit for at least 30 minutes, or up to an hour, at room temperature. Stir occasionally.
- Drain (Optional): If you prefer a thicker filling, you can drain some of the excess juice from the strawberries before assembling the cake.
- Chill Everything: Make sure your heavy cream, bowl, and whisk (or whisk attachment for your stand mixer) are all well-chilled.
- Whip the Cream: In the chilled bowl, combine the heavy cream, powdered sugar, and vanilla extract. Beat on medium-high speed until stiff peaks form. Be careful not to overwhip, or you’ll end up with butter!
- Level the Cakes (Optional): If your cakes have a slight dome, you can use a serrated knife to level them.
- Place First Layer: Place one cake layer on a serving plate or cake stand.
- Add Strawberry Filling: Spread about half of the strawberry filling evenly over the first cake layer.
- Add Whipped Cream: Spread about one-third of the whipped cream over the strawberry filling.
- Place Second Layer: Carefully place the second cake layer on top of the whipped cream.
- Frost the Cake: Frost the top and sides of the cake with the remaining whipped cream. You can use a spatula or a piping bag to create a decorative finish.
- Garnish (Optional): Garnish the cake with additional sliced strawberries, if desired. You can also sprinkle some powdered sugar on top for a pretty presentation.
- Chill and Serve: Refrigerate the cake for at least 30 minutes before serving. This will allow the flavors to meld together and the frosting to set. Enjoy!
Notes
- For best results, use room temperature ingredients for the cake batter.
- Don’t overmix the cake batter, as this can result in a tough cake.
- Make sure the cakes are completely cool before frosting to prevent the frosting from melting.
- Chilling the bowl and whisk before whipping the cream helps to create stiff peaks.
- The strawberry filling can be made ahead of time and stored in the refrigerator for up to 24 hours.


Leave a Comment