
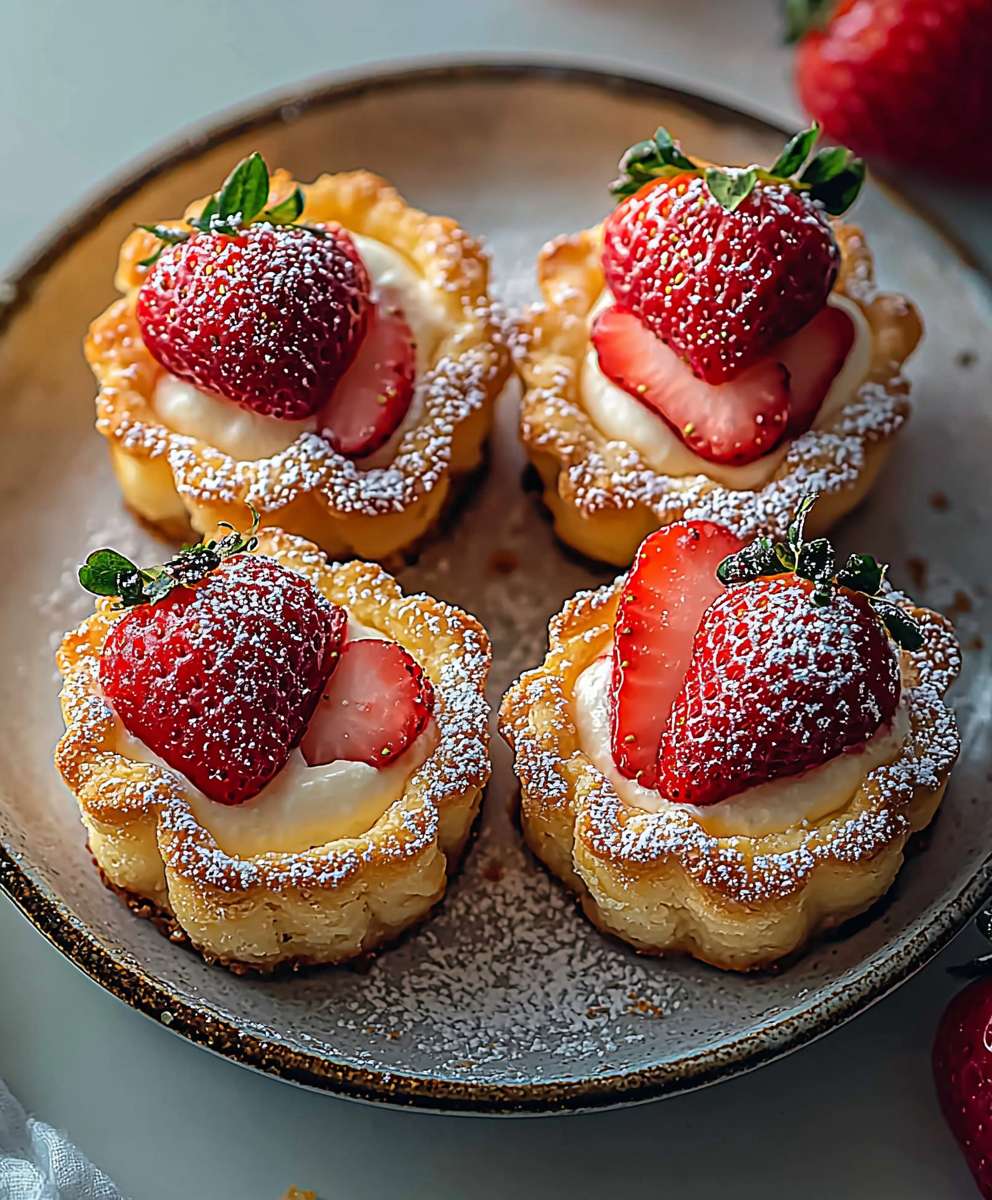
Strawberry Tartlets: Prepare to be captivated by these miniature marvels of pastry and fruit! Imagine biting into a buttery, crumbly crust, giving way to a luscious, creamy filling, all crowned with glistening, ruby-red strawberries. These aren’t just desserts; they’re tiny bites of pure summer bliss.
While the exact origins of tartlets are debated, their lineage can be traced back to medieval pies and tarts. Over time, these larger creations evolved into the elegant, individual portions we know and love today. The addition of strawberries, a fruit cherished for its vibrant color and sweet-tart flavor, elevates the humble tartlet to a truly special treat.
What makes strawberry tartlets so irresistible? It’s the perfect balance of textures and flavors. The crisp, shortbread-like crust provides a delightful contrast to the smooth, rich filling. And of course, the strawberries themselves offer a burst of freshness that awakens the palate. They are also incredibly versatile! Perfect for afternoon tea, elegant desserts at dinner parties, or even a delightful treat to brighten up a weekday. Plus, their individual size makes them ideal for portion control (if you can resist having more than one!). So, let’s embark on a journey to create these delightful little gems in your own kitchen!

Ingredients:
- For the Sweet Shortcrust Pastry:
- 250g (2 cups) all-purpose flour, plus extra for dusting
- 125g (1/2 cup + 2 tablespoons) cold unsalted butter, cubed
- 50g (1/4 cup) icing sugar, sifted
- 1 large egg yolk
- 2-3 tablespoons ice water
- Pinch of salt
- For the Pastry Cream Filling:
- 500ml (2 cups) whole milk
- 1 vanilla bean, split lengthwise and seeds scraped (or 1 teaspoon vanilla extract)
- 100g (1/2 cup) granulated sugar
- 4 large egg yolks
- 40g (1/3 cup) cornstarch
- 25g (2 tablespoons) unsalted butter, softened
- For the Strawberry Topping:
- 500g (about 1 pound) fresh strawberries, hulled and halved or quartered depending on size
- 2 tablespoons strawberry jam or apricot jam
- 1 tablespoon water
Making the Sweet Shortcrust Pastry:
- Combine Dry Ingredients: In a large bowl, whisk together the flour, icing sugar, and salt. This ensures the icing sugar is evenly distributed and prevents lumps.
- Add Butter: Add the cold, cubed butter to the flour mixture. Using your fingertips or a pastry blender, rub or cut the butter into the flour until the mixture resembles coarse breadcrumbs. The key here is to work quickly so the butter doesn’t melt. Small pieces of butter create flaky layers in the crust.
- Incorporate Egg Yolk: Make a well in the center of the flour mixture. Add the egg yolk and 2 tablespoons of ice water. Use a fork to gently mix the wet ingredients into the dry ingredients.
- Add More Water (If Needed): If the dough seems too dry, add the remaining tablespoon of ice water, a little at a time, until the dough just comes together. Be careful not to overwork the dough, as this will develop the gluten and make the crust tough.
- Form the Dough: Gently bring the dough together into a disc. Wrap it tightly in plastic wrap and refrigerate for at least 30 minutes, or preferably 1 hour. This allows the gluten to relax and the butter to firm up, making the dough easier to roll out.
- Roll Out the Dough: On a lightly floured surface, roll out the dough to about 1/8 inch thickness. Rotate the dough as you roll to ensure it’s even and doesn’t stick to the surface.
- Cut Out Tartlet Rounds: Use a round cookie cutter or a sharp knife to cut out circles of dough slightly larger than the tartlet tins. I usually use a 3-inch cutter for standard tartlet tins.
- Line the Tartlet Tins: Gently press the dough circles into the tartlet tins, making sure the dough is evenly distributed and reaches the edges. Use your fingers to trim any excess dough from the edges. You can also use a rolling pin to roll over the top of the tins to trim the edges neatly.
- Dock the Crusts: Use a fork to prick the bottom of each tartlet crust several times. This prevents the crust from puffing up during baking.
- Chill Again: Place the lined tartlet tins in the refrigerator for another 15-20 minutes. This helps the crusts hold their shape during baking.
Baking the Tartlet Shells:
- Preheat Oven: Preheat your oven to 375°F (190°C).
- Blind Bake: Line each tartlet crust with parchment paper and fill with pie weights, dried beans, or rice. This prevents the crust from shrinking or puffing up during baking.
- Bake with Weights: Bake for 15 minutes.
- Remove Weights: Carefully remove the parchment paper and pie weights.
- Bake Until Golden: Return the tartlet shells to the oven and bake for another 5-10 minutes, or until they are golden brown. Keep a close eye on them to prevent burning.
- Cool Completely: Remove the tartlet shells from the oven and let them cool completely in the tins before filling.
Making the Pastry Cream Filling:
- Infuse the Milk: In a medium saucepan, combine the milk and vanilla bean (or vanilla extract). Heat over medium heat until just simmering. Remove from heat and let steep for 15-20 minutes to infuse the milk with vanilla flavor. If using vanilla extract, add it after the milk has cooled slightly.
- Whisk Egg Yolks and Sugar: In a separate bowl, whisk together the egg yolks and granulated sugar until pale and slightly thickened.
- Add Cornstarch: Whisk in the cornstarch until smooth. This is crucial to prevent lumps in your pastry cream.
- Temper the Egg Yolks: Slowly pour about 1/2 cup of the hot milk into the egg yolk mixture, whisking constantly to temper the eggs. This prevents the eggs from scrambling when added to the hot milk.
- Combine and Cook: Pour the tempered egg yolk mixture into the saucepan with the remaining hot milk. Cook over medium heat, whisking constantly, until the mixture thickens and comes to a boil. Continue to cook for 1-2 minutes, whisking vigorously, to ensure the cornstarch is fully cooked and the pastry cream is thick and smooth.
- Remove from Heat: Remove the saucepan from the heat and stir in the softened butter until melted and fully incorporated. This adds richness and shine to the pastry cream.
- Strain (Optional): For an extra smooth pastry cream, strain it through a fine-mesh sieve into a clean bowl. This will remove any lumps or cooked egg particles.
- Cool and Chill: Cover the pastry cream with plastic wrap, pressing the plastic wrap directly onto the surface to prevent a skin from forming. Refrigerate for at least 2 hours, or preferably overnight, to allow the pastry cream to cool completely and thicken further.
Assembling the Strawberry Tartlets:
- Prepare the Strawberries: Wash and hull the strawberries. Cut them in half or quarter them, depending on their size. You want them to be a manageable size for topping the tartlets.
- Make the Glaze: In a small saucepan, combine the strawberry jam (or apricot jam) and water. Heat over low heat, stirring constantly, until the jam is melted and smooth. Strain the glaze through a fine-mesh sieve to remove any seeds or lumps. This will give you a beautiful, glossy finish.
- Fill the Tartlet Shells: Spoon or pipe the chilled pastry cream into the cooled tartlet shells, filling them to the top.
- Arrange the Strawberries: Arrange the strawberry halves or quarters on top of the pastry cream in a decorative pattern. You can create a simple circular pattern or get creative with your arrangement.
- Glaze the Strawberries: Brush the strawberries with the warm glaze. This will give them a beautiful shine and help to preserve them.
- Chill (Optional): Refrigerate the assembled tartlets for at least 30 minutes before serving to allow the pastry cream to set further and the glaze to firm up. This also helps the flavors meld together.
Conclusion:
These Strawberry Tartlets are more than just a dessert; they’re a little burst of sunshine on a plate, and I truly believe you absolutely *must* try them! The combination of the buttery, crumbly crust, the creamy, dreamy filling, and the sweet, juicy strawberries is simply irresistible. It’s a symphony of textures and flavors that will have everyone reaching for seconds (and maybe even thirds!). What makes these tartlets so special is their versatility. They’re elegant enough for a dinner party, yet simple enough to whip up for a casual weekend treat. Plus, they’re incredibly customizable! Feel free to experiment with different types of berries raspberries, blueberries, or even a mixed berry medley would be absolutely divine. You could also add a touch of lemon zest to the filling for an extra zing, or sprinkle some chopped nuts on top for added crunch.Serving Suggestions and Variations:
* Classic Presentation: Serve the tartlets chilled, as is, for a refreshing and elegant dessert. A dollop of whipped cream or a scoop of vanilla ice cream would be the perfect accompaniment. * Berry Bonanza: As mentioned before, don’t be afraid to experiment with different berries! A combination of strawberries, raspberries, and blueberries would create a stunning and flavorful tartlet. * Citrus Twist: Add a teaspoon of lemon or orange zest to the cream cheese filling for a bright and citrusy flavor. * Nutty Delight: Sprinkle chopped almonds, pecans, or walnuts on top of the tartlets before serving for added texture and flavor. * Chocolate Indulgence: Drizzle melted chocolate over the finished tartlets for a decadent treat. You could even add chocolate shavings to the filling! * Individual Cheesecakes: If you’re short on time, you can use the same filling and topping to create individual cheesecakes in ramekins. Simply bake the crust in the ramekins, fill with the cream cheese mixture, and top with strawberries. * Make-Ahead Magic: The tartlet shells can be made ahead of time and stored in an airtight container at room temperature for up to 2 days. The filling can also be made ahead of time and stored in the refrigerator for up to 24 hours. Assemble the tartlets just before serving to prevent the crust from becoming soggy. I’ve poured my heart into perfecting this recipe, and I’m so excited for you to try it. I know you’ll love the way these Strawberry Tartlets look and taste. They’re the perfect way to impress your friends and family, or simply treat yourself to something special. So, what are you waiting for? Gather your ingredients, preheat your oven, and get ready to create some magic in the kitchen! I promise, you won’t regret it. And most importantly, have fun! Baking should be a joyful experience, so relax, put on some music, and enjoy the process. Once you’ve made these delectable tartlets, I’d absolutely love to hear about your experience. Did you make any variations? Did you serve them at a special occasion? Share your photos and stories in the comments below! I can’t wait to see your creations and hear what you think. Happy baking! I am confident that you will love this Strawberry Tartlets recipe. PrintStrawberry Tartlets: A Delicious & Easy Recipe

Delicate strawberry tartlets with sweet shortcrust pastry, creamy vanilla pastry cream, and a fresh strawberry topping with a glossy glaze.
- Prep Time: 1 hour 30 minutes
- Cook Time: 30 minutes
- Total Time: 120 minutes
- Yield: 12 tartlets 1x
Ingredients
- 250g (2 cups) all-purpose flour, plus extra for dusting
- 125g (1/2 cup + 2 tablespoons) cold unsalted butter, cubed
- 50g (1/4 cup) icing sugar, sifted
- 1 large egg yolk
- 2–3 tablespoons ice water
- Pinch of salt
- 500ml (2 cups) whole milk
- 1 vanilla bean, split lengthwise and seeds scraped (or 1 teaspoon vanilla extract)
- 100g (1/2 cup) granulated sugar
- 4 large egg yolks
- 40g (1/3 cup) cornstarch
- 25g (2 tablespoons) unsalted butter, softened
- 500g (about 1 pound) fresh strawberries, hulled and halved or quartered depending on size
- 2 tablespoons strawberry jam or apricot jam
- 1 tablespoon water
Instructions
- In a large bowl, whisk together the flour, icing sugar, and salt.
- Add the cold, cubed butter to the flour mixture. Using your fingertips or a pastry blender, rub or cut the butter into the flour until the mixture resembles coarse breadcrumbs. Work quickly so the butter doesn’t melt.
- Make a well in the center of the flour mixture. Add the egg yolk and 2 tablespoons of ice water. Use a fork to gently mix the wet ingredients into the dry ingredients.
- If the dough seems too dry, add the remaining tablespoon of ice water, a little at a time, until the dough just comes together. Be careful not to overwork the dough.
- Gently bring the dough together into a disc. Wrap it tightly in plastic wrap and refrigerate for at least 30 minutes, or preferably 1 hour.
- On a lightly floured surface, roll out the dough to about 1/8 inch thickness. Rotate the dough as you roll to ensure it’s even and doesn’t stick to the surface.
- Use a round cookie cutter or a sharp knife to cut out circles of dough slightly larger than the tartlet tins (about 3 inches).
- Gently press the dough circles into the tartlet tins, making sure the dough is evenly distributed and reaches the edges. Use your fingers to trim any excess dough from the edges.
- Use a fork to prick the bottom of each tartlet crust several times.
- Place the lined tartlet tins in the refrigerator for another 15-20 minutes.
- Preheat your oven to 375°F (190°C).
- Line each tartlet crust with parchment paper and fill with pie weights, dried beans, or rice.
- Bake for 15 minutes.
- Carefully remove the parchment paper and pie weights.
- Return the tartlet shells to the oven and bake for another 5-10 minutes, or until they are golden brown.
- Remove the tartlet shells from the oven and let them cool completely in the tins before filling.
- In a medium saucepan, combine the milk and vanilla bean (or vanilla extract). Heat over medium heat until just simmering. Remove from heat and let steep for 15-20 minutes to infuse the milk with vanilla flavor. If using vanilla extract, add it after the milk has cooled slightly.
- In a separate bowl, whisk together the egg yolks and granulated sugar until pale and slightly thickened.
- Whisk in the cornstarch until smooth.
- Slowly pour about 1/2 cup of the hot milk into the egg yolk mixture, whisking constantly to temper the eggs.
- Pour the tempered egg yolk mixture into the saucepan with the remaining hot milk. Cook over medium heat, whisking constantly, until the mixture thickens and comes to a boil. Continue to cook for 1-2 minutes, whisking vigorously, to ensure the cornstarch is fully cooked and the pastry cream is thick and smooth.
- Remove the saucepan from the heat and stir in the softened butter until melted and fully incorporated.
- For an extra smooth pastry cream, strain it through a fine-mesh sieve into a clean bowl.
- Cover the pastry cream with plastic wrap, pressing the plastic wrap directly onto the surface to prevent a skin from forming. Refrigerate for at least 2 hours, or preferably overnight, to allow the pastry cream to cool completely and thicken further.
- Wash and hull the strawberries. Cut them in half or quarter them, depending on their size.
- In a small saucepan, combine the strawberry jam (or apricot jam) and water. Heat over low heat, stirring constantly, until the jam is melted and smooth. Strain the glaze through a fine-mesh sieve to remove any seeds or lumps.
- Spoon or pipe the chilled pastry cream into the cooled tartlet shells, filling them to the top.
- Arrange the strawberry halves or quarters on top of the pastry cream in a decorative pattern.
- Brush the strawberries with the warm glaze.
- Refrigerate the assembled tartlets for at least 30 minutes before serving to allow the pastry cream to set further and the glaze to firm up.
Notes
- Make sure the butter is very cold when making the pastry. This helps create a flaky crust.
- Don’t overwork the dough when making the pastry, or it will become tough.
- Blind baking the tart shells prevents them from becoming soggy.
- Tempering the egg yolks is essential to prevent them from scrambling when making the pastry cream.
- Press plastic wrap directly onto the surface of the pastry cream as it cools to prevent a skin from forming.
- You can use other fruits for the topping, such as raspberries, blueberries, or blackberries.

Leave a Comment