
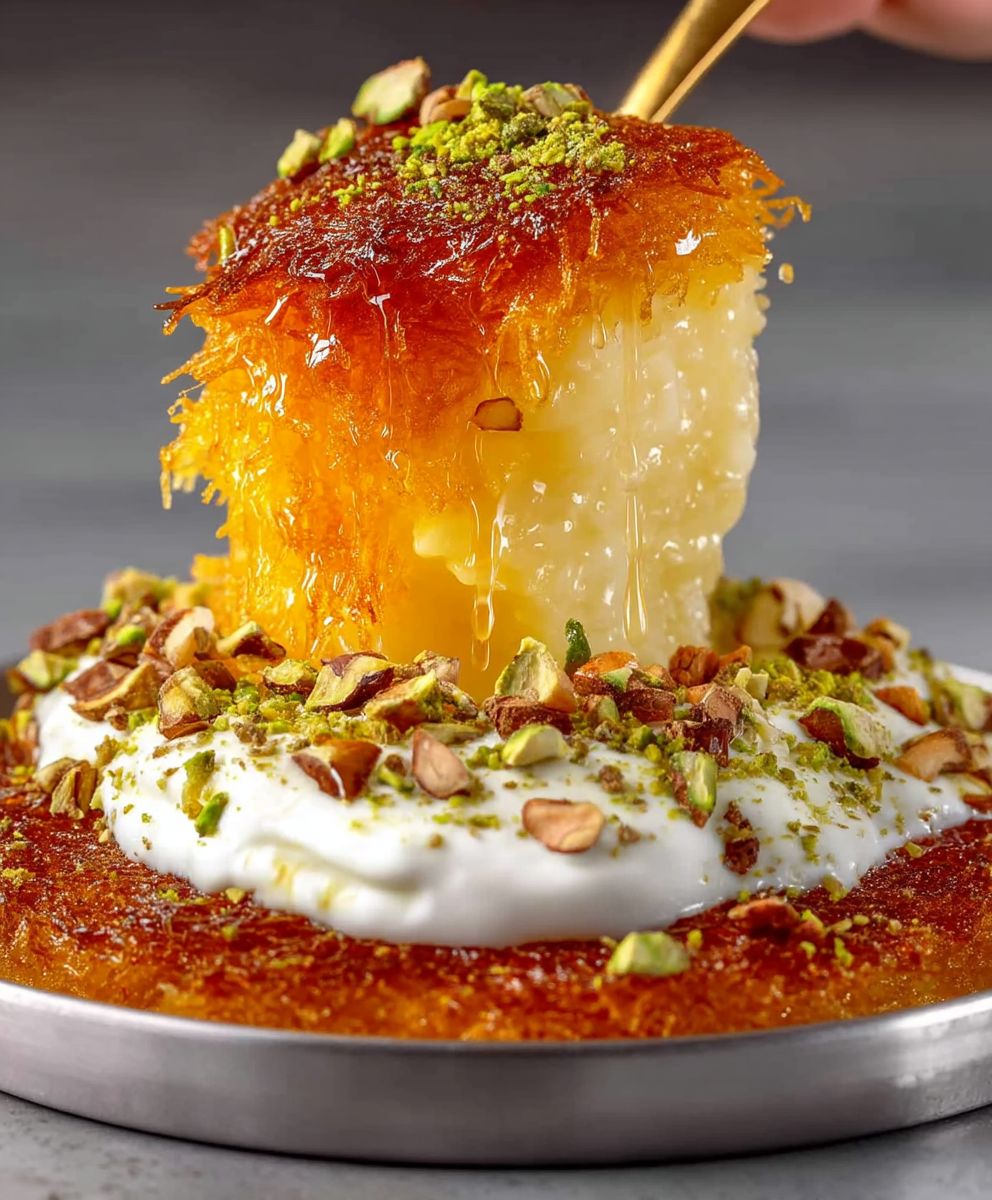
Turkish Kunefe, a dessert that transcends mere sweetness, is a culinary experience you won’t soon forget. Imagine this: crisp, golden strands of shredded phyllo dough, embracing a warm, gooey layer of melted cheese, all drenched in a fragrant, rose-infused syrup. Are you drooling yet? I know I am just thinking about it!
Kunefe, also spelled Künefe, has deep roots in the Middle East, particularly in the Hatay region of Turkey. Its origins are debated, but many believe it evolved from similar cheese-based pastries enjoyed for centuries. This delectable treat has become a symbol of hospitality and celebration, often shared during special occasions and family gatherings. It’s more than just a dessert; it’s a cultural touchstone.
What makes Turkish Kunefe so irresistible? It’s the symphony of textures and flavors. The crispy, buttery kataifi dough provides a delightful contrast to the soft, stretchy cheese. The sweet syrup, infused with lemon and rosewater, adds a fragrant and refreshing counterpoint to the richness of the cheese and dough. People adore it because it’s both comforting and indulgent, a perfect ending to any meal or a delightful treat on its own. Plus, while it might seem intimidating to make, with the right guidance, you can easily recreate this authentic Turkish delight in your own kitchen. So, let’s get started!

Ingredients:
- For the Kadayif (Shredded Phyllo Dough):
- 500g unsalted kadayif (shredded phyllo dough), fresh or frozen (thawed completely)
- 150g unsalted butter, melted
- 2 tablespoons granulated sugar
- For the Cheese Filling:
- 500g unsalted cheese, specifically Kunefe cheese (or a combination of mozzarella and a small amount of ricotta, if Kunefe cheese is unavailable)
- 1 tablespoon unsalted butter, softened (for greasing the pan)
- For the Syrup:
- 2 cups granulated sugar
- 1 cup water
- 1 tablespoon lemon juice
- 1/2 teaspoon rose water (optional, but highly recommended)
- Garnish:
- Ground pistachios, for garnish
Preparing the Syrup:
The syrup needs to be prepared first, as it needs time to cool down completely before pouring it over the hot Kunefe. Trust me, this step is crucial!
- In a medium saucepan, combine the sugar and water.
- Bring the mixture to a boil over medium-high heat, stirring occasionally until the sugar is completely dissolved.
- Once boiling, reduce the heat to medium and let it simmer for about 10-12 minutes. You’ll notice the syrup thickening slightly.
- Add the lemon juice and rose water (if using). The lemon juice prevents the syrup from crystallizing. Stir well and simmer for another minute.
- Remove the saucepan from the heat and let the syrup cool completely. You can even prepare this a day ahead and store it in the refrigerator. Just make sure it’s at room temperature before using.
Preparing the Kadayif:
This is where the magic begins! Getting the kadayif just right is key to a crispy and delicious Kunefe.
- If using frozen kadayif, make sure it’s completely thawed. This is super important! If it’s still frozen, it will be difficult to work with.
- In a large bowl, gently separate the kadayif strands. You want to break them up so they are not in large clumps. This will ensure even cooking.
- In a separate small bowl, melt the butter completely. You can do this in the microwave or in a small saucepan over low heat.
- Pour the melted butter over the kadayif. Using your hands (yes, get in there!), thoroughly mix the butter into the kadayif, making sure every strand is coated. This is what gives the Kunefe its rich flavor and crispy texture.
- Sprinkle the granulated sugar over the buttered kadayif and mix well. The sugar will help the kadayif caramelize and create a beautiful golden-brown color.
Preparing the Cheese Filling:
The cheese is the heart of the Kunefe. Using the right cheese and preparing it properly is essential for that perfect cheesy pull.
- If using Kunefe cheese, soak it in cold water for at least 2 hours, changing the water every 30 minutes. This helps to remove excess salt from the cheese. If using mozzarella, this step is not necessary.
- After soaking, drain the cheese well and pat it dry with paper towels.
- Shred the cheese or cut it into small pieces. The smaller the pieces, the easier it will melt evenly.
Assembling and Cooking the Kunefe:
Now for the exciting part putting it all together and cooking it to golden perfection!
- Preheat your oven to 350°F (175°C).
- Grease a round baking dish (approximately 9-10 inches in diameter) with the softened butter. You can also use a special Kunefe pan if you have one.
- Divide the buttered kadayif mixture in half.
- Press half of the kadayif mixture firmly and evenly into the bottom of the prepared baking dish. You want to create a compact layer that will form the base of the Kunefe. Use your hands or the bottom of a measuring cup to press it down firmly.
- Spread the shredded cheese evenly over the kadayif base, leaving a small border around the edges. This prevents the cheese from sticking to the pan and burning.
- Carefully spread the remaining kadayif mixture over the cheese, pressing it down gently to create a top layer. Again, make sure it’s evenly distributed.
- Bake in the preheated oven for 30-40 minutes, or until the Kunefe is golden brown and crispy on top. Keep a close eye on it, as baking times may vary depending on your oven.
- Alternatively, you can cook the Kunefe on the stovetop. Place the baking dish over medium-low heat and rotate it frequently to ensure even cooking. This method takes about 20-30 minutes. The bottom should be golden brown and crispy. You can check by carefully lifting the edge with a spatula. If you’re using a non-stick pan, this is easier.
- If you want to cook it on the stovetop and then finish it in the oven, you can cook it on the stovetop for about 15-20 minutes until the bottom is golden brown, and then transfer it to the oven for the last 10-15 minutes to ensure the top is also crispy and golden.
Serving the Kunefe:
The final touch! This is where the magic truly happens. The sizzle of the syrup, the aroma of rosewater, and the crunch of pistachios pure bliss!
- Once the Kunefe is cooked, immediately remove it from the oven (or stovetop).
- While the Kunefe is still hot, pour the cooled syrup evenly over the entire surface. You should hear a satisfying sizzle as the syrup soaks into the kadayif.
- Let the Kunefe sit for a few minutes to allow the syrup to be fully absorbed.
- Garnish with ground pistachios.
- Serve immediately while it’s hot and the cheese is gooey. You can cut it into wedges and enjoy!
Tips for the Perfect Kunefe:
- Cheese is Key: Using the right cheese is crucial for the authentic Kunefe experience. If you can’t find Kunefe cheese, a combination of mozzarella and a small amount of ricotta works well. Make sure the mozzarella is low-moisture.
- Don’t Overbake: Overbaking will result in a dry Kunefe. Keep a close eye on it and remove it from the oven when it’s golden brown and crispy.
- Syrup Temperature: The syrup should be completely cool when poured over the hot Kunefe. This helps the kadayif stay crispy.
- Press it Down: Pressing the kadayif firmly into the pan is important for creating a compact base and top layer.
- Serve Immediately: Kunefe is best served immediately while it’s hot and the cheese is gooey.
Variations:
- Different Nuts: You can use other nuts for garnish, such as walnuts or almonds.
- Flavorings: Experiment with different flavorings in the syrup, such as orange blossom water or cardamom.
- Cheese Variations: Try using different types of cheese, such as halloumi or paneer, for a unique flavor.
Conclusion:
And there you have it! This Turkish Pumpkin Dessert, or Kabak Tatl?s?, is more than just a sweet treat; it’s an experience, a journey to the heart of Turkish culinary tradition. I truly believe this recipe is a must-try for anyone looking to expand their dessert horizons and impress their friends and family. The combination of the naturally sweet pumpkin, the subtle spice of cinnamon, and the satisfying crunch of walnuts creates a symphony of flavors and textures that will leave you wanting more.
Why is it a must-try? Because it’s surprisingly easy to make! Don’t let the seemingly exotic name intimidate you. The steps are straightforward, and the ingredients are readily available. Plus, the slow cooking process allows the pumpkin to caramelize beautifully, resulting in a depth of flavor you simply can’t achieve with other methods. It’s also a naturally vegan and gluten-free dessert, making it a fantastic option for those with dietary restrictions. But most importantly, it’s absolutely delicious! The sweetness is balanced, the texture is perfect, and the overall experience is incredibly satisfying.
Now, let’s talk about serving suggestions and variations. While this Turkish Pumpkin Dessert is divine on its own, a dollop of thick Greek yogurt or a scoop of vanilla ice cream elevates it to another level. The cool creaminess complements the warm, spiced pumpkin perfectly. For a truly authentic Turkish experience, serve it with a strong cup of Turkish coffee. The bitterness of the coffee cuts through the sweetness of the dessert, creating a delightful contrast.
If you’re feeling adventurous, you can experiment with different variations. Try adding a pinch of ground cloves or nutmeg for a warmer, more festive flavor. A drizzle of honey or maple syrup can enhance the sweetness, while a squeeze of lemon juice can add a touch of brightness. You can also substitute the walnuts with other nuts, such as pistachios or almonds, for a different textural experience. For a richer flavor, consider using brown sugar instead of white sugar. And if you’re short on time, you can even try making this dessert in a slow cooker! Just adjust the cooking time accordingly.
I’m confident that you’ll love this recipe as much as I do. It’s a simple yet elegant dessert that’s perfect for any occasion, from a casual weeknight treat to a special holiday gathering. It’s a conversation starter, a crowd-pleaser, and a guaranteed way to impress your guests.
So, what are you waiting for? Gather your ingredients, put on your apron, and get ready to embark on a culinary adventure. I encourage you to try this Turkish Pumpkin Dessert recipe and experience the magic for yourself. And most importantly, don’t forget to share your experience! I’d love to hear your thoughts, your variations, and your serving suggestions. Leave a comment below, tag me in your photos on social media, and let me know how it turned out. Happy cooking! I can’t wait to see your creations!
Turkish Kunefe: A Delicious Guide to This Cheesy Dessert
Kunefe is a traditional Middle Eastern dessert with shredded phyllo dough, cheese, and sweet syrup. It's crispy, cheesy, and utterly delicious!
Ingredients
- 500g unsalted kadayif (shredded phyllo dough), fresh or frozen (thawed completely)
- 150g unsalted butter, melted
- 2 tablespoons granulated sugar
- 500g unsalted cheese, specifically Kunefe cheese (or a combination of mozzarella and a small amount of ricotta, if Kunefe cheese is unavailable)
- 1 tablespoon unsalted butter, softened (for greasing the pan)
- 2 cups granulated sugar
- 1 cup water
- 1 tablespoon lemon juice
- 1/2 teaspoon rose water (optional, but highly recommended)
- Ground pistachios, for garnish
Instructions
- In a medium saucepan, combine the sugar and water.
- Bring the mixture to a boil over medium-high heat, stirring occasionally until the sugar is completely dissolved.
- Once boiling, reduce the heat to medium and let it simmer for about 10-12 minutes. You’ll notice the syrup thickening slightly.
- Add the lemon juice and rose water (if using). The lemon juice prevents the syrup from crystallizing. Stir well and simmer for another minute.
- Remove the saucepan from the heat and let the syrup cool completely. You can even prepare this a day ahead and store it in the refrigerator. Just make sure it’s at room temperature before using.
- If using frozen kadayif, make sure it’s completely thawed. This is super important! If it’s still frozen, it will be difficult to work with.
- In a large bowl, gently separate the kadayif strands. You want to break them up so they are not in large clumps. This will ensure even cooking.
- In a separate small bowl, melt the butter completely. You can do this in the microwave or in a small saucepan over low heat.
- Pour the melted butter over the kadayif. Using your hands (yes, get in there!), thoroughly mix the butter into the kadayif, making sure every strand is coated. This is what gives the Kunefe its rich flavor and crispy texture.
- Sprinkle the granulated sugar over the buttered kadayif and mix well. The sugar will help the kadayif caramelize and create a beautiful golden-brown color.
- If using Kunefe cheese, soak it in cold water for at least 2 hours, changing the water every 30 minutes. This helps to remove excess salt from the cheese. If using mozzarella, this step is not necessary.
- After soaking, drain the cheese well and pat it dry with paper towels.
- Shred the cheese or cut it into small pieces. The smaller the pieces, the easier it will melt evenly.
- Preheat your oven to 350°F (175°C).
- Grease a round baking dish (approximately 9-10 inches in diameter) with the softened butter. You can also use a special Kunefe pan if you have one.
- Divide the buttered kadayif mixture in half.
- Press half of the kadayif mixture firmly and evenly into the bottom of the prepared baking dish. You want to create a compact layer that will form the base of the Kunefe. Use your hands or the bottom of a measuring cup to press it down firmly.
- Spread the shredded cheese evenly over the kadayif base, leaving a small border around the edges. This prevents the cheese from sticking to the pan and burning.
- Carefully spread the remaining kadayif mixture over the cheese, pressing it down gently to create a top layer. Again, make sure it’s evenly distributed.
- Bake in the preheated oven for 30-40 minutes, or until the Kunefe is golden brown and crispy on top. Keep a close eye on it, as baking times may vary depending on your oven.
- Alternatively, you can cook the Kunefe on the stovetop. Place the baking dish over medium-low heat and rotate it frequently to ensure even cooking. This method takes about 20-30 minutes. The bottom should be golden brown and crispy. You can check by carefully lifting the edge with a spatula. If you’re using a non-stick pan, this is easier.
- If you want to cook it on the stovetop and then finish it in the oven, you can cook it on the stovetop for about 15-20 minutes until the bottom is golden brown, and then transfer it to the oven for the last 10-15 minutes to ensure the top is also crispy and golden.
- Once the Kunefe is cooked, immediately remove it from the oven (or stovetop).
- While the Kunefe is still hot, pour the cooled syrup evenly over the entire surface. You should hear a satisfying sizzle as the syrup soaks into the kadayif.
- Let the Kunefe sit for a few minutes to allow the syrup to be fully absorbed.
- Garnish with ground pistachios.
- Serve immediately while it’s hot and the cheese is gooey. You can cut it into wedges and enjoy!
Notes
- Cheese is Key: Using the right cheese is crucial for the authentic Kunefe experience. If you can’t find Kunefe cheese, a combination of mozzarella and a small amount of ricotta works well. Make sure the mozzarella is low-moisture.
- Don’t Overbake: Overbaking will result in a dry Kunefe. Keep a close eye on it and remove it from the oven when it’s golden brown and crispy.
- Syrup Temperature: The syrup should be completely cool when poured over the hot Kunefe. This helps the kadayif stay crispy.
- Press it Down: Pressing the kadayif firmly into the pan is important for creating a compact base and top layer.
- Serve Immediately: Kunefe is best served immediately while it’s hot and the cheese is gooey.
- Variations: You can use other nuts for garnish, such as walnuts or almonds. Experiment with different flavorings in the syrup, such as orange blossom water or cardamom. Try using different types of cheese, such as halloumi or paneer, for a unique flavor.


Leave a Comment