
Turtle Bars: Prepare to be captivated by a dessert that perfectly marries the rich, gooey indulgence of caramel, the satisfying crunch of pecans, and the decadent allure of chocolate. These aren’t just any dessert bars; they’re a symphony of flavors and textures that will have everyone begging for seconds. I remember the first time I tasted a Turtle Bar; it was at a family gathering, and one bite transported me to a world of pure bliss.
While the exact origins of Turtle Bars are shrouded in a bit of mystery, their inspiration clearly comes from the iconic Turtle candies, those delightful clusters of pecans, caramel, and chocolate that have been a beloved treat for generations. The beauty of transforming this classic candy into a bar form lies in its shareability and ease of preparation.
What makes Turtle Bars so irresistible? It’s the harmonious blend of sweet and salty, the chewy caramel against the crisp pecans, and the smooth chocolate that ties it all together. They’re incredibly easy to make, perfect for potlucks, bake sales, or simply satisfying a sweet craving. Plus, they’re a guaranteed crowd-pleaser, a dessert that transcends generations and brings smiles to faces with every bite. Get ready to embark on a baking adventure that will result in a truly unforgettable treat!

Ingredients:
- For the Crust:
- 1 cup (2 sticks) unsalted butter, softened
- 1/2 cup granulated sugar
- 2 cups all-purpose flour
- 1/4 teaspoon salt
- For the Caramel Layer:
- 1 cup (2 sticks) unsalted butter
- 1 cup packed light brown sugar
- 1/2 cup light corn syrup
- 1 (14 ounce) can sweetened condensed milk
- 1 teaspoon vanilla extract
- 1/4 teaspoon salt
- For the Chocolate Topping:
- 12 ounces semi-sweet chocolate chips
- 1/4 cup (1/2 stick) unsalted butter
- For the Turtle Topping:
- 1 1/2 cups pecan halves
- Sea salt flakes, for sprinkling (optional)
Preparing the Crust
- Cream the butter and sugar: In a large bowl, or in the bowl of your stand mixer, cream together the softened butter and granulated sugar until light and fluffy. This usually takes about 3-5 minutes. Make sure to scrape down the sides of the bowl occasionally to ensure everything is evenly mixed. You don’t want any lumps of butter hiding at the bottom!
- Combine dry ingredients: In a separate medium bowl, whisk together the all-purpose flour and salt. This helps to evenly distribute the salt throughout the flour, which is important for the flavor of the crust.
- Add dry ingredients to wet ingredients: Gradually add the dry ingredients to the creamed butter and sugar, mixing on low speed until just combined. Be careful not to overmix, as this can result in a tough crust. You want the dough to come together into a soft, slightly crumbly mixture.
- Press into pan: Press the dough evenly into the bottom of a 9×13 inch baking pan. I like to use my fingers to do this, but you can also use the bottom of a measuring cup or a spatula to help smooth it out. Make sure the crust is evenly distributed across the pan so it bakes evenly.
- Bake the crust: Bake in a preheated oven at 350°F (175°C) for 18-20 minutes, or until lightly golden brown. Keep a close eye on it, as oven temperatures can vary. You want the crust to be set but not overly browned. Remove from the oven and let cool slightly while you prepare the caramel layer.
Making the Caramel Layer
- Combine ingredients in a saucepan: In a medium saucepan, combine the butter, brown sugar, corn syrup, and sweetened condensed milk. Use a heavy-bottomed saucepan to prevent scorching.
- Cook the caramel: Cook over medium heat, stirring constantly, until the butter is melted and the sugar is dissolved. Once the mixture is smooth, bring it to a boil, stirring constantly. Continue to cook, stirring constantly, for 5-7 minutes, or until the caramel reaches a deep golden brown color and thickens slightly. Use a candy thermometer if you have one; the ideal temperature is around 245°F (118°C). Be very careful, as hot caramel can cause serious burns.
- Remove from heat and add vanilla and salt: Remove the saucepan from the heat and stir in the vanilla extract and salt. The vanilla adds a lovely flavor, and the salt helps to balance the sweetness of the caramel.
- Pour over crust: Pour the caramel evenly over the partially baked crust. Spread it out with a spatula to ensure it covers the entire surface.
- Bake again: Return the pan to the oven and bake for another 15-20 minutes, or until the caramel is bubbly and golden brown. Again, keep a close eye on it to prevent burning. The caramel should be set around the edges but still slightly soft in the center.
- Cool completely: Remove from the oven and let cool completely in the pan. This is important, as the caramel needs to set before you add the chocolate topping. If you try to add the chocolate while the caramel is still warm, it will melt and mix together, which is not what we want. You can speed up the cooling process by placing the pan in the refrigerator for a couple of hours.
Creating the Chocolate Topping and Assembling the Turtle Bars
- Melt the chocolate and butter: In a heatproof bowl set over a saucepan of simmering water (or in the microwave in 30-second intervals, stirring in between), melt the semi-sweet chocolate chips and butter together until smooth. Stir frequently to prevent the chocolate from burning. If using the microwave, be extra careful not to overheat the chocolate.
- Spread chocolate over caramel: Once the caramel layer is completely cool and set, pour the melted chocolate evenly over the caramel. Spread it out with a spatula to create a smooth, even layer.
- Add pecan halves: Immediately arrange the pecan halves over the melted chocolate, pressing them gently into the chocolate so they adhere. You can arrange them in neat rows or scatter them randomly, depending on your preference.
- Sprinkle with sea salt (optional): If desired, sprinkle the top of the bars with sea salt flakes. The salt enhances the sweetness of the caramel and chocolate and adds a lovely salty-sweet flavor.
- Chill to set: Place the pan in the refrigerator for at least 30 minutes, or until the chocolate is completely set. This will make it easier to cut the bars neatly.
- Cut into bars: Once the chocolate is set, remove the pan from the refrigerator and cut the bars into squares or rectangles. I find it easiest to use a sharp knife and wipe it clean between each cut to prevent the chocolate from smearing.
- Serve and enjoy!: Store the turtle bars in an airtight container at room temperature or in the refrigerator. They are best enjoyed within a few days, but they are so delicious that they probably won’t last that long!

Conclusion:
And there you have it! These Turtle Bars are truly something special, and I genuinely believe they’re a must-try for anyone who loves a decadent, satisfying treat. From the buttery shortbread crust to the gooey caramel and chocolate topping, every layer works in perfect harmony to create a symphony of flavors and textures. They’re rich, they’re indulgent, and they’re surprisingly easy to make, making them the perfect dessert for any occasion, whether it’s a casual weeknight treat or a special celebration. What makes these Turtle Bars so irresistible? It’s the combination of salty and sweet, the crunch of the pecans against the smooth caramel, and the deep, rich chocolate that ties it all together. They’re a guaranteed crowd-pleaser, and I can almost guarantee you won’t have any leftovers! But the best part about this recipe is its versatility. Feel free to experiment and make it your own!Serving Suggestions and Variations:
* Warm with Ice Cream: Serve a warm Turtle Bar with a scoop of vanilla ice cream for an extra decadent dessert. The contrast of warm and cold is simply divine! * Drizzle with Sea Salt: A sprinkle of flaky sea salt on top enhances the sweetness and adds a delightful salty kick. * Espresso Infusion: Add a teaspoon of instant espresso powder to the chocolate topping for a mocha-flavored twist. * Nutty Variations: Swap out the pecans for walnuts, almonds, or even macadamia nuts for a different flavor profile. * White Chocolate Delight: Use white chocolate chips instead of semi-sweet for a sweeter, creamier version. * Festive Fun: For the holidays, add a sprinkle of crushed peppermint candies on top of the chocolate layer. * Caramel Swirls: Before baking, swirl some extra caramel sauce into the shortbread crust for an even more intense caramel flavor. * Make it Gluten-Free: Use a gluten-free flour blend for the shortbread crust to make this recipe accessible to those with gluten sensitivities. * Individual Bars: Bake the bars in a muffin tin for individual servings, perfect for parties or portion control. * Gift Giving: These Turtle Bars make a wonderful homemade gift! Package them in a decorative tin or box for a thoughtful and delicious present. I truly encourage you to give this recipe a try. It’s a labor of love, but the results are well worth the effort. Imagine the look on your family’s faces when they taste these amazing bars! Picture yourself enjoying a warm Turtle Bar with a cup of coffee on a cozy afternoon. It’s pure bliss! Don’t be intimidated by the multiple layers; each step is simple and straightforward. Just follow the instructions carefully, and you’ll be rewarded with a batch of irresistible Turtle Bars that will have everyone begging for more. And most importantly, I want to hear about your experience! Did you try any of the variations? Did you make any modifications of your own? What did your family and friends think? Share your photos and stories in the comments below! I can’t wait to see your creations and hear how much you enjoyed this recipe. Happy baking, and enjoy your delicious Turtle Bars! I’m confident that this will become a staple in your dessert repertoire. PrintTurtle Bars: The Ultimate Guide to Making Delicious Homemade Treats
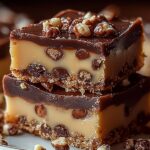
Buttery shortbread crust topped with gooey caramel, rich chocolate, and crunchy pecans.
- Prep Time: 30 minutes
- Cook Time: 55 minutes
- Total Time: 85 minutes
- Yield: 24 bars 1x
Ingredients
- 1 cup (2 sticks) unsalted butter, softened
- 1/2 cup granulated sugar
- 2 cups all-purpose flour
- 1/4 teaspoon salt
- 1 cup (2 sticks) unsalted butter
- 1 cup packed light brown sugar
- 1/2 cup light corn syrup
- 1 (14 ounce) can sweetened condensed milk
- 1 teaspoon vanilla extract
- 1/4 teaspoon salt
- 12 ounces semi-sweet chocolate chips
- 1/4 cup (1/2 stick) unsalted butter
- 1 1/2 cups pecan halves
- Sea salt flakes, for sprinkling (optional)
Instructions
- Cream the butter and sugar: In a large bowl, or in the bowl of your stand mixer, cream together the softened butter and granulated sugar until light and fluffy. This usually takes about 3-5 minutes. Make sure to scrape down the sides of the bowl occasionally to ensure everything is evenly mixed.
- Combine dry ingredients: In a separate medium bowl, whisk together the all-purpose flour and salt.
- Add dry ingredients to wet ingredients: Gradually add the dry ingredients to the creamed butter and sugar, mixing on low speed until just combined. Be careful not to overmix.
- Press into pan: Press the dough evenly into the bottom of a 9×13 inch baking pan.
- Bake the crust: Bake in a preheated oven at 350°F (175°C) for 18-20 minutes, or until lightly golden brown. Remove from the oven and let cool slightly while you prepare the caramel layer.
- Combine ingredients in a saucepan: In a medium saucepan, combine the butter, brown sugar, corn syrup, and sweetened condensed milk.
- Cook the caramel: Cook over medium heat, stirring constantly, until the butter is melted and the sugar is dissolved. Once the mixture is smooth, bring it to a boil, stirring constantly. Continue to cook, stirring constantly, for 5-7 minutes, or until the caramel reaches a deep golden brown color and thickens slightly. Use a candy thermometer if you have one; the ideal temperature is around 245°F (118°C).
- Remove from heat and add vanilla and salt: Remove the saucepan from the heat and stir in the vanilla extract and salt.
- Pour over crust: Pour the caramel evenly over the partially baked crust. Spread it out with a spatula to ensure it covers the entire surface.
- Bake again: Return the pan to the oven and bake for another 15-20 minutes, or until the caramel is bubbly and golden brown.
- Cool completely: Remove from the oven and let cool completely in the pan. You can speed up the cooling process by placing the pan in the refrigerator for a couple of hours.
- Melt the chocolate and butter: In a heatproof bowl set over a saucepan of simmering water (or in the microwave in 30-second intervals, stirring in between), melt the semi-sweet chocolate chips and butter together until smooth.
- Spread chocolate over caramel: Once the caramel layer is completely cool and set, pour the melted chocolate evenly over the caramel. Spread it out with a spatula to create a smooth, even layer.
- Add pecan halves: Immediately arrange the pecan halves over the melted chocolate, pressing them gently into the chocolate so they adhere.
- Sprinkle with sea salt (optional): If desired, sprinkle the top of the bars with sea salt flakes.
- Chill to set: Place the pan in the refrigerator for at least 30 minutes, or until the chocolate is completely set.
- Cut into bars: Once the chocolate is set, remove the pan from the refrigerator and cut the bars into squares or rectangles.
- Serve and enjoy!: Store the turtle bars in an airtight container at room temperature or in the refrigerator.
Notes
- Use a heavy-bottomed saucepan for the caramel to prevent scorching.
- Be very careful when working with hot caramel, as it can cause serious burns.
- Make sure the caramel layer is completely cool before adding the chocolate topping to prevent them from mixing.
- Wipe the knife clean between each cut when cutting the bars to prevent the chocolate from smearing.
Leave a Comment