
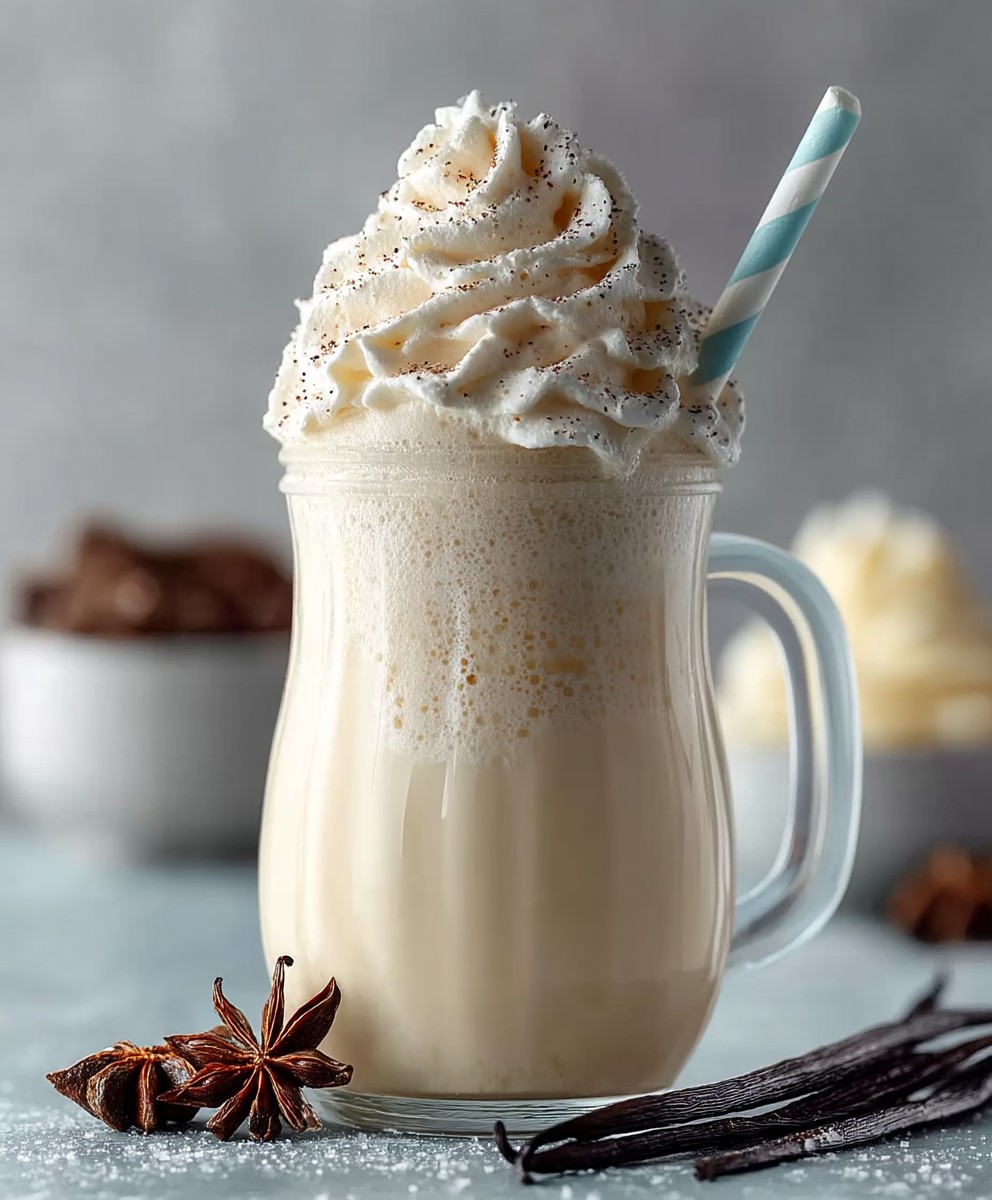
Vanilla Bean Frappuccino: Prepare to indulge in a creamy, dreamy delight that will transport you straight to your favorite coffee shop, all from the comfort of your own kitchen! Forget the long lines and hefty price tags; with this easy-to-follow recipe, you can whip up a perfectly blended Vanilla Bean Frappuccino whenever your heart desires.
While the Frappuccino, as we know it, is a relatively modern invention, its roots can be traced back to the simple desire for a refreshing, icy coffee beverage. The concept of blending coffee with ice has been around for decades, but it was Starbucks that truly popularized the Frappuccino in the 1990s, turning it into a global phenomenon. The Vanilla Bean Frappuccino, in particular, quickly became a beloved classic, offering a sweet and comforting alternative to bolder coffee flavors.
What makes the Vanilla Bean Frappuccino so irresistible? It’s the perfect balance of creamy sweetness, subtle vanilla notes, and a delightfully icy texture. Its a treat that satisfies your sweet tooth without being overly heavy, making it ideal for a warm afternoon pick-me-up or a delightful dessert. Plus, its customizable nature allows you to adjust the sweetness and consistency to your exact preferences. So, are you ready to learn how to make this iconic Vanilla Bean Frappuccino at home? Let’s get started!

Ingredients:
- 2 cups ice
- 1 cup strong brewed coffee, cooled (or 2 shots of espresso, cooled)
- 1 cup milk (any kind, I prefer whole milk for richness)
- 2 tablespoons vanilla syrup (store-bought or homemade, recipe below)
- 1/2 vanilla bean, scraped (or 1 teaspoon vanilla extract)
- 2 tablespoons granulated sugar (adjust to taste)
- Whipped cream, for topping (optional, but highly recommended!)
- Vanilla bean powder or shavings, for garnish (optional)
Homemade Vanilla Syrup (Optional):
- 1 cup water
- 1 cup granulated sugar
- 1 vanilla bean, split lengthwise and scraped
Instructions:
Making the Vanilla Syrup (If you’re going homemade!)
- Combine water and sugar: In a small saucepan, combine the water and granulated sugar.
- Add the vanilla bean: Add the split vanilla bean (both the pod and the scrapings) to the saucepan.
- Bring to a simmer: Place the saucepan over medium heat and bring the mixture to a gentle simmer, stirring occasionally until the sugar is completely dissolved.
- Simmer and infuse: Reduce the heat to low and let the syrup simmer for about 10 minutes, allowing the vanilla flavor to infuse into the syrup. The syrup should thicken slightly.
- Cool and strain: Remove the saucepan from the heat and let the syrup cool completely. Once cooled, strain the syrup through a fine-mesh sieve to remove the vanilla bean pod.
- Store: Pour the vanilla syrup into a clean, airtight container (like a glass jar) and store it in the refrigerator for up to 2 weeks.
Preparing the Frappuccino
- Combine ingredients in a blender: In a high-powered blender, combine the ice, cooled coffee (or espresso), milk, vanilla syrup (store-bought or homemade), vanilla bean scrapings (or vanilla extract), and granulated sugar.
- Blend until smooth: Secure the lid on the blender and blend on high speed until the mixture is completely smooth and creamy. This usually takes about 30-60 seconds, depending on the power of your blender. You may need to stop the blender and scrape down the sides a couple of times to ensure everything is fully incorporated. Don’t over-blend, or the frappuccino might become too watery.
- Check the consistency: Once blended, check the consistency of the frappuccino. If it’s too thick, add a splash of milk and blend again. If it’s too thin, add a few more ice cubes and blend again. Adjust the sweetness by adding more sugar or vanilla syrup, if needed.
- Taste and adjust: Give it a taste! This is your chance to make sure it’s perfectly balanced to your liking. Need more vanilla? Add a touch more extract or syrup. Want it sweeter? A little extra sugar will do the trick.
Serving and Garnishing
- Pour into a glass: Pour the blended frappuccino into a tall glass. I like to use a clear glass so you can see all the delicious layers.
- Add whipped cream (optional): If desired, top the frappuccino with a generous dollop of whipped cream. Homemade whipped cream is always a treat, but store-bought works just fine too!
- Garnish (optional): For an extra touch of elegance, sprinkle the whipped cream with vanilla bean powder or shavings. You can also drizzle a little extra vanilla syrup on top.
- Serve immediately: Serve the frappuccino immediately and enjoy! It’s best when it’s freshly made and icy cold.
Tips and Variations:
Coffee Strength:
The strength of your coffee will greatly impact the final flavor. I recommend using a strong brew or espresso for a more pronounced coffee taste. If you prefer a milder flavor, use a weaker brew or reduce the amount of coffee.
Milk Options:
Feel free to experiment with different types of milk. Whole milk will give you the richest and creamiest result, but you can also use 2% milk, skim milk, almond milk, soy milk, or oat milk. Each type of milk will impart a slightly different flavor and texture to the frappuccino.
Sweetness Level:
The amount of sugar and vanilla syrup can be adjusted to your personal preference. Start with the recommended amounts and then add more to taste. Keep in mind that the vanilla syrup already contains sugar, so you may not need to add as much granulated sugar.
Vanilla Bean vs. Vanilla Extract:
Using a vanilla bean will give you the most intense and authentic vanilla flavor. However, vanilla extract is a perfectly acceptable substitute. If using vanilla extract, be sure to use pure vanilla extract, not imitation vanilla flavoring.
Chocolate Variation:
For a chocolate vanilla frappuccino, add 1-2 tablespoons of cocoa powder or chocolate syrup to the blender along with the other ingredients. You can also drizzle chocolate syrup on top of the whipped cream for an extra touch of chocolatey goodness.
Caramel Variation:
For a caramel vanilla frappuccino, add 1-2 tablespoons of caramel syrup to the blender along with the other ingredients. You can also drizzle caramel syrup on top of the whipped cream for a beautiful and delicious garnish.
Mocha Variation:
Combine the chocolate and caramel variations for a mocha vanilla frappuccino! Add both cocoa powder and caramel syrup to the blender for a truly decadent treat.
Adding a Boost:
Want an extra kick? Add a shot of espresso directly to the blender. This is perfect for those mornings when you need a little extra caffeine to get you going.
Making it Vegan:
To make this frappuccino vegan, use a plant-based milk alternative (like almond, soy, or oat milk) and ensure your whipped cream is also vegan. Many store-bought whipped cream brands now offer vegan options.
Preventing a Watery Frappuccino:
The key to a perfect frappuccino is achieving the right consistency. Too much ice can make it watery, while not enough ice can make it too thin. Start with the recommended amount of ice and then adjust as needed. If your frappuccino is too watery, add a few more ice cubes and blend again. If it’s too thick, add a splash of milk.
Blending Tips:
Use a high-powered blender for the best results. A good blender will be able to crush the ice quickly and evenly, resulting in a smooth and creamy frappuccino. If you don’t have a high-powered blender, you may need to blend for a longer period of time, stopping occasionally to scrape down the sides of the blender.
Storage:
Frappuccinos are best enjoyed immediately. However, if you have leftovers, you can store them in the freezer for up to 1 hour. Be aware that the texture will change slightly after freezing and thawing. You may need to re-blend the frappuccino after thawing to restore its original consistency.
Vanilla Bean Powder:
Vanilla bean powder is made from ground vanilla beans and has a more concentrated flavor than vanilla extract. If you have vanilla bean powder on hand, you can use it in place of the vanilla bean scrapings or vanilla extract. Start with a small amount (about 1/4 teaspoon) and then add more to taste.
Experiment with Flavors:
Don’t be afraid to experiment with different flavors and ingredients! Try adding a pinch of cinnamon, a dash of nutmeg, or a few drops of peppermint extract. The possibilities are endless!
Adjusting for Dietary Needs:
This recipe can easily be adapted to meet various dietary needs. Use sugar-free syrup and a sugar substitute for a low-sugar version. Use dairy-free milk and whipped cream for a vegan version. And use gluten-free ingredients for a gluten-free version.
Making a Large Batch:
If you’re making frappuccinos for a crowd, you can easily double or triple the recipe. Just be sure to use a large enough blender to accommodate all of the ingredients. You may also need to blend in batches to ensure that everything is properly mixed.
The Importance of Cooled Coffee:
Never use hot coffee! Using hot coffee will melt the ice too quickly, resulting in a watery frappuccino. Make sure your coffee is completely cooled before adding it to the blender. You can even chill the coffee in the refrigerator for a few hours to make it extra cold.
Enjoying Your Frappuccino:
Most importantly, have fun and enjoy your homemade vanilla bean frappuccino! It’s a delicious and refreshing treat that’s perfect for any occasion.
Conclusion:
This homemade Vanilla Bean Frappuccino isn’t just a drink; it’s an experience. It’s the perfect blend of creamy, sweet, and caffeinated goodness, all without the hefty price tag and long lines of your favorite coffee shop. I truly believe this recipe is a must-try for anyone who loves a refreshing, indulgent treat, especially as the weather warms up. The subtle vanilla bean flavor elevates it beyond a simple vanilla drink, offering a depth and complexity that’s truly satisfying.
But why is this particular recipe so special? It’s the control you have over the ingredients. You can use your favorite milk, adjust the sweetness to your liking, and even choose the intensity of the coffee. Plus, knowing exactly what’s going into your drink is always a bonus! Forget those artificial flavors and excessive sugars this is pure, delicious, and customizable bliss.
Serving Suggestions and Variations:
The beauty of this Vanilla Bean Frappuccino recipe lies in its versatility. Feel free to experiment and make it your own!
* For the Coffee Lover: Add an extra shot of espresso for a bolder coffee flavor. You could even try using a different type of coffee, like a dark roast, for a richer, more intense taste.
* For the Chocolate Fanatic: Drizzle chocolate syrup inside the glass before pouring in the frappuccino, or add a tablespoon of cocoa powder to the blender for a mocha twist. A sprinkle of chocolate shavings on top is always a welcome addition!
* For the Caramel Craver: Caramel sauce is your best friend! Swirl it into the glass, blend it into the frappuccino, or drizzle it generously on top. You can even add a pinch of sea salt for a salted caramel version.
* For a Healthier Option: Use unsweetened almond milk or oat milk to reduce the calories and sugar. You can also substitute the sugar with a natural sweetener like stevia or monk fruit.
* For a Vegan Treat: Simply use your favorite plant-based milk and ensure your vanilla extract is vegan-friendly. A dollop of coconut whipped cream on top will complete the experience.
* For a Festive Touch: Add a sprinkle of cinnamon or nutmeg for a warm, spiced flavor, perfect for the holidays.
* For a Boozy Kick: Add a shot of your favorite coffee liqueur or vanilla vodka for an adult version of this classic treat. Remember to drink responsibly!
Don’t be afraid to get creative and experiment with different flavors and toppings. The possibilities are endless! You can even try adding different extracts, like almond or hazelnut, for a unique twist.
I’m confident that you’ll love this homemade Vanilla Bean Frappuccino as much as I do. It’s the perfect way to treat yourself on a hot day, or to enjoy a little bit of indulgence any time of year. So, grab your blender, gather your ingredients, and get ready to create your own delicious masterpiece.
I’m so excited for you to try this recipe! Once you do, please come back and share your experience in the comments below. Let me know what variations you tried, what you loved, and what you would change. I’m always looking for new ideas and inspiration, and I can’t wait to hear what you think. Happy blending!
Vanilla Bean Frappuccino: A Delicious & Easy Recipe
A creamy and refreshing homemade Vanilla Bean Frappuccino, perfect for a sweet coffee treat. Easily customizable with variations like chocolate, caramel, or mocha!
Ingredients
- 2 cups ice
- 1 cup strong brewed coffee, cooled (or 2 shots of espresso, cooled)
- 1 cup milk (any kind, I prefer whole milk for richness)
- 2 tablespoons vanilla syrup (store-bought or homemade, recipe below)
- 1/2 vanilla bean, scraped (or 1 teaspoon vanilla extract)
- 2 tablespoons granulated sugar (adjust to taste)
- Whipped cream, for topping (optional, but highly recommended!)
- Vanilla bean powder or shavings, for garnish (optional)
- 1 cup water
- 1 cup granulated sugar
- 1 vanilla bean, split lengthwise and scraped
Instructions
- Combine water and sugar: In a small saucepan, combine the water and granulated sugar.
- Add the vanilla bean: Add the split vanilla bean (both the pod and the scrapings) to the saucepan.
- Bring to a simmer: Place the saucepan over medium heat and bring the mixture to a gentle simmer, stirring occasionally until the sugar is completely dissolved.
- Simmer and infuse: Reduce the heat to low and let the syrup simmer for about 10 minutes, allowing the vanilla flavor to infuse into the syrup. The syrup should thicken slightly.
- Cool and strain: Remove the saucepan from the heat and let the syrup cool completely. Once cooled, strain the syrup through a fine-mesh sieve to remove the vanilla bean pod.
- Store: Pour the vanilla syrup into a clean, airtight container (like a glass jar) and store it in the refrigerator for up to 2 weeks.
- Combine ingredients in a blender: In a high-powered blender, combine the ice, cooled coffee (or espresso), milk, vanilla syrup (store-bought or homemade), vanilla bean scrapings (or vanilla extract), and granulated sugar.
- Blend until smooth: Secure the lid on the blender and blend on high speed until the mixture is completely smooth and creamy. This usually takes about 30-60 seconds, depending on the power of your blender. You may need to stop the blender and scrape down the sides a couple of times to ensure everything is fully incorporated. Don’t over-blend, or the frappuccino might become too watery.
- Check the consistency: Once blended, check the consistency of the frappuccino. If it’s too thick, add a splash of milk and blend again. If it’s too thin, add a few more ice cubes and blend again. Adjust the sweetness by adding more sugar or vanilla syrup, if needed.
- Taste and adjust: Give it a taste! This is your chance to make sure it’s perfectly balanced to your liking. Need more vanilla? Add a touch more extract or syrup. Want it sweeter? A little extra sugar will do the trick.
- Pour into a glass: Pour the blended frappuccino into a tall glass. I like to use a clear glass so you can see all the delicious layers.
- Add whipped cream (optional): If desired, top the frappuccino with a generous dollop of whipped cream. Homemade whipped cream is always a treat, but store-bought works just fine too!
- Garnish (optional): For an extra touch of elegance, sprinkle the whipped cream with vanilla bean powder or shavings. You can also drizzle a little extra vanilla syrup on top.
- Serve immediately: Serve the frappuccino immediately and enjoy! It’s best when it’s freshly made and icy cold.
Notes
- Coffee Strength: Use strong brewed coffee or espresso for a pronounced coffee taste.
- Milk Options: Experiment with different types of milk (whole, 2%, skim, almond, soy, oat).
- Sweetness Level: Adjust sugar and vanilla syrup to your preference.
- Vanilla Bean vs. Extract: Vanilla bean provides the most intense flavor, but extract is a good substitute.
- Variations: Try chocolate, caramel, or mocha variations by adding cocoa powder/chocolate syrup or caramel syrup.
- Boost: Add a shot of espresso for extra caffeine.
- Vegan: Use plant-based milk and vegan whipped cream.
- Watery Frappuccino: Adjust ice and milk to achieve the right consistency.
- Blending Tips: Use a high-powered blender for best results.
- Storage: Enjoy immediately, or freeze for up to 1 hour (texture will change).
- Vanilla Bean Powder: Use in place of vanilla bean scrapings or extract.
- Experiment: Add cinnamon, nutmeg, or peppermint extract.
- Dietary Needs: Adapt for low-sugar, vegan, or gluten-free diets.
- Large Batch: Double or triple the recipe for a crowd.
- Cooled Coffee: Never use hot coffee!
- Enjoy! Have fun and enjoy your homemade frappuccino!

Leave a Comment