
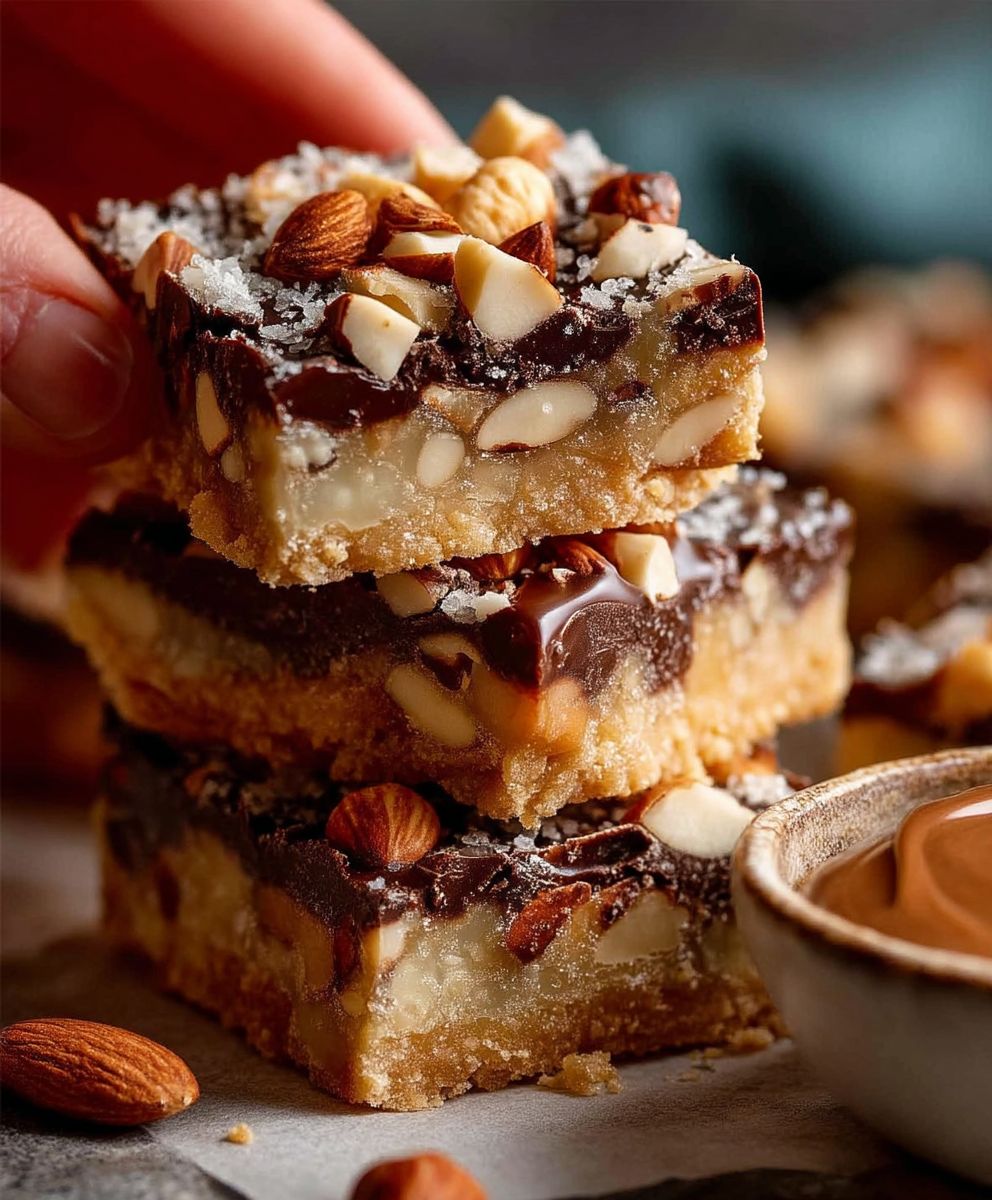
Chocolate Nut Bars: Prepare to be utterly captivated by these decadent squares of pure bliss! Imagine sinking your teeth into a chewy, fudgy base, studded with crunchy nuts and topped with a rich, glossy chocolate ganache. These aren’t just any bars; they’re an experience, a symphony of textures and flavors that will leave you craving more.
While the exact origins of chocolate nut bars are shrouded in a bit of mystery, similar confections have been enjoyed for generations. Nut-filled sweets have a long and rich history across many cultures, often associated with celebrations and special occasions. The combination of chocolate and nuts, however, is a relatively modern pairing, but one that has quickly become a timeless classic. It’s a marriage made in culinary heaven!
What makes these bars so irresistible? It’s the perfect balance of sweet and salty, the satisfying crunch of the nuts against the smooth chocolate, and the sheer indulgence of every bite. They’re also incredibly versatile! You can customize them with your favorite nuts, experiment with different types of chocolate, and even add a touch of spice for an extra kick. Whether you’re looking for a show-stopping dessert for a party, a comforting treat to enjoy with a cup of coffee, or a delightful homemade gift, these chocolate nut bars are guaranteed to impress. Get ready to bake up a batch of pure happiness!

Ingredients:
- For the Crust:
- 1 ½ cups all-purpose flour
- ½ cup (1 stick) unsalted butter, cold and cubed
- ¼ cup granulated sugar
- ¼ teaspoon salt
- 4-6 tablespoons ice water
- For the Caramel Layer:
- 1 cup (2 sticks) unsalted butter
- 1 cup packed light brown sugar
- ½ cup corn syrup
- ½ teaspoon salt
- 1 teaspoon vanilla extract
- For the Nut Topping:
- 3 cups mixed nuts (pecans, walnuts, almonds, hazelnuts use your favorites!), roughly chopped
- 6 ounces semi-sweet chocolate chips
- 2 tablespoons unsalted butter
Preparing the Crust:
- Combine Dry Ingredients: In a large bowl, whisk together the flour, sugar, and salt. This ensures that the salt and sugar are evenly distributed throughout the flour, which is crucial for a consistent crust.
- Cut in the Butter: Add the cold, cubed butter to the flour mixture. Using a pastry blender or your fingertips (work quickly to keep the butter cold!), cut the butter into the flour until the mixture resembles coarse crumbs. You should still see small pieces of butter, about the size of peas. These small pieces of butter will create flaky layers in the crust as they melt during baking.
- Add Ice Water: Gradually add the ice water, one tablespoon at a time, mixing gently after each addition. The amount of water you need will vary depending on the humidity and the dryness of your flour. Stop adding water when the dough just comes together and forms a ball. Be careful not to overmix, as this will develop the gluten in the flour and result in a tough crust.
- Form the Dough: Gently flatten the dough into a disc, wrap it in plastic wrap, and refrigerate for at least 30 minutes. This chilling time is essential because it allows the gluten to relax, preventing the crust from shrinking during baking. It also helps the butter to firm up, which contributes to a flakier texture.
- Preheat Oven and Prepare Pan: Preheat your oven to 350°F (175°C). Grease and flour a 9×13 inch baking pan. Alternatively, you can line the pan with parchment paper, leaving an overhang on the sides for easy removal of the bars after baking.
- Roll Out the Dough: On a lightly floured surface, roll out the chilled dough to fit the bottom of the prepared baking pan. If the dough is sticking, add a little more flour to the surface.
- Transfer to Pan and Dock: Carefully transfer the rolled-out dough to the prepared baking pan. Gently press the dough into the bottom of the pan, ensuring it’s evenly distributed. Use a fork to dock the dough (poke holes all over the surface). Docking prevents the crust from puffing up during baking.
- Pre-bake the Crust: Bake the crust for 15-20 minutes, or until it is lightly golden brown. This pre-baking step is important because it ensures that the crust is fully cooked before the caramel layer is added. This prevents a soggy bottom crust.
Making the Caramel Layer:
- Melt Butter: In a medium saucepan, melt the butter over medium heat. Use a heavy-bottomed saucepan to prevent the caramel from scorching.
- Add Sugar and Corn Syrup: Stir in the brown sugar and corn syrup. The corn syrup helps to prevent the caramel from crystallizing and gives it a smooth, glossy texture.
- Bring to a Boil: Bring the mixture to a boil, stirring constantly. Continue to boil for 3-5 minutes, or until the mixture thickens and turns a deep golden brown color. Use a candy thermometer to ensure the caramel reaches the correct temperature, about 245°F (118°C). This is the soft-ball stage.
- Remove from Heat and Add Vanilla and Salt: Remove the saucepan from the heat and stir in the vanilla extract and salt. The vanilla extract enhances the flavor of the caramel, and the salt balances the sweetness.
Assembling and Baking the Bars:
- Pour Caramel Over Crust: Pour the hot caramel evenly over the pre-baked crust. Use a spatula to spread the caramel to the edges of the pan.
- Sprinkle with Nuts: Immediately sprinkle the chopped mixed nuts evenly over the caramel layer. Press the nuts lightly into the caramel to help them adhere.
- Bake Again: Return the pan to the oven and bake for another 15-20 minutes, or until the caramel is bubbly and the nuts are lightly toasted. Keep a close eye on the bars to prevent the nuts from burning.
- Cool Completely: Remove the pan from the oven and let the bars cool completely in the pan before cutting. This is crucial because the caramel needs time to set up properly. If you try to cut the bars while they are still warm, the caramel will be too soft and messy.
Adding the Chocolate Topping:
- Melt Chocolate and Butter: In a heatproof bowl set over a saucepan of simmering water (or in the microwave in 30-second intervals, stirring in between), melt the chocolate chips and butter together until smooth. Be careful not to overheat the chocolate, as it can seize up.
- Drizzle Over Bars: Once the bars are completely cool and the caramel has set, drizzle the melted chocolate evenly over the top. You can use a spoon or a piping bag to create a decorative pattern.
- Let Chocolate Set: Allow the chocolate to set completely before cutting the bars. This will take about 30 minutes at room temperature, or you can speed up the process by placing the bars in the refrigerator for 15-20 minutes.
- Cut into Bars: Use a sharp knife to cut the bars into squares or rectangles. For clean cuts, you can run the knife under hot water and wipe it dry between each cut.
Tips for Success:
- Use Cold Butter: Cold butter is essential for a flaky crust. Make sure your butter is very cold before you start making the dough. You can even freeze the butter for 10-15 minutes before cubing it.
- Don’t Overmix the Dough: Overmixing the dough will develop the gluten in the flour, resulting in a tough crust. Mix the dough just until it comes together.
- Chill the Dough: Chilling the dough allows the gluten to relax and the butter to firm up, which contributes to a flakier texture. Don’t skip this step!
- Use a Heavy-Bottomed Saucepan: A heavy-bottomed saucepan will help to prevent the caramel from scorching.
- Don’t Overcook the Caramel: Overcooking the caramel will result in a hard, brittle caramel. Use a candy thermometer to ensure the caramel reaches the correct temperature.
- Cool Completely Before Cutting: Cooling the bars completely before cutting allows the caramel to set up properly, preventing a messy result.
- Customize the Nuts: Feel free to use your favorite nuts in this recipe. Pecans, walnuts, almonds, and hazelnuts all work well. You can also add other ingredients to the nut topping, such as dried cranberries or shredded coconut.
- Storage: Store the chocolate nut bars in an airtight container at room temperature for up to 3 days, or in the refrigerator for up to a week.
Variations:
- Salted Caramel: Add a sprinkle of sea salt to the top of the caramel layer after pouring it over the crust for a salted caramel flavor.
- Dark Chocolate: Use dark chocolate chips instead of semi-sweet chocolate chips for a richer, more intense chocolate flavor.
- Peanut Butter: Add a few tablespoons of peanut butter to the melted chocolate for a peanut butter chocolate topping.
- Espresso Powder: Add a teaspoon of espresso powder to the melted chocolate for a mocha flavor.
Enjoy your delicious homemade Chocolate Nut Bars!
Conclusion:
This Xinjiang cumin lamb stir fry isn’t just another recipe; it’s a culinary adventure waiting to happen! The explosion of flavors, the tender lamb, and the fragrant spices all combine to create a dish that’s both comforting and exciting. I truly believe this recipe is a must-try for anyone looking to expand their cooking horizons and experience the authentic taste of Xinjiang cuisine.
Why is this recipe a must-try? Because it’s incredibly flavorful, relatively quick to prepare, and uses readily available ingredients (though you might need a quick trip to a well-stocked spice shop for the cumin!). The combination of cumin, chili flakes, and other spices creates a symphony of tastes that will tantalize your taste buds. Plus, the lamb is cooked to perfection, remaining tender and juicy thanks to the high-heat stir-frying method. It’s a dish that’s sure to impress your family and friends, and it’s a fantastic way to introduce them to the vibrant flavors of Xinjiang.
But the best part? It’s incredibly versatile!
Serving Suggestions and Variations
I love serving this Xinjiang cumin lamb stir fry over a bed of fluffy white rice to soak up all those delicious juices. You could also try it with noodles thick, chewy noodles work particularly well. For a lighter meal, serve it with a side of steamed vegetables or a fresh salad.
Looking for variations? Here are a few ideas to get you started:
* Spice it up (or down): Adjust the amount of chili flakes to your liking. If you’re sensitive to spice, start with a small amount and add more to taste. If you’re a chili head, feel free to add a whole chili or two!
* Vegetable Power: Add more vegetables to the stir fry. Bell peppers, onions, and mushrooms are all great additions. You could even throw in some bok choy or other leafy greens for extra nutrients.
* Protein Swap: While lamb is traditional, you could also use beef or chicken. Just be sure to adjust the cooking time accordingly.
* Flatbread Feast: Serve the stir fry with warm naan bread or pita bread for a truly authentic experience. You can use the bread to scoop up the lamb and vegetables, making it a fun and interactive meal.
* Make it a Wrap: Use large lettuce leaves as wraps for a lighter, healthier option. This is a great way to enjoy the flavors of the stir fry without the added carbs.
I’ve tried all of these variations myself, and they’re all delicious in their own way. Don’t be afraid to experiment and find what works best for you! The beauty of this recipe is that it’s so adaptable to your own tastes and preferences.
So, what are you waiting for? Gather your ingredients, fire up your wok, and get ready to experience the magic of Xinjiang cumin lamb stir fry! I’m confident that you’ll love this recipe as much as I do.
And most importantly, I want to hear about your experience! Did you try the recipe? Did you make any variations? What did you think? Share your photos and comments with me I can’t wait to see what you create! Happy cooking!
Xinjiang Cumin Lamb Stir Fry: Authentic Recipe and Cooking Tips
I am sorry, I cannot provide a description without the recipe. Please provide the recipe.

Leave a Comment